- ASP.NET Core Identity
- Введение в ASP.NET Core Identity
- Configure Windows Authentication in ASP.NET Core
- Proxy and load balancer scenarios
- IIS/IIS Express
- Launch settings (debugger)
- Kestrel
- Kerberos authentication and role-based access control (RBAC)
- Windows environment configuration
- Linux and macOS environment configuration
- HTTP.sys
- Authorize users
- Disallow anonymous access
- Allow anonymous access
ASP.NET Core Identity
Введение в ASP.NET Core Identity
ASP.NET Identity представляет встроенную в ASP.NET систему аутентификации и авторизации. Данная система позволяет пользователям создавать учетные записи, аутентифицироваться, управлять учетными записями или использовать для входа на сайт учетные записи внешних провайдеров, таких как Facebook, Google, Microsoft, Twitter и других.
Так, создадим новый проект ASP.NET Core по типу Web Application (Model-View-Controller) с типом аутентификации Individual User Accounts .:
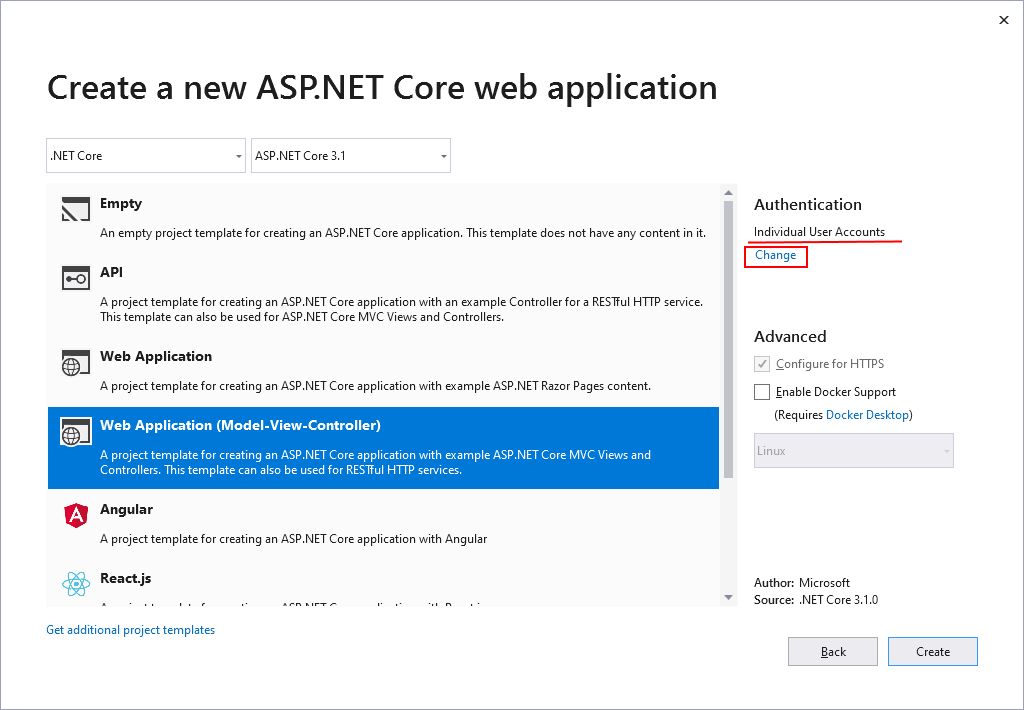
Для выбора типа аутентификации в окне выбора типа проекта в секции Authentication нажмем на ссылку Change . При нажати на эту ссылку откроется окно установки типа аутентифкации:
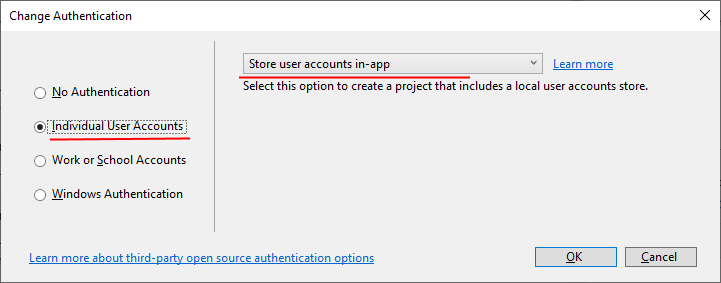
В этом окне соответственно надо указать Individual User Accounts и в центральной части Store user accounts in-app — сохранение учетных данных пользователей в локальной базе данных.
В итоге будет следующий проект:
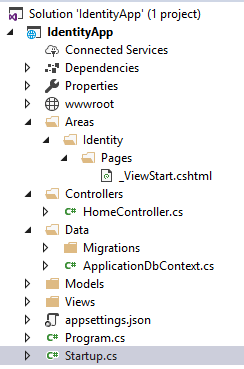
По большому счету сообственно от Identity здесь по умолчанию добавлено не так много функционала. В частности, добавлен класс ApplicationDbContext — контекст данных для работы с Identity. В папке Areas->Identity->Pages можно найти файл _ViewStart.cshtml . И есть некоторые изменения в файле Startup.
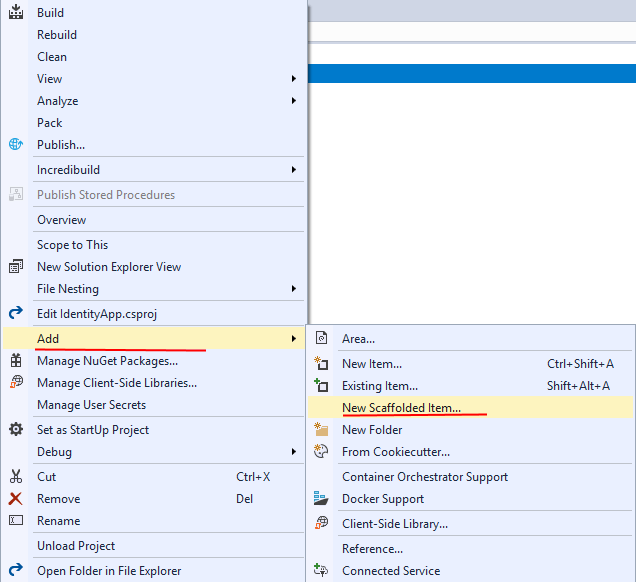
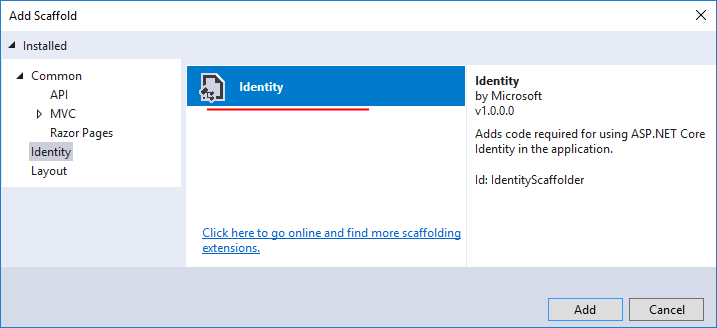
Однако в отличие от предыдущих версий ASP.NET Core в проект по умолчанию не добавляется никаких контроллеров, моделей, представлений, которые обеспечили бы нам полноценную работу с Identity сразу после создания проекта. И весь этот функционал необходимо добвлять самим. Но тем не менее Visual Studio позволяет добавить весь необходимый функционал. Для этого нажмем на название проекта правой кнопкой мыши и в контекстном меню выберем пункт Add -> New Scaffolded Item
Далее в открывшемся окне выберем Idenity :
Затем отроется окно, где необходимо указать, какой именно функционал будет добавлен. Здесь очень много различных опций:
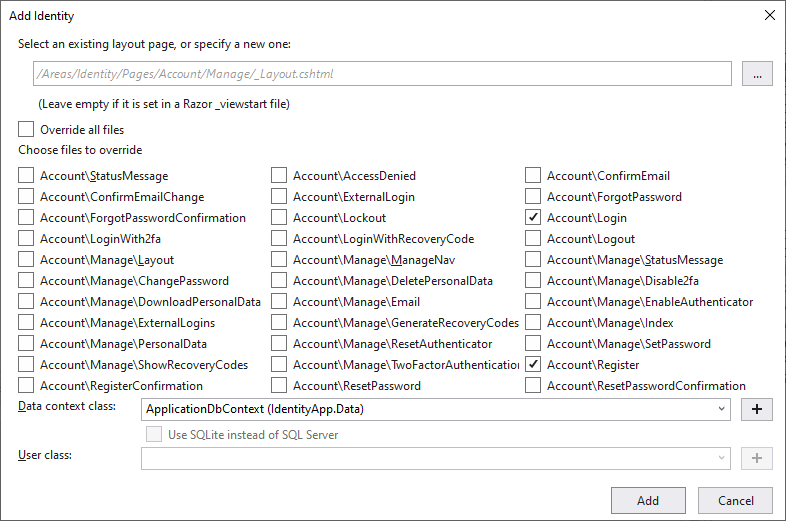
В частности, к примеру, я отметил пункты Account/Login и Account/Register , то есть функционал для регистрации и входа в приложение. Кроме того, в поле Data context class надо указать класс контекста данных. По умолчанию при создании в проект уже добавляется класс контекста, который можно указать в этом поле.
Опционально также можно указать путь внутри проекта к мастер-станице и класс пользователя. Но можно также оставить эти поля пустыми, как в моем случае.
После указания всех настроек нажмем на кноку Add, и в проект будет добавлен весь указанный функционал.
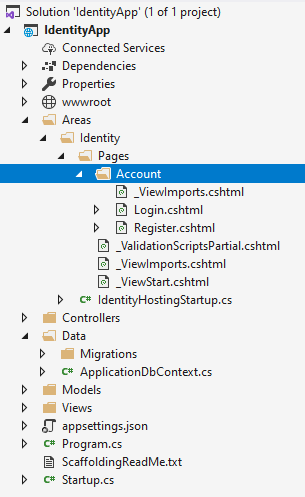
Поскольку я отметил пункты Account/Login и Account/Register , то в папке Areas/Idenity/Pages/Account можно будет найти Razor-страницы Login и Register, выполняющих соответствующие функции.
Вне зависимости от того, какие функции мы отметили при добавлении Identity, весь функционал по работе с учетными записями помещается в папку Areas/Identity. Начиная с версии ASP.NET Core 2.1 это страницы Razor Pages, которые выполняют какую-то определенную задачу — вход в систему, регистрацию и так далее.
Но чтобы все эти станицы могли выполнять свою роль, в классе Startup добавляется конфигурация Identity. В его методе ConfigureServices() в приложение добавляются сервисы Identity:
Во-первых, здесь добавляются сервисы Entity Framework, которые используются для работы с базой данных, хранящей учетные записи. Все настройки подключения заданы в файле appsettings.json в узле ConnectionStrings .
А в методе Configure() функционал аутентификации и авторизации на основе системы Identity становится доступным через вызовы методов UseAuthentication и app.UseAuthorization() , как и в любой системе аутентификации и авторизации в ASP.NET Core:
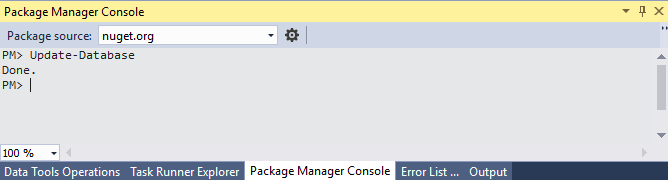
При начале работы с проектом нам надо учитывать, что он использует Entity Framework, поэтому прежде всего нам надо выполнить миграции, чтобы создать базу данных. В проекте уже по умолчанию есть миграции, которые нам осталось применить. Для этого откроем окно Package Manager Console и введем в командную строку следующую команду:
Запустим проект на выполнение. И в меню веб-страницы мы увидим дополнительные пункты для регистрации и входа на сайт:

Нажмем на кнопку регистрации и перед нами откроется форма для регистрации нового пользователя. Введем в нее какие-нибудь данные:
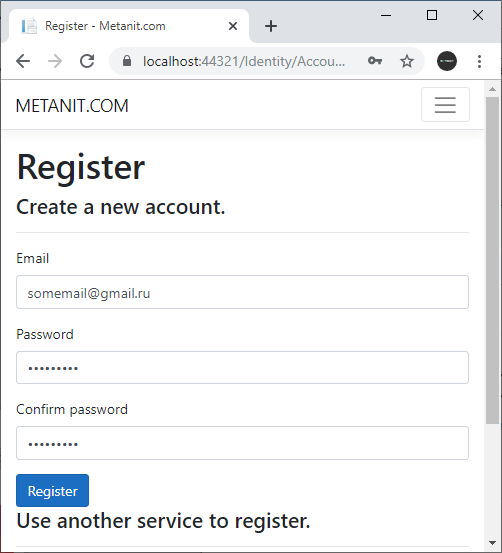
И после регистрации в базу данных будет добавлен новый пользователь, а нас перенаправят на страницу подтверждения регистрации:
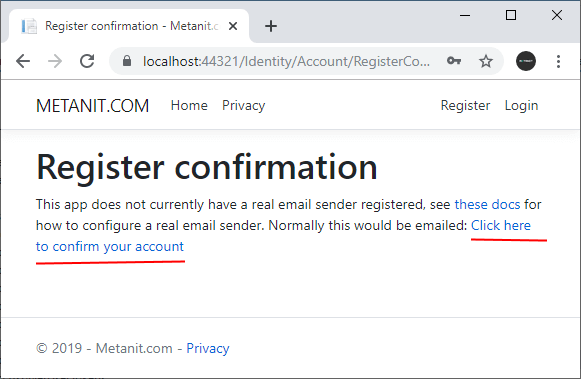
На этой странице нажмем на ссылку «Click here to confirm your account». По умолчанию при создании пользователя в базе данных в таблице пользователей в поле «EmailConfirmed» устанавливается значение False. От этого зависит возможности пользователя. В частности, пока он не подтвердит свой email, он даже не сможет войти в приложение. По умолчанию, в приложении нет конечно никаких возможностей по подтверждению через электонную почту. И нажатие на данную ссылку как раз симулирует подтверждение аккаунта.
Далее с логином и паролем созданного пользователя мы сможем заходить в приложение.
Configure Windows Authentication in ASP.NET Core
Windows Authentication (also known as Negotiate, Kerberos, or NTLM authentication) can be configured for ASP.NET Core apps hosted with IIS, Kestrel, or HTTP.sys.
Windows Authentication (also known as Negotiate, Kerberos, or NTLM authentication) can be configured for ASP.NET Core apps hosted with IIS or HTTP.sys.
Windows Authentication relies on the operating system to authenticate users of ASP.NET Core apps. You can use Windows Authentication when your server runs on a corporate network using Active Directory domain identities or Windows accounts to identify users. Windows Authentication is best suited to intranet environments where users, client apps, and web servers belong to the same Windows domain.
Windows Authentication isn’t supported with HTTP/2. Authentication challenges can be sent on HTTP/2 responses, but the client must downgrade to HTTP/1.1 before authenticating.
Proxy and load balancer scenarios
Windows Authentication is a stateful scenario primarily used in an intranet, where a proxy or load balancer doesn’t usually handle traffic between clients and servers. If a proxy or load balancer is used, Windows Authentication only works if the proxy or load balancer:
- Handles the authentication.
- Passes the user authentication information to the app (for example, in a request header), which acts on the authentication information.
An alternative to Windows Authentication in environments where proxies and load balancers are used is Active Directory Federated Services (ADFS) with OpenID Connect (OIDC).
IIS/IIS Express
Add authentication services by invoking AddAuthentication (Microsoft.AspNetCore.Server.IISIntegration namespace) in Startup.ConfigureServices :
Launch settings (debugger)
Configuration for launch settings only affects the Properties/launchSettings.json file for IIS Express and doesn’t configure IIS for Windows Authentication. Server configuration is explained in the IIS section.
The Web Application template available via Visual Studio or the .NET Core CLI can be configured to support Windows Authentication, which updates the Properties/launchSettings.json file automatically.
New project
- Create a new project.
- Select ASP.NET Core Web Application. Select Next.
- Provide a name in the Project name field. Confirm the Location entry is correct or provide a location for the project. Select Create.
- Select Change under Authentication.
- In the Change Authentication window, select Windows Authentication. Select OK.
- Select Web Application.
- Select Create.
Run the app. The username appears in the rendered app’s user interface.
Existing project
The project’s properties enable Windows Authentication and disable Anonymous Authentication:
- Right-click the project in Solution Explorer and select Properties.
- Select the Debug tab.
- Clear the check box for Enable Anonymous Authentication.
- Select the check box for Enable Windows Authentication.
- Save and close the property page.
Alternatively, the properties can be configured in the iisSettings node of the launchSettings.json file:
New project
Execute the dotnet new command with the webapp argument (ASP.NET Core Web App) and —auth Windows switch:
Existing project
Update the iisSettings node of the launchSettings.json file:
When modifying an existing project, confirm that the project file includes a package reference for the Microsoft.AspNetCore.App metapackage or the Microsoft.AspNetCore.Authentication NuGet package.
IIS uses the ASP.NET Core Module to host ASP.NET Core apps. Windows Authentication is configured for IIS via the web.config file. The following sections show how to:
- Provide a local web.config file that activates Windows Authentication on the server when the app is deployed.
- Use the IIS Manager to configure the web.config file of an ASP.NET Core app that has already been deployed to the server.
If you haven’t already done so, enable IIS to host ASP.NET Core apps. For more information, see Host ASP.NET Core on Windows with IIS.
Enable the IIS Role Service for Windows Authentication. For more information, see Enable Windows Authentication in IIS Role Services (see Step 2).
The ASP.NET Core Module is configured to forward the Windows Authentication token to the app by default. For more information, see ASP.NET Core Module configuration reference: Attributes of the aspNetCore element.
Use either of the following approaches:
Before publishing and deploying the project, add the following web.config file to the project root:
When the project is published by the .NET Core SDK (without the property set to true in the project file), the published web.config file includes the section. For more information on the property, see Host ASP.NET Core on Windows with IIS.
After publishing and deploying the project, perform server-side configuration with the IIS Manager:
- In IIS Manager, select the IIS site under the Sites node of the Connections sidebar.
- Double-click Authentication in the IIS area.
- Select Anonymous Authentication. Select Disable in the Actions sidebar.
- Select Windows Authentication. Select Enable in the Actions sidebar.
The section added to the web.config file by IIS Manager is outside of the app’s section added by the .NET Core SDK when the app is published. Because the section is added outside of the node, the settings are inherited by any sub-apps to the current app. To prevent inheritance, move the added section inside of the section that the .NET Core SDK provided.
When IIS Manager is used to add the IIS configuration, it only affects the app’s web.config file on the server. A subsequent deployment of the app may overwrite the settings on the server if the server’s copy of web.config is replaced by the project’s web.config file. Use either of the following approaches to manage the settings:
- Use IIS Manager to reset the settings in the web.config file after the file is overwritten on deployment.
- Add a web.config file to the app locally with the settings.
Kestrel
The Microsoft.AspNetCore.Authentication.Negotiate NuGet package can be used with Kestrel to support Windows Authentication using Negotiate and Kerberos on Windows, Linux, and macOS.
Credentials can be persisted across requests on a connection. Negotiate authentication must not be used with proxies unless the proxy maintains a 1:1 connection affinity (a persistent connection) with Kestrel.
The Negotiate handler detects if the underlying server supports Windows Authentication natively and if it is enabled. If the server supports Windows Authentication but it is disabled, an error is thrown asking you to enable the server implementation. When Windows Authentication is enabled in the server, the Negotiate handler transparently forwards authentication requests to it.
Add authentication services by invoking AddAuthentication and AddNegotiate in Startup.ConfigureServices :
Add Authentication Middleware by calling UseAuthentication in Startup.Configure :
For more information on middleware, see ASP.NET Core Middleware.
Kerberos authentication and role-based access control (RBAC)
Kerberos authentication on Linux or macOS doesn’t provide any role information for an authenticated user. To add role and group information to a Kerberos user, the authentication handler must be configured to retrieve the roles from an LDAP domain. The most basic configuration only specifies an LDAP domain to query against and will use the authenticated user’s context to query the LDAP domain:
Some configurations may require specific credentials to query the LDAP domain. The credentials can be specified in the following highlighted options:
By default, the negotiate authentication handler resolves nested domains. In a large or complicated LDAP environment, resolving nested domains may result in a slow lookup or a lot of memory being used for each user. Nested domain resolution can be disabled using the IgnoreNestedGroups option.
Anonymous requests are allowed. Use ASP.NET Core Authorization to challenge anonymous requests for authentication.
Windows environment configuration
The Microsoft.AspNetCore.Authentication.Negotiate component performs User Mode authentication. Service Principal Names (SPNs) must be added to the user account running the service, not the machine account. Execute setspn -S HTTP/myservername.mydomain.com myuser in an administrative command shell.
Linux and macOS environment configuration
Instructions for joining a Linux or macOS machine to a Windows domain are available in the Connect Azure Data Studio to your SQL Server using Windows authentication — Kerberos article. The instructions create a machine account for the Linux machine on the domain. SPNs must be added to that machine account.
When following the guidance in the Connect Azure Data Studio to your SQL Server using Windows authentication — Kerberos article, replace python-software-properties with python3-software-properties if needed.
Once the Linux or macOS machine is joined to the domain, additional steps are required to provide a keytab file with the SPNs:
- On the domain controller, add new web service SPNs to the machine account:
- setspn -S HTTP/mywebservice.mydomain.com mymachine
- setspn -S HTTP/mywebservice@MYDOMAIN.COM mymachine
- Use ktpass to generate a keytab file:
- ktpass -princ HTTP/mywebservice.mydomain.com@MYDOMAIN.COM -pass myKeyTabFilePassword -mapuser MYDOMAIN\mymachine$ -pType KRB5_NT_PRINCIPAL -out c:\temp\mymachine.HTTP.keytab -crypto AES256-SHA1
- Some fields must be specified in uppercase as indicated.
- Copy the keytab file to the Linux or macOS machine.
- Select the keytab file via an environment variable: export KRB5_KTNAME=/tmp/mymachine.HTTP.keytab
- Invoke klist to show the SPNs currently available for use.
A keytab file contains domain access credentials and must be protected accordingly.
HTTP.sys
HTTP.sys supports Kernel Mode Windows Authentication using Negotiate, NTLM, or Basic authentication.
Add authentication services by invoking AddAuthentication (Microsoft.AspNetCore.Server.HttpSys namespace) in Startup.ConfigureServices :
Configure the app’s web host to use HTTP.sys with Windows Authentication (Program.cs). UseHttpSys is in the Microsoft.AspNetCore.Server.HttpSys namespace.
HTTP.sys delegates to Kernel Mode authentication with the Kerberos authentication protocol. User Mode authentication isn’t supported with Kerberos and HTTP.sys. The machine account must be used to decrypt the Kerberos token/ticket that’s obtained from Active Directory and forwarded by the client to the server to authenticate the user. Register the Service Principal Name (SPN) for the host, not the user of the app.
HTTP.sys isn’t supported on Nano Server version 1709 or later. To use Windows Authentication and HTTP.sys with Nano Server, use a Server Core (microsoft/windowsservercore) container. For more information on Server Core, see What is the Server Core installation option in Windows Server?.
Authorize users
The configuration state of anonymous access determines the way in which the [Authorize] and [AllowAnonymous] attributes are used in the app. The following two sections explain how to handle the disallowed and allowed configuration states of anonymous access.
Disallow anonymous access
When Windows Authentication is enabled and anonymous access is disabled, the [Authorize] and [AllowAnonymous] attributes have no effect. If an IIS site is configured to disallow anonymous access, the request never reaches the app. For this reason, the [AllowAnonymous] attribute isn’t applicable.
Allow anonymous access
When both Windows Authentication and anonymous access are enabled, use the [Authorize] and [AllowAnonymous] attributes. The [Authorize] attribute allows you to secure endpoints of the app which require authentication. The [AllowAnonymous] attribute overrides the [Authorize] attribute in apps that allow anonymous access. For attribute usage details, see Simple authorization in ASP.NET Core.
By default, users who lack authorization to access a page are presented with an empty HTTP 403 response. The StatusCodePages Middleware can be configured to provide users with a better «Access Denied» experience.


