- Viewing and Editing Memory in WinDbg
- Debugger Command Window
- Opening a Memory Window
- Using a Memory Window
- Memory Options Dialog Box
- Additional Information
- How to Get Full RAM Specifications in Windows 10
- Introduction
- How to get detailed information on system memory with the command prompt console
- Identify the manufacturer
- Identify the part number
- Check the serial number of your memory module
- Identify RAM capacity
- Discover capacity of each RAM module
- Displaying total amount of RAM
- Check RAM speed
- Check RAM type
- The comprehensive list of supported memory types
- Check RAM form factor
- The comprehensive list of supported memory form factors
- Displaying all RAM details
- Conclusion
Viewing and Editing Memory in WinDbg
In WinDbg, you can view and edit memory by entering commands or by using a Memory window.
Debugger Command Window
You can view memory by entering one of the Display Memory commands in the Debugger Command window. You can edit memory by entering one of the Enter Values commands in the Debugger Command window. For more information, see Accessing Memory by Virtual Address and Accessing Memory by Physical Address.
Opening a Memory Window
To open a Memory window, choose Memory from the View menu. (You can also press ALT+5 or select the Memory button ( ) on the toolbar. ALT+SHIFT+5 closes the active Memory window.)
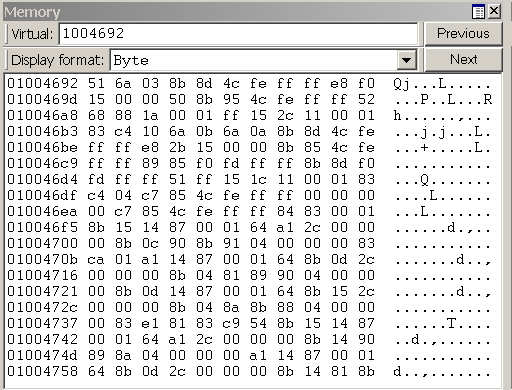
The following screen shot shows an example of a Memory window.
Using a Memory Window
The Memory window displays data in several columns. The column on the left side of the window shows the beginning address of each line. The remaining columns display the requested information, from left to right. If you select Bytes in the Display format menu, the ASCII characters that correspond to these bytes are displayed in the right side of the window.
NoteВ В By default, the Memory window displays virtual memory. This type of memory is the only type of memory that is available in user mode. In kernel mode, you can use the Memory Options dialog box to display physical memory and other data spaces. The Memory Options dialog box is described later in this topic.
In the Memory window, you can do the following:
To write to memory, select inside the Memory window and type new data. You can edit only hexadecimal data—you cannot directly edit ASCII and Unicode characters. Changes take effect as soon as you type new information.
To see other sections of memory, use the Previous and Next buttons on the Memory window toolbar, or press the PAGE UP or PAGE DOWN keys. These buttons and keys display the immediately preceding or following sections of memory. If you request an invalid page, an error message appears.
To navigate within the window, use the RIGHT ARROW, LEFT ARROW, UP ARROW, and DOWN ARROW keys. If you use these keys to move off of the page, a new page is displayed. Before you use these keys, you should resize the Memory window so that it does not have scroll bars. This sizing enables you to distinguish between the actual page edge and the window cutoff.
To change the memory location that is being viewed, enter a new address into the address box at the top of the Memory window. Note that the Memory window refreshes its display while you enter an address, so you could get error messages before you have completed typing the address. NoteВ В The address that you enter into the box is interpreted in the current radix. If the current radix is not 16, you should prefix a hexadecimal address with 0x. To change the default radix, use the n (Set Number Base) command in the Debugger Command window. The display within the Memory window itself is not affected by the current radix.
To change the data type that the window uses to display memory, use the Display format menu in the Memory window toolbar. Supported data types include short words, double words, and quad-words; short, long, and quad integers and unsigned integers; 10-byte, 16-byte, 32-byte, and 64-byte real numbers; ASCII characters; Unicode characters; and hexadecimal bytes. The display of hexadecimal bytes includes ASCII characters as well.
The Memory window has a toolbar that contains two buttons, a menu, and a box and has a shortcut menu with additional commands. To access the menu, select and hold (or right-click) the title bar or select the icon near the upper-right corner of the window (). The toolbar and shortcut menu contain the following choices:
(Toolbar only) The address box enables you to specify a new address or offset. The exact meaning of this box depends on the memory type you are viewing. For example, if you are viewing virtual memory, the box enables you to specify a new virtual address or offset.
(Toolbar only) Display format enables you to select a new display format.
(Toolbar and menu) Previous (on the toolbar) and Previous page (on the shortcut menu) cause the previous section of memory to be displayed.
(Toolbar and menu) Next (on the toolbar) and Next page (on the shortcut menu) cause the next section of memory to be displayed.
(Menu only) Toolbar turns the toolbar on and off.
(Menu only) Auto-fit columns ensures that the number of columns displayed in the Memory window fits the width of the Memory window.
(Menu only) Dock or Undock causes the window to enter or leave the docked state.
(Menu only) Move to new dock closes the Memory window and opens it in a new dock.
(Menu only) Set as tab-dock target for window type sets the selected Memory window as the tab-dock target for other Memory windows. All Memory windows that are opened after one is chosen as the tab-dock target are automatically grouped with that window in a tabbed collection.
(Menu only) Always floating causes the window to remain undocked even if it is dragged to a docking location.
(Menu only) Move with frame causes the window to move when the WinDbg frame is moved, even if the window is undocked. For more information about docked, tabbed, and floating windows, see Positioning the Windows.
(Menu only) Properties opens the Memory Options dialog box, which is described in the following section within this topic.
(Menu only) Help opens this topic in the Debugging Tools for Windows documentation.
(Menu only) Close closes this window.
Memory Options Dialog Box
When you select Properties on the shortcut menu, the Memory Options dialog box appears.
In kernel mode, there are six memory types available as tabs in this dialog box: Virtual Memory, Physical Memory, Bus Data, Control Data, I/O (I/O port information), and MSR (model-specific register information). Select the tab that corresponds to the information that you want to access.
In user mode, only the Virtual Memory tab is available.
Each tab enables you to specify the memory that you want to display:
In the Virtual Memory tab, in the Offset box, specify the address or offset of the beginning of the memory range that you want to view.
In the Physical Memory tab, in the Offset box, specify the physical address of the beginning of the memory range that you want to view. The Memory window can display only described, cacheable physical memory. If you want to display physical memory that has other attributes, use the d* (Display Memory) command or the !d\* extension.
In the Bus Data tab, in the Bus Data Type menu, specify the bus data type. Then, use the Bus number, Slot number, and Offset boxes to specify the bus data that you want to view.
In the Control Data tab, use the Processor and Offset text boxes to specify the control data that you want to view.
In the I/O tab, in the Interface Type menu, specify the I/O interface type. Use the Bus number, Address space, and Offset boxes to specify the data that you want to view.
In the MSR tab, in the MSR box, specify the model-specific register that you want to view.
Each tab also includes a Display format menu. This menu has the same effect as the Display format menu in the Memory window.
Select OK in the Memory Options dialog box to cause your changes to take effect.
Additional Information
For more information about memory manipulation and a description of other memory-related commands, see Reading and Writing Memory.
How to Get Full RAM Specifications in Windows 10
Read this article to find out how to find specifications for the system memory installed on your computer, including information about its manufacturer, part number, serial number, effective speed, capacity, form factor, type etc.
Introduction
There are many scenarios when the ability of Windows 10 to supply specifications data on installed computer hardware may come in handy. Getting to know the detailed information on system memory (also known as random-access memory, or RAM) can sometimes be very useful in helping you to take the correct decision if any problems arise. For example, if a computer works slowly because it has to run memory-intensive applications or games, then adding more system memory may give it a considerable boost. Knowing certain peculiarities and required standards of the system memory can help you decide on the correct capacity, speed and brand of RAM to buy a piece of compatible hardware for an upgrade.
If you are having issues with system memory, knowing the information on its manufacturer, part number and serial number will help you to contact the tech support and solve the problem. At least, you will be able to find a memory module of the same type which, as you already know, is fully compatible with your PC. Besides, when you are configuring memory settings in the basic input / output system (BIOS) or in the unified extensible firmware interface (UEFI), a chance to have a look at memory information can help you to understand if a particular configuration was applied correctly.
Whatever might be your reasons, Windows 10 can provide you with all the information you may need; what is more, it saves you the trouble of having to open the computer case or install third-party tools, which may trigger a conflict of interest or cause compatibility issues.
In this tutorial, we will try to show you how to find specifications for the system memory installed on your computer, including information about its manufacturer, part number, serial number, effective speed, capacity, form factor, type etc.
A brief note: Despite the fact that Windows 10 lets users see detailed information on the system memory in their devices, some data may be unavailable due to peculiarities of specific hardware.
How to get detailed information on system memory with the command prompt console
If you suspect that Task Manager displays inaccurate or wrong information on your RAM specifications, or if you need to learn more detailed data such as serial number, part number, manufacturer etc on every memory module, Windows 10 is here to help you find all that information by using a certain set of system commands.
To start searching and find specific data on memory modules installed on your desktop PC or laptop, you need to use the functions of the command prompt with administrator rights in Windows 10. There are a few ways to open the Command Prompt application, the rich functionality of which we are going to explore today.
Click the Search button, shaped as a magnifying glass and located on the Taskbar next to the Start button, and open the search panel. There, type command prompt or cmd. The Best match section will show you the app you are looking for. Right-click on it and select Run as administrator from the context menu.

Identify the manufacturer
Here is what you do to identify the manufacturer company (brand or trademark) that produced the RAM modules installed on your PC.
Open the Command Prompt with administrator rights using the way you prefer.
To find out the manufacturer’s name, type the following command and press the Enter key (make sure there are no quotation marks):
wmic memorychip get devicelocator, manufacturer
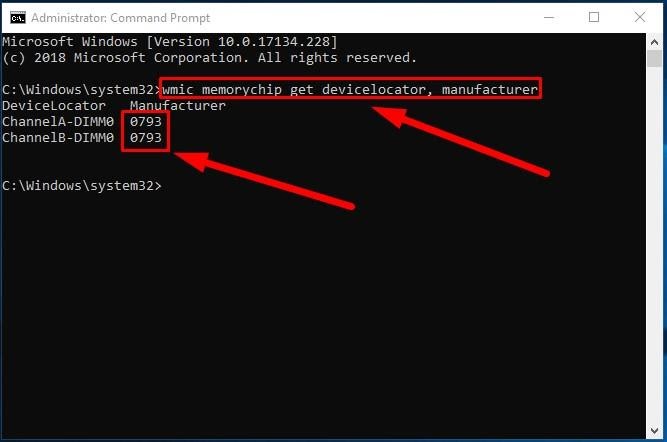
Read the RAM module manufacturer name under the column Manufacturer.
Identify the part number
To find data on the part number that the manufacturer assigned to a specific RAM module, here’s a simple sequence of steps to take.
Use any method you prefer to open the command prompt console with extended rights.
In the window that appear, type the command to run (without quotation marks) and press the Enter key.
wmic memorychip get devicelocator, partnumber

Under the column PartNumber you will see the product identifier you are looking for.
Note: If the speed of data processing and overall performance of your computer is decreasing, upgrading your RAM modules might be one of the best way to solve the issue. Using modern memory sticks, you can add high-quality components to your machine, with a pleasant bonus of higher bandwidth and advanced settings at an affordable price.
Check the serial number of your memory module
Take these steps to find out the serial numbers for every memory stick currently installed in your computer:
Open Command Prompt with administrator rights using any way you prefer.
In the corresponding line, type the command for identification of RAM serial number (make sure there are no quotation marks) and hit the Enter key to begin.
wmic memorychip get devicelocator, serialnumber
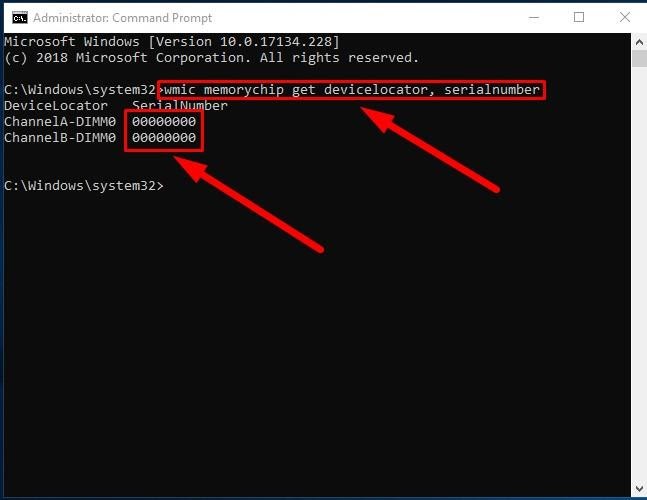
Hint: In the command for identification of the serial number, you can replace the part devicelocator by banklabel to see the serial number of the physical label of the bank where the memory is installed on the motherboard.

The result will be displayed in the Command Prompt window under the column SerialNumber.
Identify RAM capacity
In Windows 10 you can use a variable set of commands to find out total capacity for every RAM module, and for the entire system memory.
Discover capacity of each RAM module
To learn capacity of each memory stick in your configuration, take a few steps.
Open Command Prompt with administrator rights, using any method you prefer.
In the program’s window, type the following command for displaying the memory capacity, and then press the Enter key to run it (make sure the command doesn’t contain any quotation marks).
wmic memorychip get devicelocator, capacity
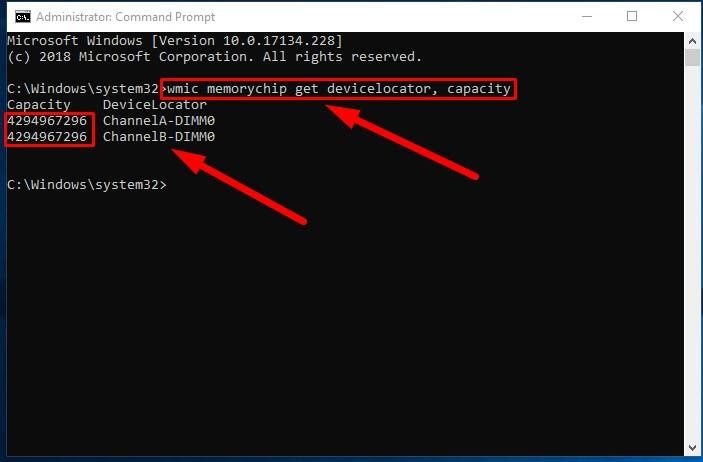
The total capacity of RAM installed on your computer will be shown under the column Capacity.
Note: The memory module capacity is represented in bytes, so to understand the figure properly you need to convert it into gigabytes (divide the value shown in the Command Prompt window by 1073741824, which is how many bytes are there in one gigabyte).
Displaying total amount of RAM
In addition, you can quickly learn the total size of system memory on your computer by taking another sequence of simple steps.
Open Command Prompt with administrator rights.
When the corresponding window opens, type the following command to see the total system memory size installed on your computer with Windows 10, and press the Enter key to run the command (remove any quotation marks).
systeminfo | find “Total Physical Memory”
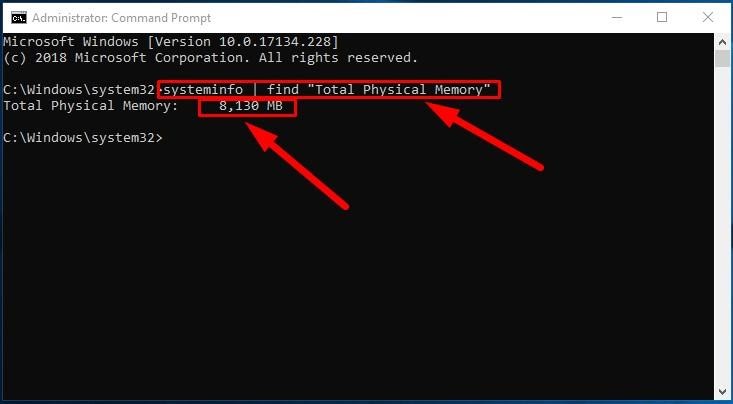
Note: If the total memory size is not displayed, try a similar command:
systeminfo | findstr /C:”Total Physical Memory”
With every command, make sure there are no quotation marks.
The total size of physical system memory (in megabytes) available on this computer will be shown in the corresponding line.
Check RAM speed
To find out the speed that the memory modules are operating at, here are the steps to use:
Open the Command Prompt console with administrator rights in any way you prefer.
Type the command to determine the RAM speed and press Enter on your keyboard (make sure there are no quotation marks):
wmic memorychip get devicelocator, speed
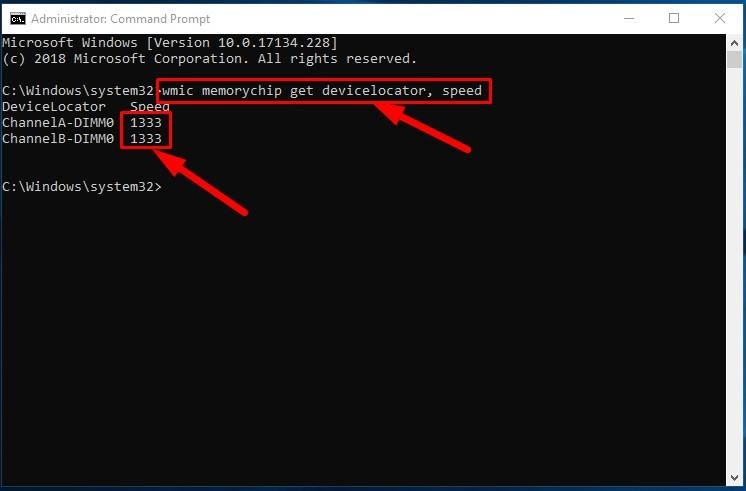
In the corresponding Speed column, the program will display the speed of your memory modules (in MHz).
Check RAM type
To check the system memory type (generation) in Windows 10, take these steps:
Open Command Prompt with administrator rights, using any method you prefer.
In the corresponding line, type the following command to determine the memory type and press Enter on your keyboard (make sure there are no quotation marks):
wmic memorychip get devicelocator, memorytype
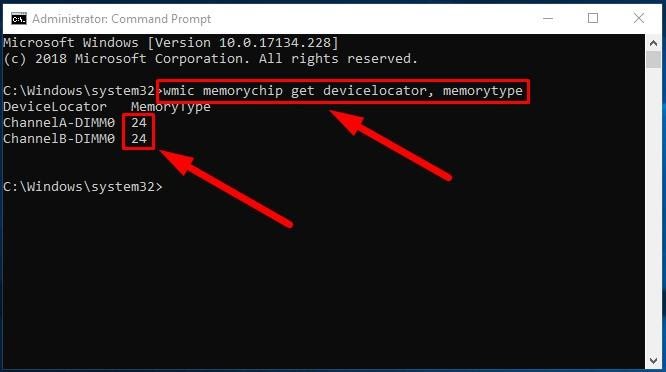
The MemoryType column will contain a digit from zero to twenty-five that denotes a certain memory type. For example, if you see 24 in the column, it means this computer is using DDR3memory modules.
Also, you may see zeroes in the MemoryType column: it means the Windows system tool wmic.exe cannot identify the memory generation properly (it may happen if you’re using DDR4 modules), as such values are not provided in the specifications.
The comprehensive list of supported memory types
Below, find the comprehensive list of file types that can be identified by this command:
- 0: Unknown.
- 1: Other.
- 2: DRAM.
- 3: Synchronous DRAM
- 4: Cache DRAM.
- 5: EDO.
- 6: EDRAM.
- 7: VRAM.
- 8: SRAM.
- 9: RAM.
- 10: ROM.
- 11: Flash.
- 12: EEPROM.
- 13: FEPROM.
- 14: EPROM.
- 15: CDRAM.
- 16: 3DRAM.
- 17: SDRAM.
- 18: SGRAM.
- 19: RDRAM.
- 20: DDR.
- 21: DDR2.
- 22: DDR2 FB-DIMM.
- 24: DDR3.
- 25: FBD2.
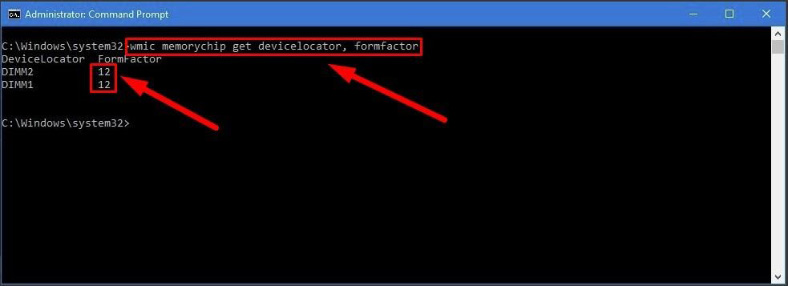
Check RAM form factor
The word “form factor” (standard size) suggests certain standard dimensions of a memory module which also includes additional characteristics such as the module shape. By form factor, there are twenty-five types of system memory. However, the two most widespread categories are DIMM and SODIMM.
To find out if your RAM sticks are DIMM or SODIMM, follow these steps:
Use your preferred method to open Command Prompt with administrator rights.
In the window Administrator: Command Prompt, type the following command to identify the memory form factor and press the Enter key (make sure there are no quotation marks):
wmic memorychip get devicelocator, formfactor
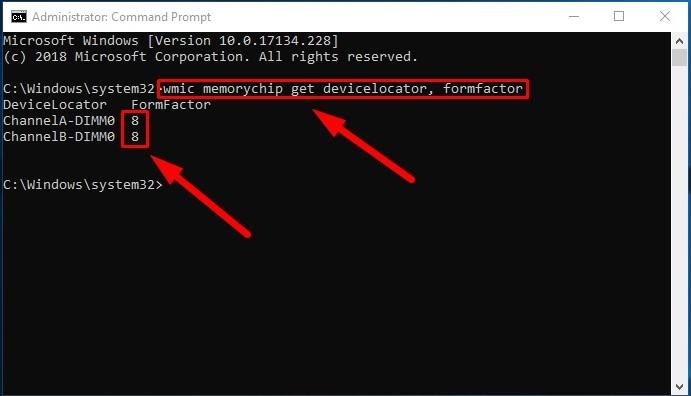
If the result in the FormFactor column is 8, then your computer is using DIMM modules (the default option for desktop computers). Otherwise, if the command displays the number 12, then your computer is using SODIMM modules (the typical choice for laptops).
The comprehensive list of supported memory form factors
Here is the list of form factors that this command can identify:
- 0: Unknown.
- 1: Other.
- 2: SIP.
- 3: DIP.
- 4: ZIP.
- 5: SOJ
- 6: Proprietary.
- 7: SIMM.
- 8: DIMM.
- 9: TSOP.
- 10: PGA.
- 11: RIMM.
- 12: SODIMM.
- 13: SRIMM.
- 14: SMD.
- 15: SSMP.
- 16: QFP.
- 17: TQFP.
- 18: SOIC.
- 19: LCC.
- 20: PLCC.
- 21: BGA.
- 22: FPBGA.
- 23: LGA.
- 24: FB-DIMM.
Displaying all RAM details
The commands described above allow you to identify the most important data about memory modules. However, if you want to find all the information, here’s what you do:
Open Command Prompt with administrator rights in any way you prefer.
In the corresponding line, type the following command to display all memory details and press Enter to run it (don’t forget to remove any quotation marks):
wmic memorychip list full
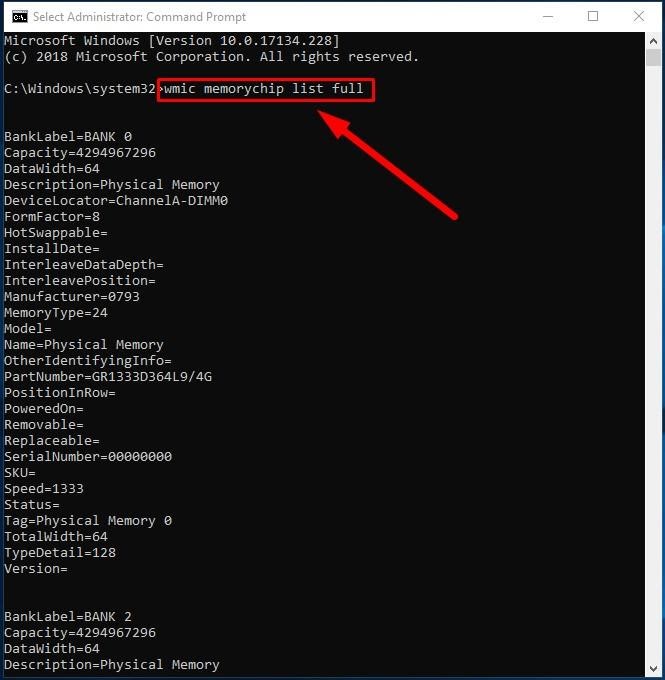
View all the available information for each RAM module installed on your computer.
(Optional) if the list of data is too big and you don’t actually need all that stuff, type the following command to view only the necessary things and press Enter (everything should be typed into one line; remember to remove the quotation marks):
wmic memorychip get devicelocator, manufacturer, partnumber, serialnumber, capacity, speed, memorytype, formfactor

Now you can view the memory information you prefer.
Conclusion
Using the steps described in this article, you’ll get an impressive amount of data on the RAM modules installed on your computer. These hints will come in handy when troubleshooting PC issues, tweaking configuration (e.g. when overclocking), or when you’re planning to upgrade your system memory to improve overall computer performance.
See the full article with all additional video tutorials


