- Как установить Android Studio на Linux Mint 20
- Как установить Android Studio на Linux Mint 20
- Установить Android Studio на Linux Mint 20 Ulyana
- Шаг 1. Перед запуском приведенного ниже руководства важно убедиться, что ваша система обновлена, выполнив следующие apt команды в терминале:
- Шаг 2. Установка Java.
- Шаг 3. Включите и установите Snapd в системе Linux Mint.
- Шаг 4. Установка Android Studio на Linux Mint 20.
- Шаг 5. Доступ к Android Studio.
- How to run Android apps in Linux Mint with Anbox
- What is Anbox
- Prerequisites to install Anbox
- How to install snapd on Linux Mint
- How to install Anbox in Linux Mint
- How to setup Anbox in Linux Mint
- How to download APK files from the Google Play Store
- How to set up Android Debug Bridge
- How to start and use apps in Anbox
- Final words
- Related Posts
- How to Connect your Android phone to Zorin OS with Zorin Connect
- How to follow your favorite websites with the NewsFlash RSS Feed Reader for Linux
- How to verify your Linux Mint ISO image file
- Follow RealLinuxUser
- Why this website
- Android with linux mint
Как установить Android Studio на Linux Mint 20

Как установить Android Studio на Linux Mint 20
В этом руководстве мы покажем вам, как установить Android Studio на Linux Mint 20. Для тех из вас, кто не знал, Android Studio — это официальная интегрированная среда разработки (IDE) для разработки приложений Android, основанная на IntelliJ IDEA. Помимо мощного редактора кода и инструментов разработчика IntelliJ, Android Studio предлагает еще больше функций, которые повышают вашу продуктивность при создании приложений для Android.
В этой статье предполагается, что у вас есть хотя бы базовые знания Linux, вы знаете, как использовать оболочку, и, что наиболее важно, вы размещаете свой сайт на собственном VPS. Установка довольно проста и предполагает, что вы работаете с учетной записью root, в противном случае вам может потребоваться добавить ‘ sudo ‘ к командам для получения привилегий root. Я покажу вам пошаговую установку Android Studio на Linux Mint 20 (Ульяна).
Установить Android Studio на Linux Mint 20 Ulyana
Шаг 1. Перед запуском приведенного ниже руководства важно убедиться, что ваша система обновлена, выполнив следующие apt команды в терминале:
Шаг 2. Установка Java.
Выполните следующую команду, чтобы установить Oracle JDK 11 на Linux Mint 20:
Шаг 3. Включите и установите Snapd в системе Linux Mint.
Snap доступен для Linux Mint 20. Перед установкой в Linux Mint необходимо удалить. Это можно сделать из командной строки: /etc/ apt / preferences . d / nosnap . pref
Затем выполните следующую команду для установки snapd:
Шаг 4. Установка Android Studio на Linux Mint 20.
- Установка Android Studio с помощью Snapd
Чтобы установить Android Studio, просто используйте следующую команду:
- Установите Android studio из официального репозитория
Нам нужно добавить репозиторий Android Studio в систему Linux Mint, чтобы мы могли установить Android Studio:
После этого обновите свой apt и приступайте к установке Android Studio:
Шаг 5. Доступ к Android Studio.
Наконец, запустите Android Studio из диспетчера приложений Linux Mint или, альтернативно, вы можете запустить Android Studio с помощью следующей команды:
Поздравляю! Вы успешно установили Android Studio . Благодарим за использование этого руководства для установки последней версии Android Studio в системе Linux Mint. Для получения дополнительной помощи или полезной информации мы рекомендуем вам посетить официальный сайт Android Studio .
Источник
How to run Android apps in Linux Mint with Anbox
Even though there are a lot of fantastic applications available for Linux, there is also a very large Android world out there that many people can only access on their phone or tablet. But through Anbox we can also use these Android apps and games fullscreen under Linux on our laptop or desktop equipment. As Anbox is still in its earliest development stage it is a bit buggy. But for those who like to try things out, in this blog post I will explain how to run Android apps in Linux Mint with Anbox.
In this blog post I will discuss the following subjects:
- What is Anbox
- Prerequisites to install Anbox
- How to install snapd
- How to install Anbox
- How to setup Anbox
- How to download APK files from Play Store
- How to setup Android Debug Bridge
- How to install apps via Android Debug Bridge
- How to start and use apps in Anbox
What is Anbox
Simply said we can say that Anbox is Android in a box. Anbox is a free and open source environment that enables running Android applications on your Linux distribution. It offers a compatibility layer by executing an Android runtime environment to execute Android applications. There are other Android for Linux projects as well, like Shashlik or Genymotion. The difference is that these projects rely on an emulator to run the necessary Android environment, which activates an entire emulated system with its own kernel. On the other hand Anbox runs the Android system directly on the Linux kernel. This improves performance.
Prerequisites to install Anbox
To begin with, it is good to realize that it is not very easy to install Anbox. We are forced to use the command line, it requires the installation of a number of kernel components, the implementation of snapd is necessary and there is no Google Play Store in Anbox. But I will describe everything you need.
Anbox is not available as readily installable application in the Linux Mint applications repository. To be able to install Anbox on your Linux Mint implementation your system need to support snaps, which is the preferred approach according to the developers of Anbox.
Maybe you ask yourself what snaps are. Simply said a snap is a self-contained way of packaging software that enables independent software installation. In the traditional Linux applications metaphor software depends on the availability of complete and correct related packages to be able to do a successful software installation. This has some disadvantages as dependencies can be broken due to upgrades and updates.
With snaps everything that is needed to run an application is part of the snap package, so there are no external dependencies outside the snap package and no dependency with the application repository. The tool for using snaps is called snapd, which must be installed in Linux Mint before being able to install and use snap based applications.
Further you need to install two kernel modules, allow your browser to download APK files and setup Android Debug Bridge.
How to install snapd on Linux Mint
Snapd is available for Linux Mint 18.2, Linux Mint 18.3 and the most recent Linux Mint 19. You can install snapd via the Linux Mint Software Manager.
1) Open your Software Manager by clicking on Menu and searching for Software Manager.
2) Search for snapd and click on Install.

3) Restart your machine, or log out and log in again, to complete the installation.
It is also possible to install snapd via the command line instead of using the Software Manager.
1) Use key combination CTRL + ALT + T to start the Terminal.
2) Type “sudo apt update” and give enter.
3) Type “sudo apt install snapd” and give enter.
4) Restart your machine, or log out and log in again, to complete the installation.
How to install Anbox in Linux Mint
Now that we installed snapd, we can continue with installing the necessary kernel modules that enables to support the mandatory kernel subsystems Ashmem and Binder for the Android container. We do that by adding the required PPA (personal package archive).
1) Use key combination CTRL + ALT + T to open the Terminal.
2) Type “sudo add-apt-repository ppa:morphis/anbox-support” and give enter.
3) You will be asked to confirm the installation. Give enter.
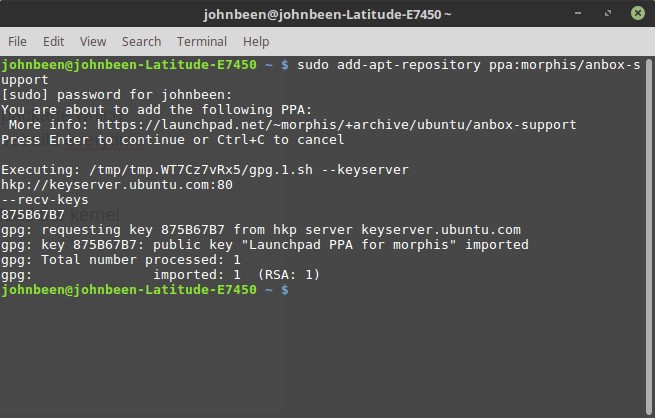
4) Type “sudo apt update” and give enter.
5) Type “sudo apt install anbox-modules-dkms” and give enter.
The above added the PPA and installed the anbox related modules that contain the before mentioned Ashmem and Binder kernel modules.
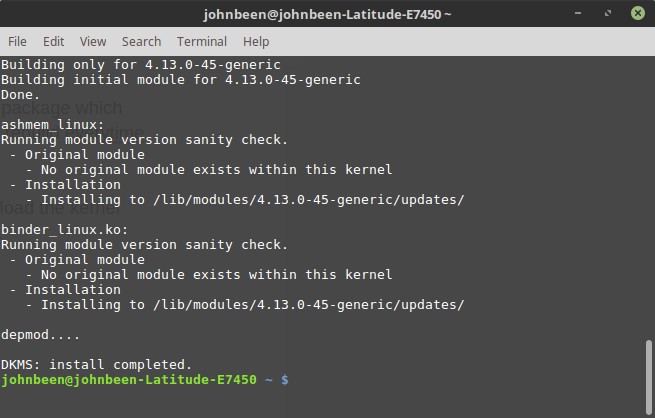
Now we have to manually load the kernel modules, which is a one time action.
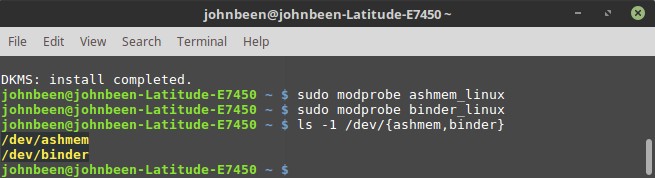
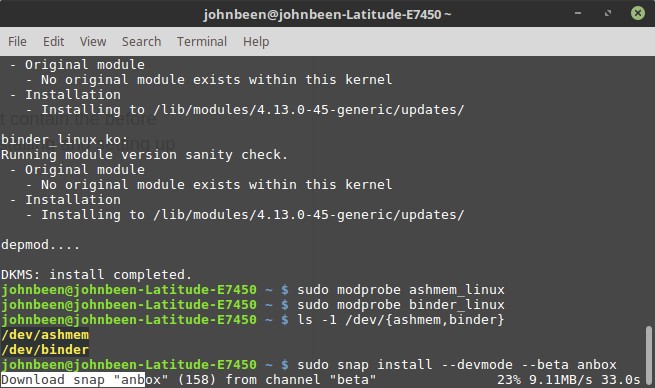
6) Type “sudo modprobe ashmem_linux” and give enter.
7) Type “sudo modprobe binder_linux” and give enter.
You can check if there are two new sub folders available by typing “ls -1 /dev/
Now that we added the PPA and installed the anbox related modules that contain the before mentioned Ashmem and Binder kernel modules, we can continue with installing and setting up the Anbox snap package.
8) Type “sudo snap install –devmode –beta anbox” and give enter.

9) Now update to the most recent version by typing “snap refresh –beta –devmode anbox”. Give enter.
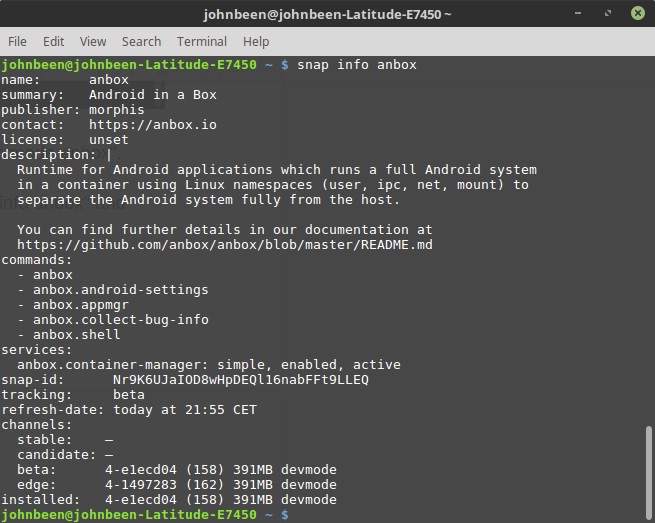
10) To request information about the currently available versions type “snap info anbox” and give enter.
How to setup Anbox in Linux Mint
Anbox is now ready to use.
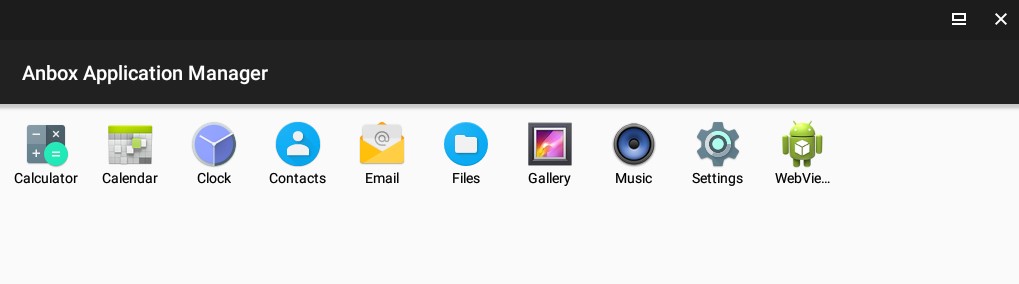
1) Go to your application menu via Menu and search for Anbox.
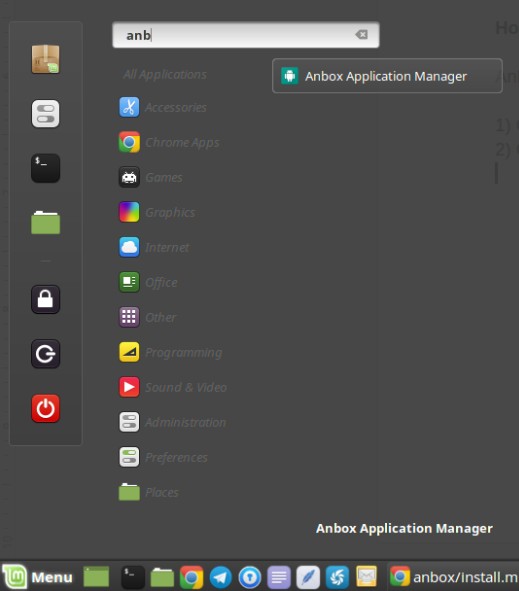
2) Click on Anbox Application Manager.
Now the Anbox Application Manager will be started.
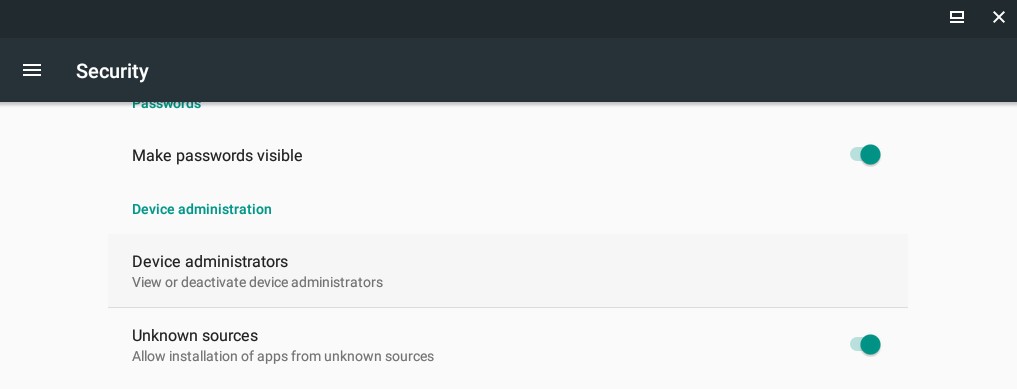
As you will notice there isn’t a Google Play Store available to install Android Apps. To add the apps and games you like to run on your Linux machine, you must first download the Android APK files. But before being able to install APK files in Android and thus in Anbox you need to change your security settings in Anbox.
3) Click on Settings.
4) Go to Security.

5) Make sure that Unknown sources is enabled.
How to download APK files from the Google Play Store
Downloading apk files from the Play Store is possible by using the “Apk Downloader” extension for your Firefox, Chrome or Chromium browser.
1) Open your browser and go to menu option Add-ons.
2) Search for “apk downloader”.
3) Install “apk downloader”.
Now we can download the APK files.
4) Go to the Play Store via https://play.google.com/store.
5) Search for an app.
6) Select the app.

Here you will see the additional “Download APK” button.
7) Click on “Download APK” and select “Save file”.
How to set up Android Debug Bridge
Unfortunately, you can not simply download an apk application file and start it directly in Linux Mint. You need Android Debug Bridge (adb) to bring apk files to Anbox.
1) Use key combination CTRL + ALT + T to open the Terminal.
2) Type “sudo apt-get install android-tools-adb” and give enter.
How to install apps via adb
Now that you have set up adb on your Linux system you can install android applications in Anbox. In section “How to download APK files from the Google Play Store” I downloaded the Flipboard apk (flipboard-app1540872000.apk) as an example in the Downloads folder. When we want to add Flipboard to Anbox we do the following:
1) Type “adb install Downloads/flipboard-app1540872000.apk” and give enter.
How to start and use apps in Anbox
Now you will see the Flipboard app in Anbox.
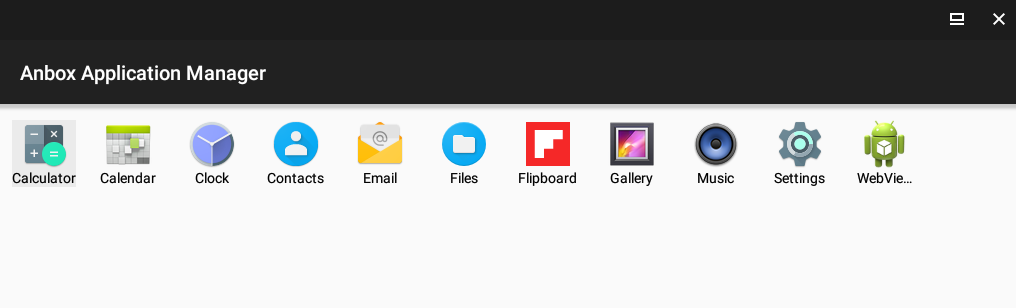
1) Click on Flipboard and the app will be started in its own window.

Final words
Although it is not an easy process, it is doable to set up Anbox, download apps and use these apps under Linux. As Anbox is still in its earliest development stage it is a bit buggy. But for those who like to try things out, share your experiences with the development team. As always, the more users and experiences, the better for further development of software. In future blogs I will write about Shashlik and Genymotion.
Related Posts
How to Connect your Android phone to Zorin OS with Zorin Connect
March 23, 2021 March 23, 2021

How to follow your favorite websites with the NewsFlash RSS Feed Reader for Linux

How to verify your Linux Mint ISO image file
February 20, 2021 February 20, 2021
Follow RealLinuxUser
Why this website
Hi, my name is John. I started this website because I think that many Linux-oriented websites are too technical to be of any interest for novice users or people who just want to be productive with their computer, and that scares off a potentially large group of new people to take the step to Linux. And that is a pity because Linux is a formidable platform and with the right user-centered approach Linux could get a much larger footprint. So this website tries to be different and will be simple and focused on users who just want to be productive with Linux and related software.
Источник
Android with linux mint
Anbox — эмулятор Android
версия: 0.1.0

Описание:
Anbox — это как вайн, только для запуска андроид-приложений. Anbox использует технологию контейнеризации, что позволяет запускать приложения на железе и ядре хоста с производительностью сравнимой с нативной. Для запуска приложений используются контейнеры LXC и (пока что) модули ядра, собираемые через DKMS.
С эмулятором поставляется чистый образ AOSP 7.1.1. Гаппсы не поставляются и не планируются. Поддерживается триде-графика. Для успешного запуска на x86/x64 приложение должно поддерживать одну из этих платформ.
Установка приложений на данный момент возможна только через ADB. Андроид-приложения запускаются в отдельных окнах. Интеграция с ДЕ хоста находится в зайчаточном состоянии — доступна только интеграция буфера обмена; интеграция уведомлений, ФС, IME и некоторых других элементов пока не реализована.
Для Убунту подготовлен Снап-пакет, так же пакет доступен для арча в ауре.
От прочих эмуляторов отличается хорошей производительностью, опенсурсностью (ЖПЛв3), наличием под онтопиком и неплохой (даже на данный момент) интеграцией с хостом. Ну как, интеграция с хостом определённо превосходит любые решения с ВМ и почти так же хороша, как в ARC.
Разработчик: The Anbox Developers
Домашняя страница: http://anbox.io
Сообщение отредактировал Kenas — 11.01.21, 12:43
 piranius, написать отзыв на гитхабе и собственно почитать как там решали проблемы
Сообщение отредактировал dik08razz — 26.04.17, 16:22
Я на archlinux без проблем запустил.
На юбунте и минте должно запускаться без дополнительных телодвижений, только лишь аккуратно выполнив инструкцию по установке.
Выкладывайте логи, будем смотреть чего там не стартует.
Модули собрались нормально и загружаются?
$ sudo modprobe ashmem_linux
$ sudo modprobe binder_linux
Запуск сервиса не ругается? /usr/bin/anbox session-manager
Можете попробовать так запустить /usr/bin/anbox session-manager —gles-driver=host
Потом посмотрите anbox system-info на чего ругается.
Сообщение отредактировал pushild — 02.05.17, 01:02
pushild, GitHub Issues — вот мой отчёт. Толком нет интернета чтобы самому решить проблему
Сообщение отредактировал dik08razz — 02.05.17, 11:01
У вас образ не находит, или он побитый или переменные не задали.
datadir=$HOME/anbox-data
$ mkdir -p $datadir/rootfs
$ sudo anbox container-manager \
—android-image=/path/to/android.img \
—data-path=$datadir
Попробуйте для начала не самостоятельно собирать, а снапом установить, на юбунту-подобный дистр должно встать как влитое.
$ snap install —classic anbox-installer && anbox-installer
Убедитесь что в установочном логе нет ошибок, перезагружаетесь и должно сразу стартовать по значку. Если ядро конечно стандартное, а не zen какой.
Первая часть касается тех, кто ставил Anbox штатным установщиком
/anbox/anbox_2_amd64.snap
Проверяем, что он работает.
Удаляем установленный и ставим наш.
Перезаходим, запускаем Anbox. Если запустился, идем дальше.
Часть 2. Внесение изменений в образ
Предварительно скачать и распаковать http://opengapps.org (x86_64, 7.1, mini)
Работать будем с
1. Распаковываем img: sudo unsquashfs
/anbox/prime/android.img
После окончания процесса видим распакованный образ в папке
/squashfs-root/
2. Из распакованного архива open_gapps-x86_64-7.1-pico-.zip распаковать Core/vending-all.tar.lz, Core/gsflogin-all.tar.lz, Core/gsfcore-all.tar.lz, Core/gmscore-x86_64.tar.lz
3. В распакованном найти папки Phonesky, GoogleLoginService, GoogleServicesFramework, PrebuiltGmsCore и скопировать их в squashfs-root/system/priv-app/
4. Меняем владельца скопированных папок:
cd
/squashfs-root/system/priv-app
sudo chown -R 100000:100000 Phonesky GoogleLoginService GoogleServicesFramework PrebuiltGmsCore
cd
5. Собираем образ обратно: sudo mksquashfs squashfs-root android.img -b 131072 -comp xz -Xbcj x86
6. Перемещаем полученный образ в prime: mv
обновляем и ставим снап. Лучше перед этим удалить установленный, но необязательно

P.S. Ногами не пинать. Если что-то неправильно написал/сделал, поправьте. Про снапы узнал неделю назад, увидев эту тему, да и Ubuntu подзабыл.
Сообщение отредактировал AJacobs — 05.05.17, 09:10
Зачем это нужно? Ставьте убунту под virtualbox в винде и все у вас заработает. Хотя под виндоус и так полно отлично работающих андроид-плееров.
Сообщение отредактировал pushild — 18.05.17, 01:04
$ env BAMF_DESKTOP_FILE_HINT=/var/lib/snapd/desktop/applications/anbox_anbox.desktop /snap/bin/anbox launch —package=org.anbox.appmgr —component=org.anbox.appmgr.AppViewActivity
[WW 2017-05-23 15:53:58] [launch.cpp:[email protected]()] Anbox session manager service isn’t running, trying to start it.
$ env BAMF_DESKTOP_FILE_HINT=/var/lib/snapd/desktop/applications/anbox_anbox.desktop /snap/bin/anbox launch —package=org.anbox.appmgr —component=org.anbox.appmgr.AppViewActivityDESKTOP_FILE_HINT=/var/lib/snapd/desktop/applications/anbox_anbox.desktop /snap/bin/anbox launch —package=org.anbox.appmgr —compo[WW 2017-05-23 15:44:13] [launch.cpp:[email protected]()] Anbox session manager service isn’t running, trying to start it.
[WW 2017-05-23 15:44:19] [launch.cpp:[email protected]()] Anbox session manager service isn’t running, trying to start it.
[WW 2017-05-23 15:44:24] [launch.cpp:[email protected]()] Anbox session manager service isn’t running, trying to start it.
[EE 2017-05-23 15:44:29] [launch.cpp:[email protected]()] Couldn’t get a connection with the session manager
$ anbox session-manager
[EE 2017-05-23 16:13:35] [daemon.cpp:[email protected]] bind: Address already in use
Сообщение отредактировал stitchix — 23.05.17, 19:15
Пишет что сервис не стартанул, пробует запустить, запустить естественно не сможет. Что у вас там в минте, systemd?
посмотрите запустился ли
Сообщение отредактировал pushild — 24.05.17, 17:10
Под идее под эту версию разрабочики тестируют, вам ничего кроме как snap install —classic anbox-installer && anbox-installer делать не надо. Далее перезагрузка и на клик значок.
Может ядро у вас модифицированное, а не стандартное, сорцы ядра для сборки модуля dkms — у не хватает или версии пакетов из тестовых репозитории. Выложите логи установки, наверняка на чего то ругается.
$ sudo snap install —classic anbox-installer && anbox-installer
anbox-installer 1 from ‘morphis’ installed
Anbox (Android in a Box) — Installer
IMPORTANT: THIS IS ALPHA LEVEL SOFTWARE. EXPECT INSTABILITY AND
BUGS .
IMPORTANT: ALSO PLEASE BE AWARE THAT WE DON’T PROVIDE FULL
CONFINEMENT FOR THE SNAP YET .
PLEASE NOTE: This script will require root access on your system
to install all necessary things. It will prompt you to enter your
password when required.
What do you want to do?
1. Install Anbox
2. Uninstall Anbox
Please enter your choice 2:
1
This is the installer for the anbox runtime environment. It will
install certain things on your system to ensure all requirements
are available for anbox to work correctly.
In summary we will install the following things:
* Add the anbox-support ppa ppa:morphis/anbox-support to the
host system
* Install the anbox-modules-dkms deb package from the ppa
which will add kernel modules for ashmem and binder which are
required for the Android container to work.
* Configure binder and ashmem kernel modules to be loaded
automatically on boot.
* Install the anbox-common package from the ppa which will
— Add an upstart job for the current user max1024 which will
start the anbox runtime on login.
— Add a X11 session configuration file to allow the system
application launcher (Unity7, Gnome Shell, ..) to find
available Android applications.
Please type ‘I AGREE’ followed by pressing ENTER to continue
or type anything else to abort:
I AGREE
Starting installation process .
+ sudo apt install -y software-properties-common linux-headers-generic
Reading package lists. Done
Building dependency tree
Reading state information. Done
linux-headers-generic is already the newest version (4.4.0.78.84).
software-properties-common is already the newest version (0.96.20.7).
The following packages were automatically installed and are no longer required:
php-common php7.0 php7.0-cli php7.0-common php7.0-fpm php7.0-json
php7.0-opcache php7.0-readline
Use ‘sudo apt autoremove’ to remove them.
0 upgraded, 0 newly installed, 0 to remove and 5 not upgraded.
+ sudo add-apt-repository -y ppa:morphis/anbox-support
gpg: keyring `/tmp/tmp15cgry4a/secring.gpg’ created
gpg: keyring `/tmp/tmp15cgry4a/pubring.gpg’ created
gpg: requesting key 875B67B7 from hkp server keyserver.ubuntu.com
gpg: /tmp/tmp15cgry4a/trustdb.gpg: trustdb created
gpg: key 875B67B7: public key «Launchpad PPA for morphis» imported
gpg: Total number processed: 1
gpg: imported: 1 (RSA: 1)
OK
+ sudo apt update
Get:1 http://ppa.launchpad.net/morphis/anbox-support/ubuntu xenial InRelease [17,5 kB]
Hit:2 http://ppa.launchpad.net/noobslab/icons/ubuntu xenial InRelease
Hit:3 http://ppa.launchpad.net/noobslab/themes/ubuntu xenial InRelease
Ign:4 http://download.opensuse.org/repositories/home:/Horst3180/xUbuntu_16.04 InRelease
Hit:5 http://download.opensuse.org/repositories/home:/Horst3180/xUbuntu_16.04 Release
Get:6 http://ppa.launchpad.net/morphis/anbox-support/ubuntu xenial/main amd64 Packages [672 B]
Get:7 http://download.opensuse.org/repositories/home:/Horst3180/xUbuntu_16.04 Release.gpg [481 B]
Get:8 http://ppa.launchpad.net/morphis/anbox-support/ubuntu xenial/main i386 Packages [672 B]
Hit:9 http://debian.drdteam.org stable InRelease
Get:10 http://ppa.launchpad.net/morphis/anbox-support/ubuntu xenial/main Translation-en [368 B]
Ign:7 http://download.opensuse.org/repositories/home:/Horst3180/xUbuntu_16.04 Release.gpg
Hit:11 http://archive.ubuntu.com/ubuntu xenial InRelease
Get:12 http://archive.ubuntu.com/ubuntu xenial-updates InRelease [102 kB]
Get:13 http://archive.ubuntu.com/ubuntu xenial-backports InRelease [102 kB]
Get:14 http://archive.ubuntu.com/ubuntu xenial-security InRelease [102 kB]
Get:15 http://archive.ubuntu.com/ubuntu xenial-updates/main amd64 DEP-11 Metadata [299 kB]
Get:16 http://archive.ubuntu.com/ubuntu xenial-updates/main DEP-11 64×64 Icons [200 kB]
Get:17 http://archive.ubuntu.com/ubuntu xenial-updates/universe amd64 DEP-11 Metadata [160 kB]
Get:18 http://archive.ubuntu.com/ubuntu xenial-updates/universe DEP-11 64×64 Icons [188 kB]
Get:19 http://archive.ubuntu.com/ubuntu xenial-updates/multiverse amd64 DEP-11 Metadata [2.520 B]
Get:20 http://archive.ubuntu.com/ubuntu xenial-backports/main amd64 DEP-11 Metadata [3.324 B]
Get:21 http://archive.ubuntu.com/ubuntu xenial-backports/universe amd64 DEP-11 Metadata [3.976 B]
Get:22 http://archive.ubuntu.com/ubuntu xenial-security/main amd64 DEP-11 Metadata [54,6 kB]
Get:23 http://archive.ubuntu.com/ubuntu xenial-security/main DEP-11 64×64 Icons [50,2 kB]
Get:24 http://archive.ubuntu.com/ubuntu xenial-security/universe amd64 DEP-11 Metadata [32,2 kB]
Get:25 http://archive.ubuntu.com/ubuntu xenial-security/universe DEP-11 64×64 Icons [37,0 kB]
Reading package lists. Done
W: GPG error: http://download.opensuse.org/repositories/home:/Horst3180/xUbuntu_16.04 Release: The following signatures couldn’t be verified because the public key is not available: NO_PUBKEY 5A7D1D38BEB6D886
E: The repository ‘http://download.opensuse.org/repositories/home:/Horst3180/xUbuntu_16.04 Release’ is not signed.
N: Updating from such a repository can’t be done securely, and is therefore disabled by default.
N: See apt-secure(8) manpage for repository creation and user configuration details.
+ cleanup
+ local err=100
+ trap — EXIT
+ echo ‘ERROR: Installation failed. Removing all parts of Anbox again.’
ERROR: Installation failed. Removing all parts of Anbox again.
+ uninstall
+ set -x
+ sudo snap remove anbox
snap «anbox» is not installed
+ ‘[‘ -e /etc/apt/sources.list.d/morphis-ubuntu-anbox-support-xenial.list ‘]’
+ ppa_purged_installed=0
+ dpkg —get-selections
+ grep -q ppa-purge
+ sudo apt install -y ppa-purge
Reading package lists. Done
Building dependency tree
Reading state information. Done
ppa-purge is already the newest version (0.2.8+bzr63).
The following packages were automatically installed and are no longer required:
php-common php7.0 php7.0-cli php7.0-common php7.0-fpm php7.0-json
php7.0-opcache php7.0-readline
Use ‘sudo apt autoremove’ to remove them.
0 upgraded, 0 newly installed, 0 to remove and 5 not upgraded.
+ sudo ppa-purge -y ppa:morphis/anbox-support
Updating packages lists
W: GPG error: http://download.opensuse.org/repositories/home:/Horst3180/xUbuntu_16.04 Release: The following signatures couldn’t be verified because the public key is not available: NO_PUBKEY 5A7D1D38BEB6D886
W: The repository ‘http://download.opensuse.org/repositories/home:/Horst3180/xUbuntu_16.04 Release’ is not signed.
PPA to be removed: morphis anbox-support
Package revert list generated:
Disabling morphis PPA from
/etc/apt/sources.list.d/morphis-ubuntu-anbox-support-xenial.list
Updating packages lists
W: GPG error: http://download.opensuse.org/repositories/home:/Horst3180/xUbuntu_16.04 Release: The following signatures couldn’t be verified because the public key is not available: NO_PUBKEY 5A7D1D38BEB6D886
W: The repository ‘http://download.opensuse.org/repositories/home:/Horst3180/xUbuntu_16.04 Release’ is not signed.
Reading package lists. Done
Building dependency tree
Reading state information. Done
The following packages were automatically installed and are no longer required:
php-common php7.0 php7.0-cli php7.0-common php7.0-fpm php7.0-json
php7.0-opcache php7.0-readline
Use ‘sudo apt autoremove’ to remove them.
0 upgraded, 0 newly installed, 0 to remove and 5 not upgraded.
PPA purged successfully
+ ‘[‘ 0 -eq 1 ‘]’
+ set +x
Сообщение отредактировал MaxV1024 — 03.06.17, 21:49
2MaxV1024
Проблема с ключами gpg. или обновить ключи или в sources.list закоментить репу. вариант решения — https://www.nixp.ru/recipes/4.html или
sudo apt-get update
дождитесь строк типа
W: Ошибка: deb.opera.com unstable Release: Следующие подписи не могут быть проверены, так как недоступен открытый ключ: NO_PUBKEY F9A2F76A9D1A0061
F9A2F76A9D1A0061 — это КЛЮЧ, он разный для разных репозиториев
sudo apt-key adv —recv-keys —keyserver keyserver.ubuntu.com КЛЮЧ (Спасибо vasilisc)
ну или если не понравится — на форумах убунты таких вопросов вагон.
Источник


