- Setup Android Environment Variables
- Find the folder location where you installed Android SDK
- Setup Android Environment Variables – Setup ANDROID_HOME
- Folder locations to be added to Path variable
- Setup Path Variable
- Verify that Android Environment Variables have been set correctly
- Environment variables
- Variables reference
- How to set environment variables
Setup Android Environment Variables
This article will provide you with a detailed guide to setup Android Environment variables. This article is a continuation of our previous articles on Android, where you learned how to download and install Android Studio bundle and then how to install additional Android SDK tools.
The main Android environment variables that you would have to set are ANDROID_HOME and Path variables. If you have followed our Appium Tutorial series from the beginning, then you would remember that this article is similar to our previous article where we setup Java environment variables. Let’s now start with the setup process.
Find the folder location where you installed Android SDK
In the first step we will try to find the folder path where we have installed Android SDK –
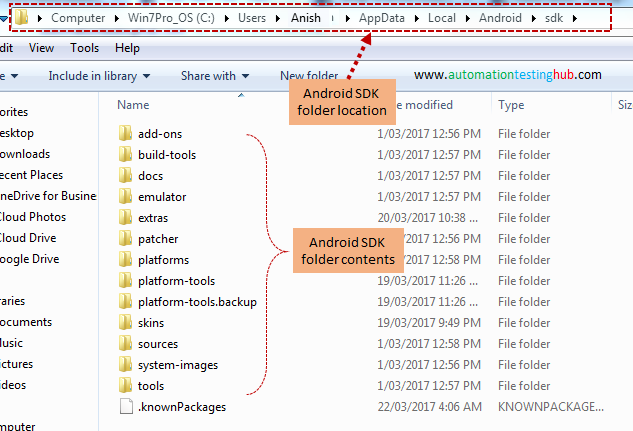
1. The default folder location where Android SDK is installed is – C:\Users\Anish\AppData\Local\Android\sdk. Please open this folder path and see if you have Android SDK folder in there with contents as shown below
Please note that if you try to open this folder location by going to each folder one by one (i.e. C > Users > YourUserName and so on… ), then you might not see the AppData folder as its a hidden folder. So, you will have to make hidden folders visible first
2. Copy the SDK folder location once you find it. For us, this folder location is – C:\Users\Anish\AppData\Local\Android\sdk
Setup Android Environment Variables – Setup ANDROID_HOME
Follow the steps given below to setup ANDROID_HOME environment variable –
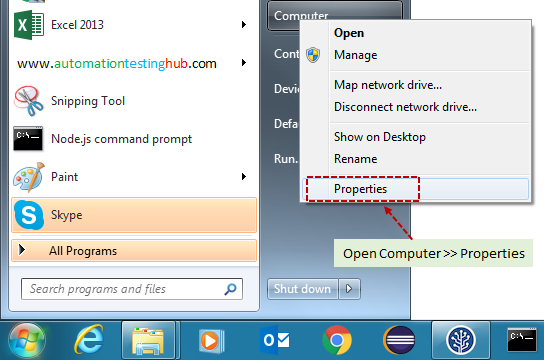
1. Click on Start menu. Then right click on Computer and select Properties option
2. This would open the System Properties window as shown below. Now from the Advanced Tab, click on Environment Variables button
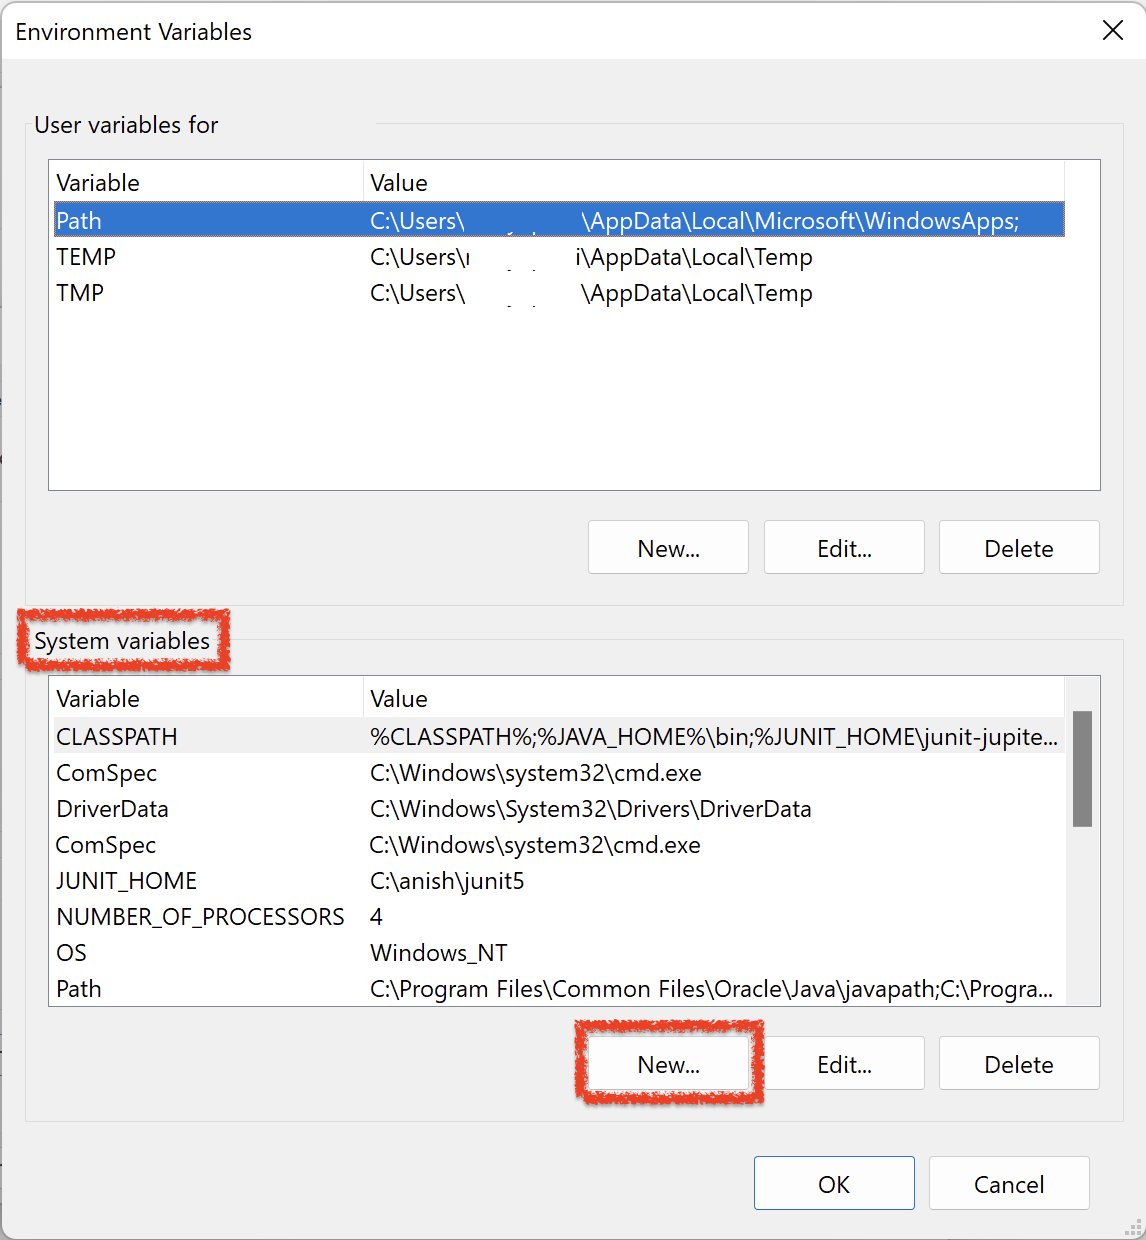
3. From the Environment Variables window, click on New button from System variables section
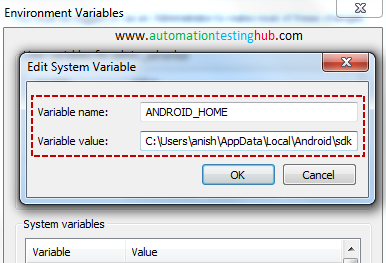
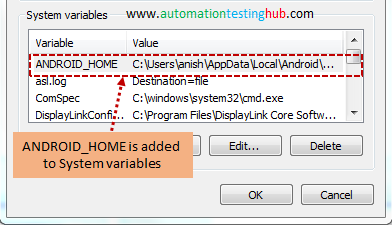
4. Enter ANDROID_HOME in Variable Name field and SDK folder location (C:\Users\Anish\AppData\Local\Android\sdk) in Variable value field as shown in below image (Please enter the correct folder location that you have in your machine)
5. Click on OK button. ANDROID_HOME variable will now be added to System variables
With this, we have successfully added ANDROID_HOME variable. Let us now see how to add the Path variable.
Folder locations to be added to Path variable
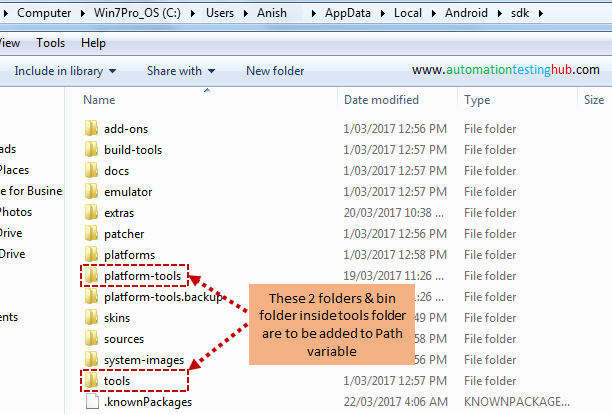
In Android SDK folder, there are three specific folders that you need to add to the Path variable. These folders are –
- platforms-tools folder which has path – C:\Users\Anish\AppData\Local\Android\sdk\platform-tools
- tools folder which has path – C:\Users\Anish\AppData\Local\Android\sdk\tools
- bin folder inside tools folder with path – C:\Users\Anish\AppData\Local\Android\sdk\tools\bin
Since we have already added ANDROID_HOME in System variables and its represented by – C:\Users\Anish\AppData\Local\Android\sdk, hence all these above three folder locations can be written as –
- %ANDROID_HOME%\platform-tools
- %ANDROID_HOME%\tools
- %ANDROID_HOME%\tools\bin
Let us now add all these three folder locations in Path variable.
Setup Path Variable
Follow the steps given below to setup Path variable –
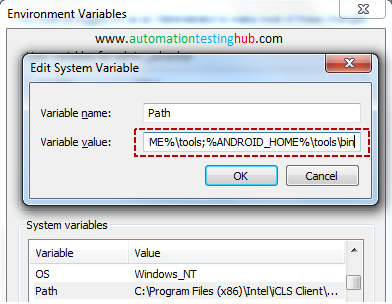
1. In the Environment variables window, check that there is a variable called Path under System variables

2. Select the Path variable and click on Edit button. Path variable window would be opened
3. Move over to the end in the Variable value text field. Put a semicolon (;) at the end and start adding all the 3 folder paths separated by semicolon (Semicolon acts as a delimiter between different folder locations added in the Path variable). You should have added all the 3 folder locations as this – ;%ANDROID_HOME%\platform-tools;%ANDROID_HOME%\tools;%ANDROID_HOME%\tools\bin
4. Click on OK button. All the three variables would now be added to the Path variables.
5. Close the Environment variable window by clicking on Ok button. With this, we have now successfully setup Path variable as well
Verify that Android Environment Variables have been set correctly
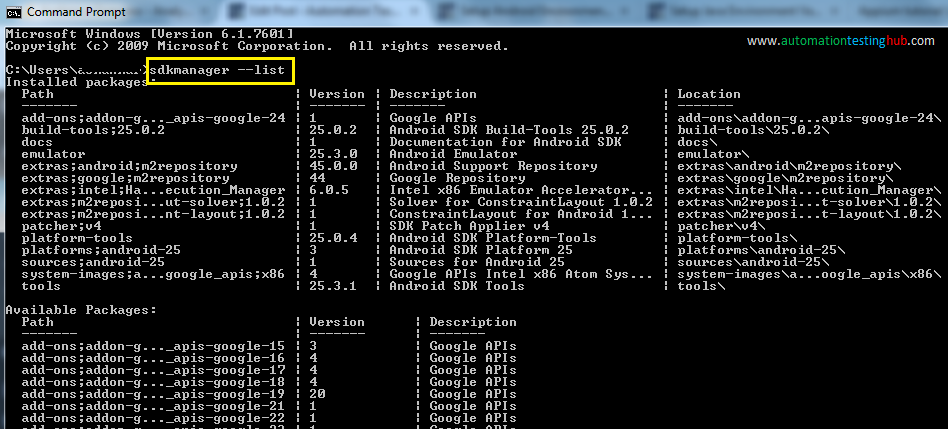
To verify that all the Android Environment Variables are correctly setup, open command prompt and run this command: sdkmanager – -list (please note that there should be no space between the 2 hyphens, as shown in the below image). This would list down all the installed and available packages which would look a bit like something as shown below (please wait for 3-5 seconds for the list to be displayed)
You can also run this command: uiautomatorviewer in command prompt. This will open UI Automator Viewer window as displayed below.
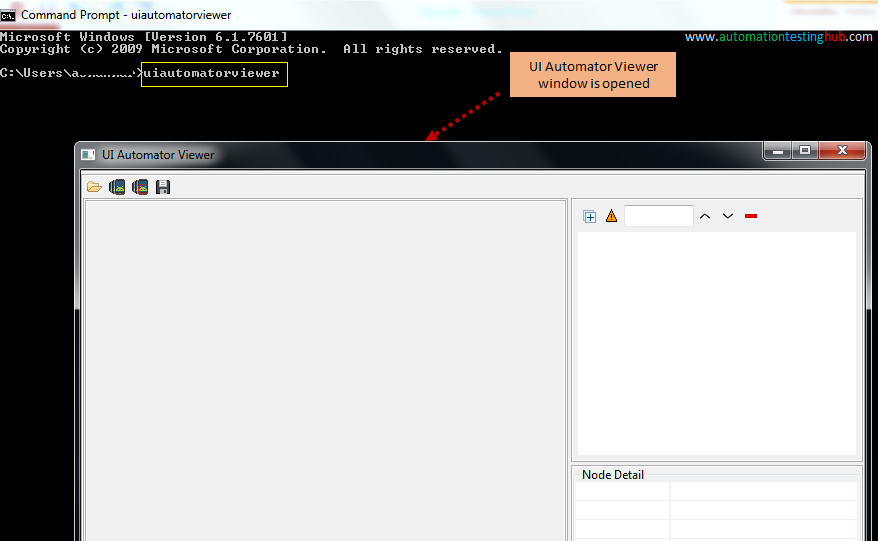
You can now close UI Automator Window and the command prompt. Both the above commands verify that the Android Environment Variables have been setup correctly. If you face any issues with any of the steps, or if you get any different output using these commands, then please let us know using the comments section. With this we complete our article series on installing Android and setting up Android environment variables. We will now move over to our next article, which is downloading and installing Appium Desktop client.
Environment variables
You can set environment variables for Android Studio and the command-line tools that specify things like where the SDK is installed and where user-specific data is stored. This page describes the most commonly used environment variables.
The following example shows how to use an environment variable to launch an emulator when the SDK installation has been put in E:\Android\sdk\ instead of in its default location of $USER_HOME or $HOME .
Variables reference
The following table describes commonly used environment variables for the Android SDK tools.
Table 1. Environment variables
| Android SDK environment variables | |
|---|---|
| ANDROID_SDK_ROOT | Sets the path to the SDK installation directory. Once set, the value does not typically change, and can be shared by multiple users on the same machine. ANDROID_HOME , which also points to the SDK installation directory, is deprecated. If you continue to use it, the following rules apply:
|
| REPO_OS_OVERRIDE | Set this variable to windows , macosx , or linux when you use sdkmanager to download packages for an operating system different from the current machine. Note: You can use Android Studio instead of sdkmanager to manage your SDK packages. See Update Your Tools with the SDK Manager. |
| Android Studio configuration environment variables | |
| The Android Studio configuration variables contain settings that customize the location of configuration files and the JDK. On start-up, Android Studio checks these variables for settings. For more information, see Configure Android Studio. | |
| STUDIO_VM_OPTIONS | Sets the location of the studio.vmoptions file. This file contains settings that affect the performance characteristics of the Java HotSpot Virtual Machine. This file can also be accessed from within Android Studio. See Customize your VM options. |
| STUDIO_PROPERTIES | Sets the location of the idea.properties file. This file allows you to customize Android Studio IDE properties, such as the path to user installed plugins, and the maximum file size supported by the IDE. See Customize your IDE properties. |
| STUDIO_JDK | Sets the location of the JDK with which to run Android Studio. When you launch the IDE, it checks the STUDIO_JDK , JDK_HOME , and JAVA_HOME environment variables in that order. |
| STUDIO_GRADLE_JDK | Sets the location of the JDK that Android Studio uses to start the Gradle daemon. When you launch the IDE, it first checks STUDIO_GRADLE_JDK . If STUDIO_GRADLE_JDK is not defined, the IDE uses the value set in the Project Structure dialog. |
| Emulator Environment Variables | |
| By default, the emulator stores configuration files under $HOME/.android/ and AVD data under $HOME/.android/avd/ . You can override the defaults by setting the following environment variables. The emulator -avd command searches the avd directory in the order of the values in $ANDROID_AVD_HOME , $ANDROID_SDK_HOME/.android/avd/ , and $HOME/.android/avd/ . Note: Starting with Android Studio 4.2, the ANDROID_SDK_HOME environment variable is deprecated and has been replaced with ANDROID_PREFS_ROOT . For emulator environment variable help, type emulator -help-environment at the command line. For information about emulator command-line options, see Control the Emulator from the Command Line. | |
| ANDROID_EMULATOR_HOME | Sets the path to the user-specific emulator configuration directory. In Android Studio 4.1 and lower, the default location is $ANDROID_SDK_HOME/.android/ . Starting with Android Studio 4.2, the ANDROID_SDK_HOME environment variable is deprecated and the default location of the emulator configuration directory is $ANDROID_PREFS_ROOT/.android/ . |
| ANDROID_AVD_HOME | Sets the path to the directory that contains all AVD-specific files, which mostly consist of very large disk images. The default location is $ANDROID_EMULATOR_HOME/avd/ . You might want to specify a new location if the default location is low on disk space. |
| The Android emulator queries the following environment variables when it starts. | |
| ANDROID_LOG_TAGS | See ANDROID_LOG_TAGS . |
| HTTP_PROXY | Contains the HTTP/HTTPS proxy (host name and port) setting for a global http proxy. Uses a colon (:) separator between the host and the port. For example, set HTTP_PROXY=myserver:1981 . |
| ANDROID_VERBOSE | See ANDROID_VERBOSE . |
| ANDROID_SDK_ROOT | See ANDROID_SDK_ROOT . |
| ANDROID_EMULATOR_USE_SYSTEM_LIBS | Contains a value of 0 (default) or 1. A value of 1 means to use the system’s libstdc++.so file instead of the one that comes bundled with the emulator. Set this enivronment variable only when the emulator does not start on your linux system because of a system library problem. For example, some Linux Radeon GL driver libraries require a more recent libstdc++.so file. Note: There is no guarantee that setting this environment variable to 1 will make the emulator runnable. It is a work-around for system library issues that affect a very small number of Linux users. |
| Quick emulator (QEMU) audio | |
| QEMU_AUDIO_DRV QEMU_AUDIO_OUT_DRV QEMU_AUDIO_IN_DRV | On Linux, you can change the default audio backend of the emulator by setting the QEMU_AUDIO_DRV environment variable to one of the following values:
You can also use distinct backends for audio input and audio outputs by selecting one of the QEMU values for the QEMU_AUDIO_OUT_DRV and QEMU_AUDIO_IN_DRV environment variables: If you want to disable the audio support, use the emulator -no-audio option or set QEMU_AUDIO_DRV to none . You might need to disable the audio in the following situations:
|
| adb environment variables | |
| ANDROID_SERIAL | Use this variable to provide an emulator serial number, such as emulator-5555, to an adb command. If you set this variable, but use the -s option to specify a serial number from the command line, the command-line input overrides the value in ANDROID_SERIAL . The following example sets ANDROID_SERIAL and calls adb install helloworld.apk , which then installs the Android application package on emulator-5555. |
| adb logcat environment variables | |
| ANDROID_LOG_TAGS | Use this environment variable to set a default filter expression when you are running logcat from your development computer. For example: See Filtering Log Output for more information and examples. |
| ADB_TRACE | Contains a comma-separated list of the debug information to log. Values can be the following: all , adb , sockets , packets , rwx , usb , sync , sysdeps , transport , and jdwp . To display the adb logs for the adb clients and the adb server, set ADB_TRACE to all , and then call the adb logcat command, as follows: |
| ANDROID_VERBOSE | Contains a comma-separated list of verbose output options (debug tags) used by the emulator. The following example shows ANDROID_VERBOSE defined with the debug-socket and debug-radio debug tags: Unsupported debug tags are ignored. For more information about debug tags, use emulator -help-debug-tags . How to set environment variablesThe following examples show how to set environment variables in a terminal window and in a shell script for different operating systems. Variable settings in terminal windows last as long as the window is open. Variable settings in shell scripts persist across login sessions. Windows: In a terminal window, type the following: Alternately, add it to a shell script through the Windows UI. Check the documentation for your version of Windows to learn how. Property > Advanced > Environment Variables > New, and enter the following values: Variable name: HTTP_PROXY Mac and Linux: In a terminal window, type the following: Alternately, add it to your /.bash_profile file and source the file as follows: Content and code samples on this page are subject to the licenses described in the Content License. Java is a registered trademark of Oracle and/or its affiliates. |


