- How to Fix An Error Occurred While Preparing the Installation on Mac
- Method 1: Change Date and Time
- Method 2: Use macOS Recovery
- Method 3: Download Installer Again
- If an error occurred while updating or installing macOS
- Check your internet connection
- Install in safe mode
- Apple silicon
- Intel processor
- Install after repairing your disk
- Install from macOS Recovery
- Apple silicon
- Intel processor
- Install after erasing your Mac
- Ошибка при чистой установке Mac OS X
- Меняем дату на Mac
- “An Error Occurred While Preparing the Installation”, Fix
- Thank you for choosing to leave a comment.
- 19 thoughts on ““An Error Occurred While Preparing the Installation”, Fix”
How to Fix An Error Occurred While Preparing the Installation on Mac
Updates often contain various fixes and new features that everyone wishes to have. If you have been using Mac for a while, you probably know that updates usually go smoothly on Mac devices. However, in some cases, that might not be the case. The error message “An error occurred while preparing the installation” appears, as apparent from the message itself when you are trying to install a new macOS, or updating your current one. Regardless of the scenario, this error message can be really annoying and tedious.
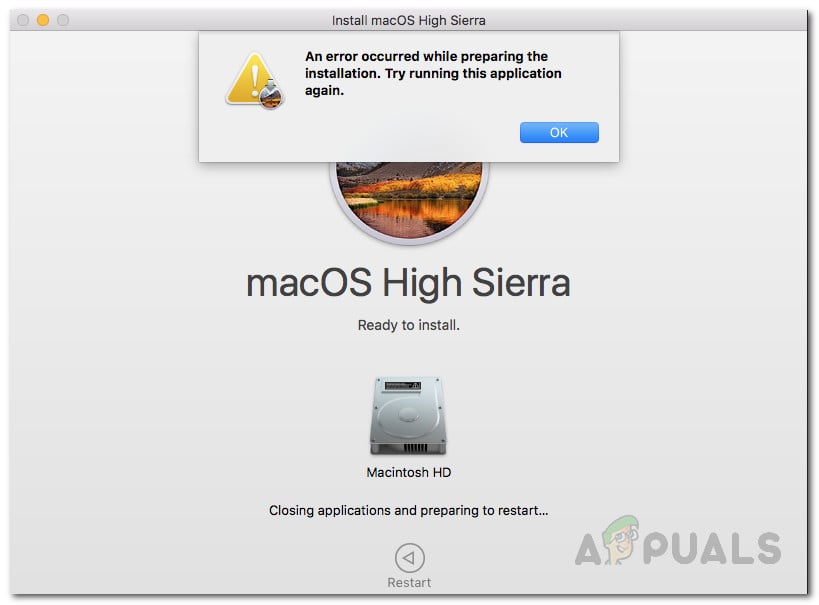 An Error Occurred While Preparing The Installation
As it turns out, the issue can in some scenarios be solved by just rebooting your Mac device. However, that may not always be the case and as a result, you will be stuck with the error message. Now, there are not many reasons due to which the issue appears, but rather the causes are very limited. We will be going through them down below so that you have a better understanding before we get into the solutions. With that said, let us get started.
- Incorrect Date and Time — One of the main reasons why this error message appears is the incorrect date and time settings. If the date and time on your device are incorrect, the installer will not be able to proceed. This is pretty common as servers often reject connections if the time and date do not sync. Therefore, to resolve this, you will have to rectify the date and time settings on your device.
- Corrupted Installer — Another cause of the said error message can be a corrupted installer. When your installer is not downloaded properly or is interrupted during the downloading process, it may get damaged or corrupted due to which your installation does not proceed. To fix this, you will just have to simply download a fresh copy of the installer.
Now that we have gone through the possible causes of the said error message, let us go through the methods that you can follow to resolve the issue. It is important to note here that in some cases, as we have mentioned, the error message can be gotten rid of with a simple reboot. Therefore, you should try restarting your device before you move on to the solutions given down below. In case the issue persists even after a reboot, follow through.
Method 1: Change Date and Time
As it turns out, when you are trying to install/upgrade your macOS, the installer tries to establish a connection to the Apple servers. Now, it is common behavior for servers to check the date and time of the connection. Therefore, if your date and time settings are incorrect, the connection is rejected as it does not sync. As a result, an error message is thrown by the installer which indicates it. Now, in order to fix the issue, you will have to obviously rectify the settings on your device before proceeding with the installation again.
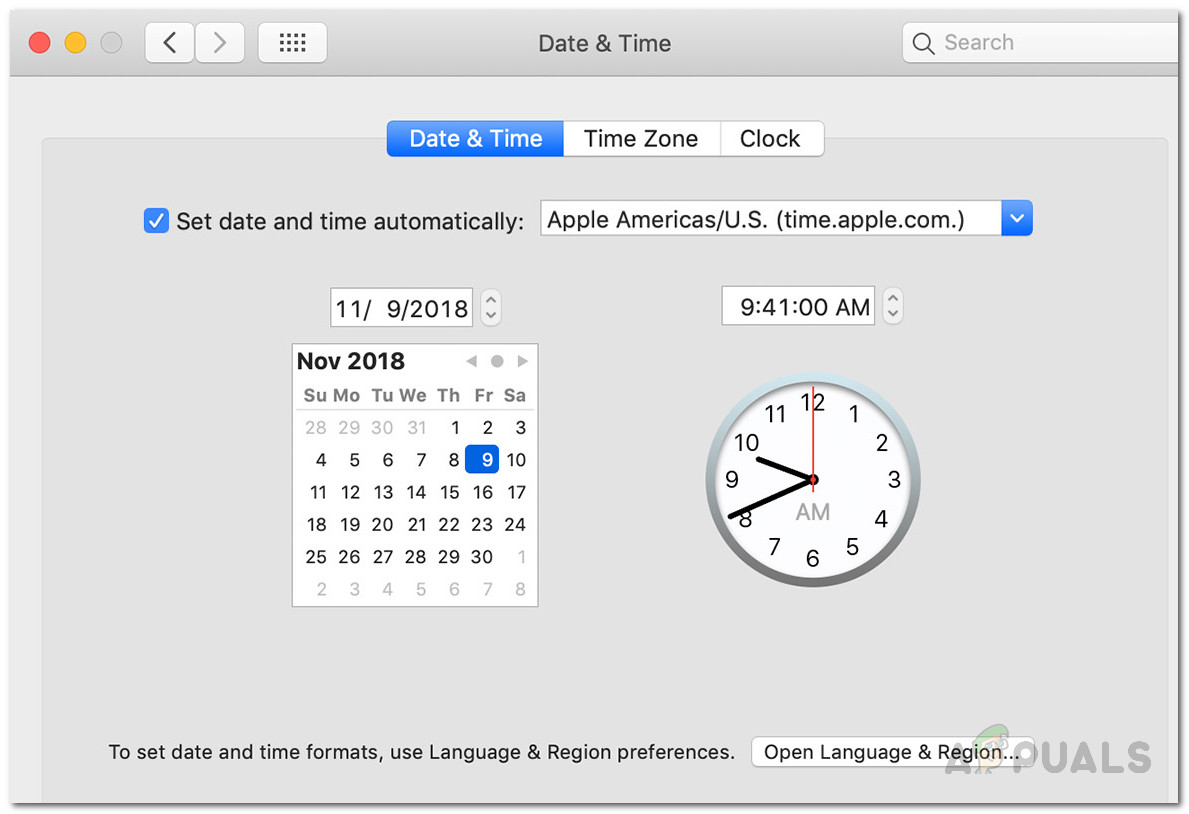
There are essentially two ways that you can do this. If you are able to use your Mac normally, then you can update the date and time from the System Preferences. To do this, follow the instructions down below:
- First of all, open up the System Preferences window from the Apple menu.
- After that, make your way to the Date & Time option.
- There, check the “Set date and time automatically” option and make sure the correct region is selected from the drop-down menu in front.
 Changing Date and Time
 - Once the date and time have been rectified, restart, and try using the installer again to see if the issue has been resolved.
 Changing Date and Time
In case you are not able to boot into your Mac, do not worry as you can still change your date and time. To do this, you will have to boot into macOS recovery. Follow the instructions down below:
- First of all, power off your Mac device.
- Once the device is powered off, turn it on and then press and hold down the Command + R keys. Accessing macOS Utilities
- Keep pressing the keys until you are able to see the Apple logo on your Mac’s screen.
- After that, you can let go of the keys. This will start your Mac into macOS Recovery.
- On the macOS Utilities screen, click on the Utilities option on the menu bar.
- From the drop-down menu, choose the Terminal option. Accessing a Terminal
- Once the Terminal window has opened up, you will be able to change the date and time settings.
- In case you have an active internet connection, you can enter the following command to automatically update the date and time settings:
- Otherwise, you will have to do it manually. The format of the date command is as follows:
- In simpler terms, this means month, day, hour, minutes, and then finally the year.
- You will have to enter this without any spaces so it will look something like this: Changing Date and Time From Terminal
- To double-check, you can just enter the date command to see if it has been updated successfully. Once you have done that, you can exit the Terminal window.
- Finally, try using the installer again to see if the issue has been resolved.
 Accessing macOS Utilities
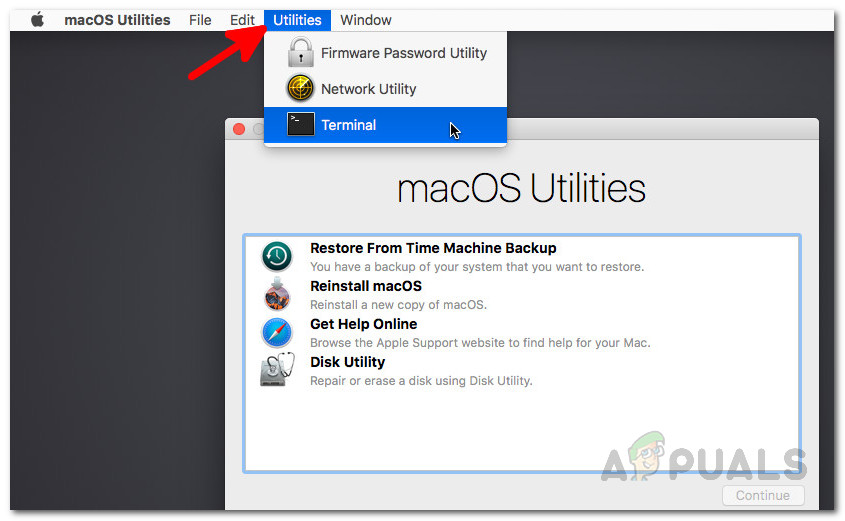 Accessing a Terminal
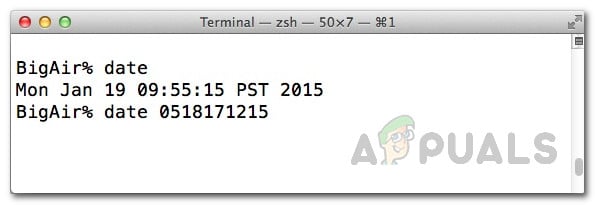 Changing Date and Time From Terminal
Method 2: Use macOS Recovery
Another way that you can resolve the issue is by using the built-in macOS Recovery. When you boot into macOS Recovery, you can use different key combinations to different versions of macOS. We will be listing the different key combinations down below among which you can choose which suits you best. This is really simple to do, just follow the instructions given down below:
- First of all, turn your Mac off.
- Once you have done that, you can turn it back on but make sure to use one of the following key combinations:
- Command + R: This will reinstall the latest macOS version that was installed on your device.
- Option + Command + R: This key combination will update your Mac to the latest compatible macOS version available. Mac Keyboard Combination
- Shift + Option + Command + R: Finally, you can use this combination if you wish to install the version that came with your Mac device.
- When prompted, click the Reinstall macOS option to continue with the installation. macOS Utilities
 Mac Keyboard Combination
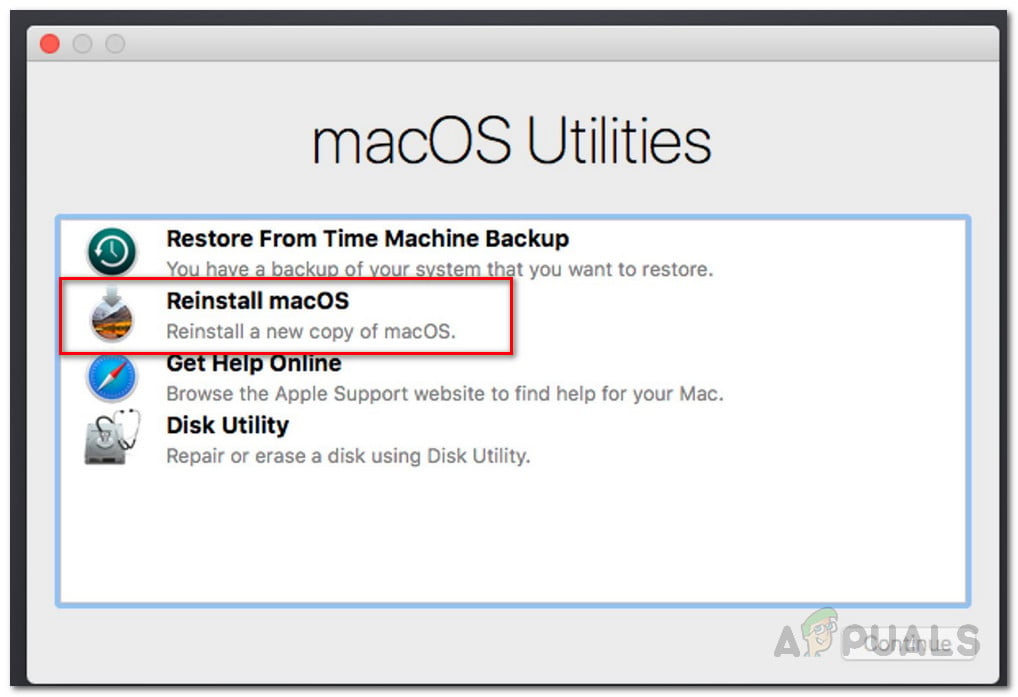 macOS Utilities
Method 3: Download Installer Again
Finally, if none of the above solutions work out for you, it could be that the installer that you are trying to use is simply corrupted or damaged. In such a scenario, what you have to do is simply download the installer again and that should fix your issue. Such problems are really common and they happen to users every now and then. Once you have downloaded the installer again, you should be good to go. Before you go ahead and download the installer again, make sure to delete the previous installer from your Mac. After that, proceed with the download.
Источник
If an error occurred while updating or installing macOS
The message might say that an error occurred while downloading, preparing, or installing, or that the installer is damaged or could not be verified.
The cause of messages like this can vary, and sometimes they are only temporary. If the message recommends a solution, such as to redownload the installer and try again, please try that first. The other solutions here are organized starting with the easiest. If the issue persists or you need help, please contact Apple Support.
Check your internet connection
Even if you’re not installing macOS from the internet, the installer needs the internet to get firmware and other information specific to your Mac. Make sure that your Mac has a working and stable internet connection.
Install in safe mode
Install while your Mac is started up in safe mode. To start up in safe mode, determine whether you’re using a Mac with Apple silicon, then follow the appropriate steps:
Apple silicon
- Shut down your Mac.
- Turn on your Mac and continue to press and hold the power button until you see the startup options window.
- Select your startup disk, then press and hold the Shift key while clicking “Continue in Safe Mode.”
- Log in to your Mac. You might be asked to log in again.
Intel processor
- Turn on or restart your Mac, then immediately press and hold the Shift key as your Mac starts up.
- Release the key when you see the login window, then log in to your Mac.
- You might be asked to log in again. On either the first or second login window, you should see ”Safe Boot” in the upper-right corner of the window.
Install after repairing your disk
Install from macOS Recovery
Install while your Mac is started up from macOS Recovery. This gives you the latest version of the macOS currently or most recently installed. To start up from macOS Recovery, follow the appropriate steps:
Apple silicon
Turn on your Mac and continue to press and hold the power button until you see the startup options window. Click the gear icon labeled Options, then click Continue.
Intel processor
Turn on your Mac and immediately press and hold Command (⌘)-R until you see an Apple logo or other image.
If you’re asked to select a user you know the password for, select the user, click Next, then enter their administrator password. When you see the utilities window in macOS Recovery, select Reinstall macOS, then click Continue and follow the onscreen instructions. Learn more about using macOS Recovery to reinstall.
Install after erasing your Mac
If no other solutions work, erase your Mac, then reinstall macOS or restore from a backup.
Источник
Ошибка при чистой установке Mac OS X
При установке OS X El Capitan или OS X Yosemite могут появиться ошибки:
«This copy of the Install OS X El Capitan application can’t be verified. It may have been corrupted or tampered with during downloading» или «This copy of the Install OS X Yosemite application can’t be verified. It may have been corrupted or tampered with during downloading», ну или «An error occurred while preparing the installation. Try running again».
«Не удалось проверить этот экземпляр программы Установка OS X Yosemite (Mavericks). Он мог был быть поврежден или подвергнуться изменениям в процессе загрузки.»
Иногда они могут быть решены путем простой перезагрузки и попытки переустановки OS X еще раз (или повторной перезаписи дистрибутива на флешку/диск, если он был поврежден), но если сообщения об ошибках появляются постоянно, то можно решить проблему только сменой даты на вашем Mac.
Меняем дату на Mac
Сделать это можно не выходя из меню установки, использовав терминальные команды. Для этого запускаем «Терминал» и вводим команду:
После чего вам отобразится установленная в данный момент дата. Ее нужно поменять, задав дату выпуска дистрибутива.
Дата и время вводятся в определенном формате: [mm]dd]HH]MM[[cc]yy]. Расшифровывается это так: Месяц Число Часы Минуты Секунды Год, введенные без пробелов и, обязательно, в такой последовательности.
К примеру, если нужно установить дату и время на 24 октября 2015 года 18 часов 25 минуты, то команда будет выглядеть так:
Смысл в том, чтобы выставить дату, позже выпуска вашего дистрибутива, но раньше выпуска следующего обновления. Экспериментируйте!
После этого закрываем «Терминал» и начинаем процесс установки.
Если вы нашли ошибку, пожалуйста, выделите фрагмент текста и нажмите Ctrl+Enter.
Источник
“An Error Occurred While Preparing the Installation”, Fix
Updating your Mac to the latest version of the macOS software is usually easy and straightforward. However, you may run into Mac update issues. A common installation error message that a lot of users are receiving is below:
“An error occurred while preparing the installation. Try running this application again.”
You may see this message when you want to install or reinstall an update or upgrade. This article explains how you can fix this problem.

Here is how you can fix this problem:
Please try the following troubleshooting tips in order. After trying each step, test to see if you’ve fixed your issue.
1. Restart your Mac.
Simply restart your Mac to see if this fixes your problem.
2. Check the date and time.
Make sure that the date and time on your Mac are set correctly. Here is how you can check this:
- On your Mac, click System Preferences, then choose Date & Time. If your settings are not correct, update them. You may also want to check the “set date and time automatically” box to turn on the option to set date and time automatically.
- However, the option above may not work for you as you may not access System Preferences if your Mac stuck in the middle of a macOS update. Then you can use Terminal (Applications / Utilities) to update your date and time settings. Here is how:
- Turn off your Mac, you can do so by pressing and holding the power button.
- Turn on your Mac and immediately press and hold the Command (⌘)-R keys together. Keep holding these keys until you see the Apple logo or a spinning globe.
- Your Mac will start up from macOS Recovery. This may take time so be patient.
- Enter your password, if asked.
- You will see the “macOS Utilities” window.
- From the top menu, click Utilities and Terminal. This will open the Terminal window.
- In Termina, enter the following command and hit enter:
- date
- This will give you your computers time and date setting. Is that correct? If not, update it:
- If your Mac has an Internet connection, enter the following command and hit enter:
- ntpdate -u time.apple.com
- This will automatically update the setting. If you have no Internet connection, then you will have to manually update this setting:
- Enter the current date using this format: date mmddHHMMyy”. (mm = two-digit month, dd = two-digit day, HH = 24 hour, MM = minute, yy = 2 digit year) So if it is currently 11:46am, April 03, 2020, the command would look like: “date 0403114620”. So enter something like this:
- date 0403114620
- Again let’s doublecheck, enter the date command again to see if your Mac has the correct setting.
- Now exit Terminal and try again.
3. Try installing in Safe Mode.
- Turn off your Mac.
- Turn on your Mac and immediately press and hold the Shift key.
- Keep holding the Shift key until you see the Apple logo.
- Log in, you may have to log in a few times.
- Now your computer is in Safe Mode.
- Try updating your Mac now. Does it work?
- To exit Safe Mode, restart your Mac normally.
4. Use macOS Recovery.
- Turn off your Mac.
- Turn on your Mac and immediately press one of the keyboard combinations:
- Command (⌘)-R: This reinstalls the latest macOS version that was installed on your Mac.
- Option-⌘-R: This will update your Mac to the latest compatible macOS version.
- Shift-Option-⌘-R: This will install the macOS version that came with your Mac.
- Click Reinstall macOS and then Continue.
5. Use a combo update.
- Please note that you can use this method to update your Mac from a prior version of macOS within the same major release. For example, the macOS 10.15.4 combo update requires that macOS 10.15.0 or later is installed.
- Download the necessary macOS combo update from the Apple website.
- They are dmg files. Also, note that they are very large files.
- Double click the install the file. And then follow the onscreen instructions.
![]()
Serhat Kurt
Dr. Serhat Kurt worked as a Senior Technology Director. He holds a doctoral degree (or doctorate) from the University of Illinois at Urbana / Champaign and a master’s degree from Purdue University. Here is his LinkedIn profile.
Thank you for choosing to leave a comment.
Please note the following:
- All comments are moderated.
- Your email will NOT be published nor shared.
- All SPAM comments will be deleted.
- Please see our comment policy page for more info.
19 thoughts on ““An Error Occurred While Preparing the Installation”, Fix”
Thanks so much. Option 4 (alt command R) fixed me up right away. Really super helpful!!
Источник


