- How to Install the Fonts You Want in Windows 10
- How to Install Fonts in Windows 10
- How to install and manage fonts in Windows 10 [Quick Guide]
- How can I install and manage new fonts in Windows 10?
- 1. Use the Fonts folder in Control Panel
- 2. Download fonts from the Microsoft Store
- 3. Use Adobe Fonts
- Adobe Fonts
- 4. Manage your fonts
- 5. Manage possible font issues
- Where are fonts stored in Windows 10 and the font folder location?
- Example to find stored fonts in the Windows 10, please start the MS Explorer to install, or uninstall the Windows Fonts!
- 1.) . Find and open the Fonts Folder in Windows 10! 2.) . Copy a font eg install from another folder on Windows-10! 3.) . Create a Desktop Shortcut for Windows 10 font Folder! 4.) . Keyboard Shortcut for a fast access to Font Directory!
- 1.) Find and open the fonts Folder in Windows 10 !
- 2.) Copy a font eg install from another folder!
- 3.) Create a Shortcut for Windows font Folder!
- 4.) Keyboard Shortcut for a fast access to Font Directory!
- How to Install and Manage Fonts in Windows 10
How to Install the Fonts You Want in Windows 10


Windows comes preloaded with a lot of stylish fonts, but they might not be what you are looking for. Thankfully Windows 10 makes it easy to install any font you desire. Here’s a look at how to install them.
How to Install Fonts in Windows 10
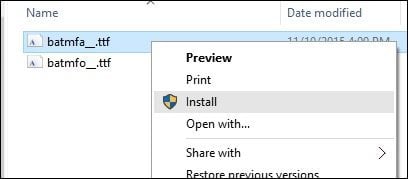
Once you have your font downloaded (these are often .ttf files) and available, just right-click it and click Install. That’s it! I know, uneventful.
To check if the font is installed, press Windows key+Q then type: fonts then hit Enter on your keyboard.
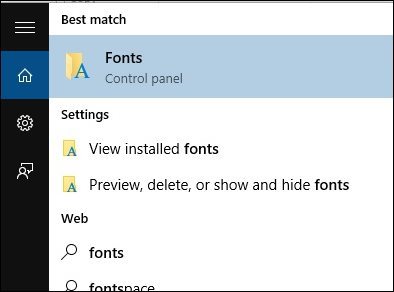
You should see your fonts listed in the Font Control Panel.
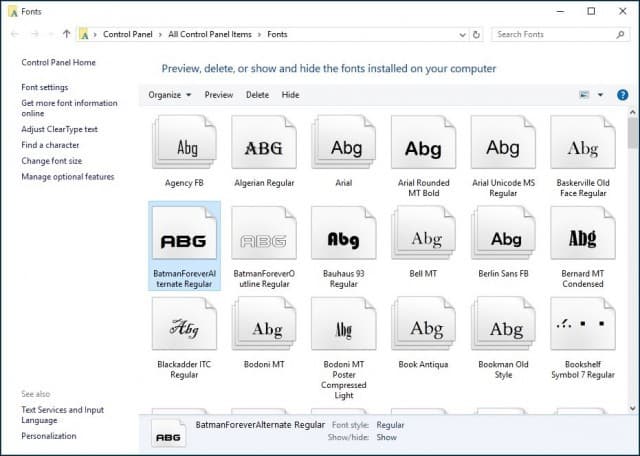
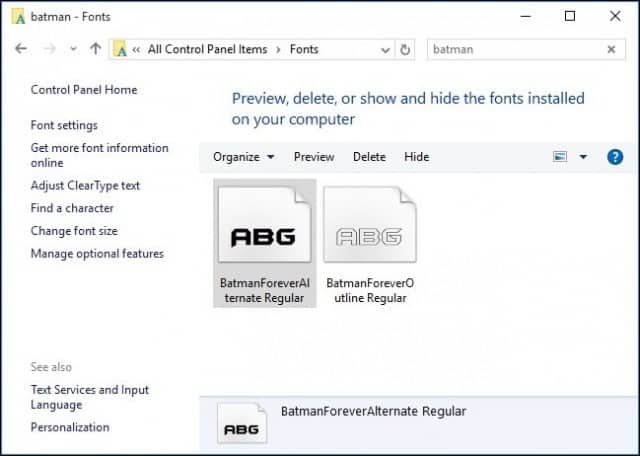
If you don’t see it and have a ton of them installed, just type in its name in the search box to find it.
That’s all there is to it. Now you can create stylish and unique documents with some of your favorite fonts not included in Windows 10 by default.
If you’re not on Windows 10 yet, check out our article on how to install fonts on Windows 8.1.
If you’re a graphics design enthusiast, before downloading a font, be sure to check out our article about the best and worst fonts for homemade designs.
How to install and manage fonts in Windows 10 [Quick Guide]

- If you’re looking to install the best fonts for Windows 10, in our article we’ll give you some unexpected and fun options.
- Going for something more sophisticated? then Adobe will surprise you with a multitude of features.
- Once you add your favorite fonts to Windows 10, learn to manage them efficiently in our excellent guide.
- You won’t have to worry about potential errors regarding fonts, we have some great solutions for that too.

- Photos
- Videos
- Songs
- 3D models & infographics
- Many other artworks
If you want to add some additional cool fonts to your Windows 10 OS, you don’t have to put much effort in it, because it’s very easy.
And in this article we’ll show you not only how to install fonts in your Windows 10 but we’ll also provide you with interesting data on how to manage them.
How can I install and manage new fonts in Windows 10?
1. Use the Fonts folder in Control Panel
- Go to Search.
- Type fonts and open Fonts.
- Drag your font file to Fonts folder and wait until the installation is complete.
Your fonts are packed in .otf files and these files have an installing option, so just right-click on the font you want to install, and choose Install.
There are two ways to add fonts to Windows 10: you can add them simply by installing them or putting them in the Fonts folder in Control Panel.
2. Download fonts from the Microsoft Store
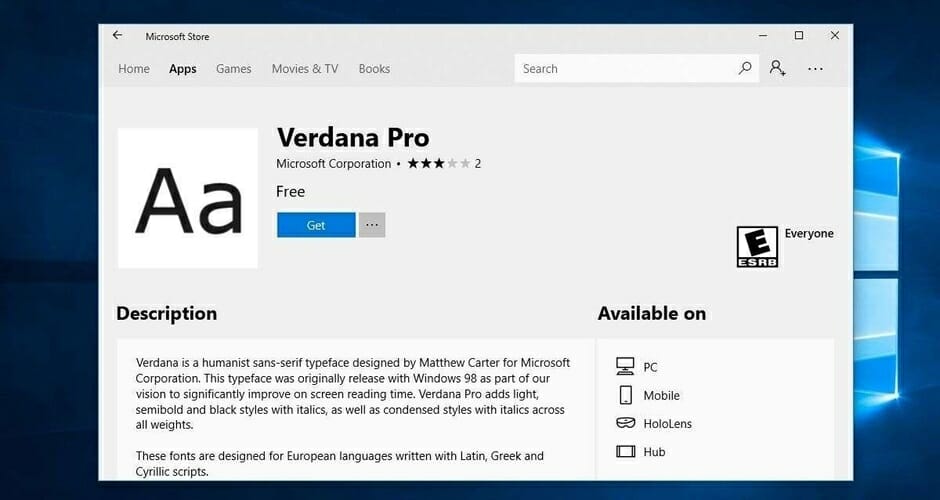
You can also download and install Windows 10 fonts from the Microsoft Store. There are many resources that you can use to add new fonts on your computer.
For example, the Fonts app lets you customize your posts and replies on social media using a wide variety of fonts.
You can write in different styles and your text will definitely stand out in the crowd. You can also rotate your text if you want to puzzle your friends.
3. Use Adobe Fonts

By using Adobe Fonts, you will get the fonts directly on the websites that you are using. More so, they become synced via Adobe Creative Cloud to applications installed on the subscriber’s PC.
Get ready to be amazed by the multitude of style fonts that can help you enhance the impact you make whether you’re an entrepreneur or a media content creator.
You have over 1.000 different options to choose from and they’re all one click away, all you have to do is switch the toggle button and you’re free to make the best of those amazing fonts.
The fonts you download with this smart tool can also be used with other editing programs, for example you can add the Adobe font to Photoshop in your Windows 10.
A great advantage of this high-quality tool is the fact it’s reliable so you won’t have to deal with bugs or other annoying errors.

Adobe Fonts
4. Manage your fonts

Once installed, you can manage your fonts. You can preview them to make sure that you really like them, hide them if you’re not planning on using them any time soon or you can simply delete them.
All you need to do is go to Start, type fonts and double click on the first result. The fonts window will now open and you just have to select the font that you want to manage and click on the option of your choice.
There you go, with just a few simple steps, you have new fonts installed on your computer, ready to decorate your project or other kinds of work.
As we already showed you, managing your fonts is as easy as installing them. Just go to the above-mentioned Fonts folder in Control Panel, where you can preview, add, delete or even print your fonts.
5. Manage possible font issues

Upgrading to Windows 10 can also create some font-related problems. These are not some out-of-normal issues but can seriously obstruct you from using your PC.
Hopefully, we have managed to find the necessary fixes for the most faced font issues in Windows 10.
First of all, we have a great fix article if you encounter problems with installing fonts in Windows 10 that it’s definitely worth your attention.
Fortunately we managed to offer solution for one of he most common issues that users confront with and you can check it in our article on how to fix the font being too small in Windows 10.
If you’re having issues with changing the default font in Windows 10 Registry Editor, take a look at this guide that will help you handle the problem. Checking the fixing guides above will help you get rid of various font issues in Windows 10.
As you can there are plenty of sources if you want to install fonts in Windows 10 and we recommend you to try all of them.
Don’t forget that if you encounter any issues you can always check out the useful guides we mentioned about how you can fix potential errors.
If you have some additional comments or questions, please write them down in the comments section below, we would love to hear them.
Where are fonts stored in Windows 10 and the font folder location?
Example to find stored fonts in the Windows 10, please start the MS Explorer to install, or uninstall the Windows Fonts!
1.) . Find and open the Fonts Folder in Windows 10!
2.) . Copy a font eg install from another folder on Windows-10!
3.) . Create a Desktop Shortcut for Windows 10 font Folder!
4.) . Keyboard Shortcut for a fast access to Font Directory!
1.) Find and open the fonts Folder in Windows 10 !
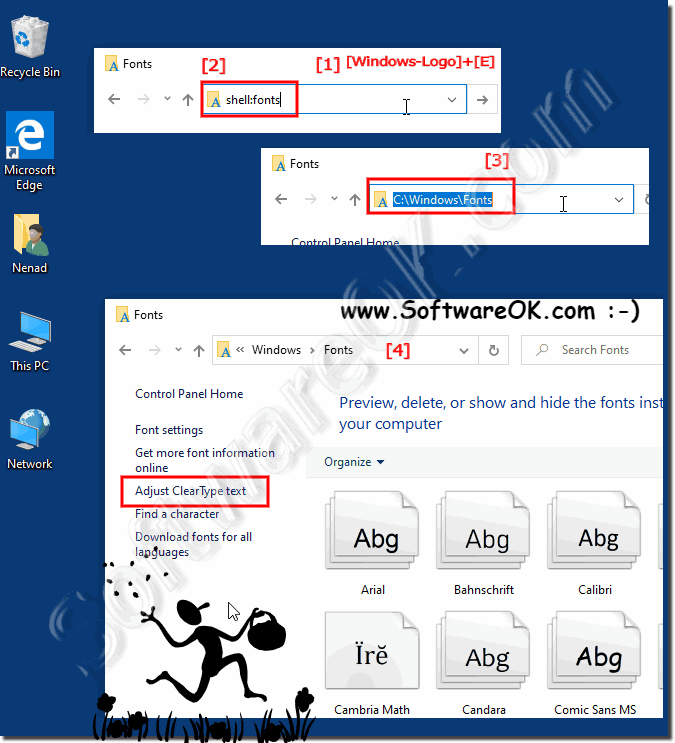
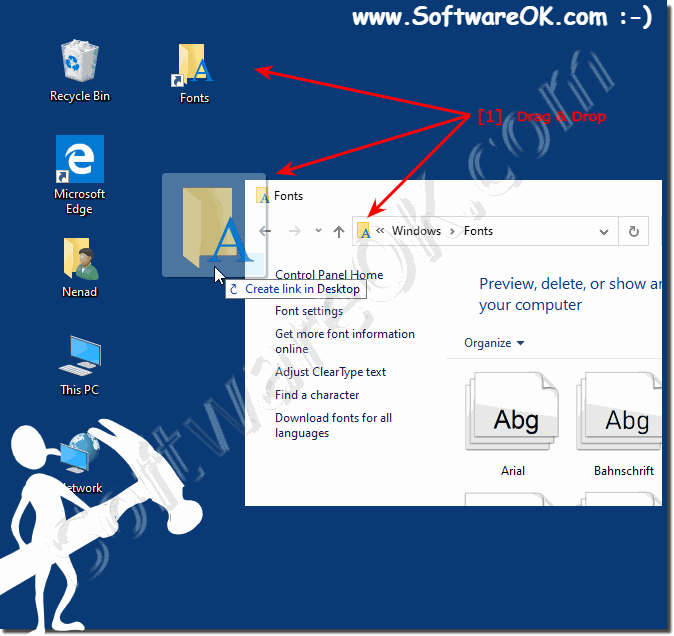
1. Please use the hot key [Windows + E]
2. and enter in the address bar Address: shell:fonts or %WINDIR%/Fonts
(. see Image-1 Point 1 to 3)
3. now you can see all installed fonts on the Windows 10
In Windows-10 Fonts Overview, you can also Adjust Clear Type text (. see Image-1 Point 5)
At this point, you can create a Desktop Shortcut for the System-Fonts-Folder on the Windows-10 Desktop, it is very easy, by using Drag & Drop! (. see Image-2 Arrow-1)
| (Image-1) Fonts folder in windows 10 (install, uninstall)! |
 |

Tip: To delete a font, open the Windows 10 fonts folder. Click the font you want to delete. To select more than one font at a time in Windows 10 explorer, press and hold down the Ctrl button while you click each font.
Tip: Right-click the font you want to install and click install. You can also install a font by dragging it into the Fonts Control Panel page in Windows 10 Explorer View. See also: Uninstall fonts from Windows-10 (remove, delete)?
| (Image-2) Desktop Shortcut for the System-Fonts on the Windows 10 Desktop! |
 |
Despite the abundance of preinstalled fonts in Windows 10, some Windows users, especially those involved in design, graphics, advertising, and printing, often require the installation of additional fonts, for example, imported from third-party applications or created for business purposes. What could be easier than installing fonts on Windows 10? But some users of Windows 10 even sometimes need help solving such a task, the information in this FAQ provides the solution to the font theme here!
There is also a problem with this font smoothing that should not be forgotten.
► How can I disable ClearType in Windows 8.1 or 10?
2.) Copy a font eg install from another folder!
Please open the Windows Fonts Folder and the source folder of new fonts and drag & drop or install it via copy & paste!
(. see Image-3)
| Copy install fonts on Windows 10! (Image-3) |
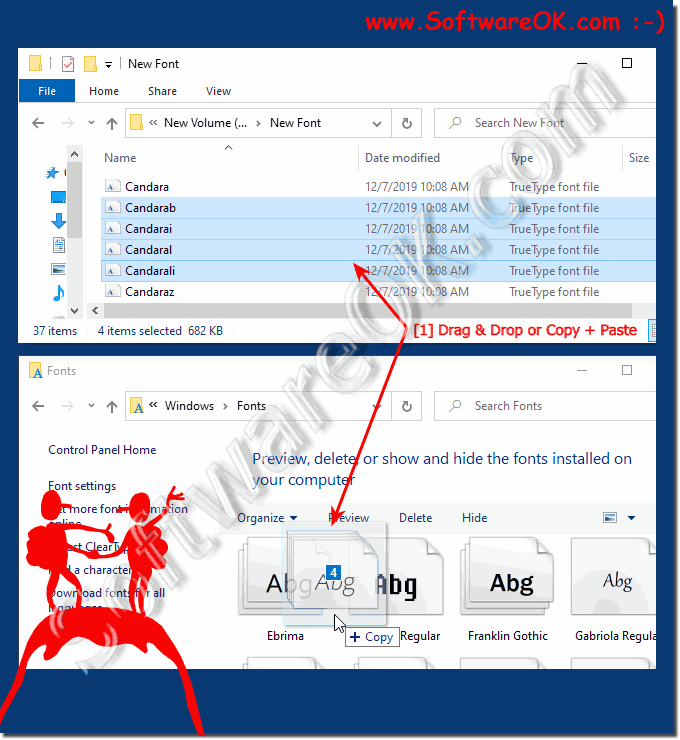 |
Fonts are ordinary files with a specific extension. For fonts that support Windows 10, the .ttf extension is the TrueType font, and the .otf extension is OpenType. Sometimes a font can consist of several similar files that define the outline of the same font. Before you install a font on your system, you can see what the font looks like. After opening the file, just double-click on the file with the font to see what the font looks like and check if the font matches the font!
► Uninstall fonts from Windows-10 (remove, delete)!
3.) Create a Shortcut for Windows font Folder!
To see the Windows 10 desktop, press the key combination Windows logo key + D.
Click on an empty space on the Windows 10 desktop, right Mouse-Button. And select «New», «shortcut»
Now enter the full location path of the Font Directory: C:\Windows\Fonts (Optional: shell:fonts)
Click the Button «Next».
Please enter the name for the Desktop-Shortcut, you can use Fonts or enter Font Folder.
(. see Image-4 Point 1 to 4)
| (Image-4) Fonts Folder Shortcut for the Desktop! |
 |
Many users are wondering where the Windows fonts are, here are simple examples of how to find them and make them more accessible, these solutions are not just for 10, but are also an example of working on Microsoft Web Server 2019, 2016 or 2012 R2!
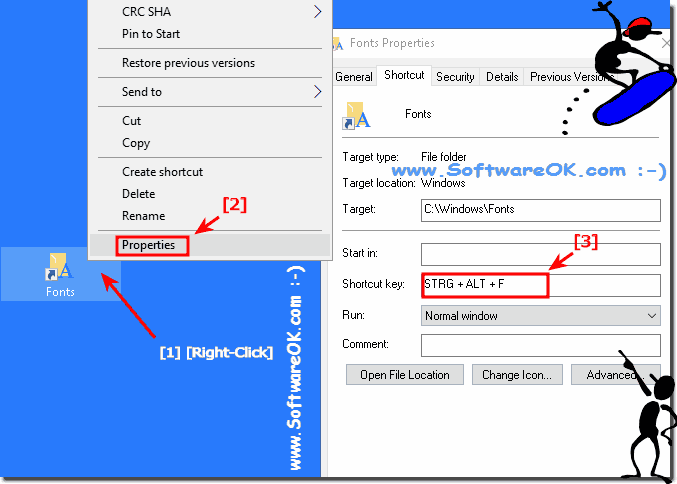
4.) Keyboard Shortcut for a fast access to Font Directory!
If you have created the desktop shortcut for the Font folder, do a Mouse Right Click and select «Properties»
And create / activate a windows Font Folder keyboard shortcut for you Windows!
| (Image-5) fonts folder keyboard shortcut ergo Hot-Key! |
 |
The solution is simple and is also suitable for Windows Server 2016 and Web Server 2012 R2 to find the font folder and install fonts! This is the Question of many Window User and hear is the answer for this very important Question, to find fonts on Microsoft’s best Windows operating system ever on your personal computer system and business PC!
The simple examples, how to find fonts folder and make the fonts much more accessible on Windows 10 and also for Microsoft Windows Server 2019, 2016, .
How to Install and Manage Fonts in Windows 10
By Bryan Clark 01 July 2018
Managing fonts in Windows is a relatively straightforward process once you know where to find what you’re looking for. And what we’re looking for, in this case, is a built-in font management system hiding in the Windows Control panel.

Microsoft is touting a more feature-rich font manager to come in its Fall Creators Update, but for now, here’s how you find, add, and remove fonts in Windows.
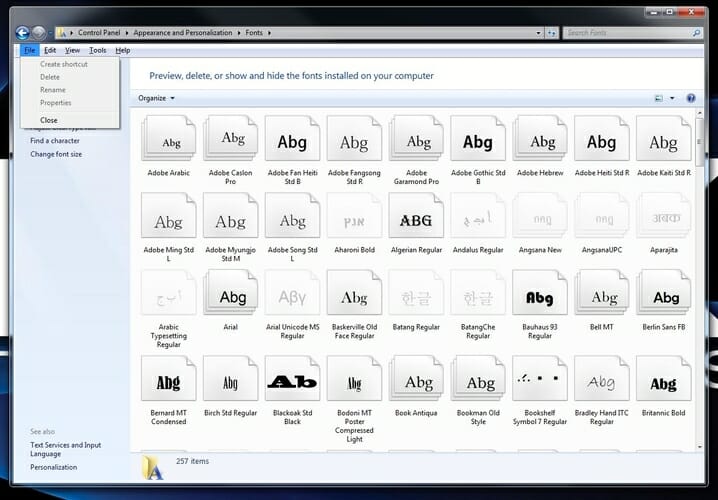
1. Open the Windows Control Panel .
2. Select Appearance and Personalization .
3. At the bottom, select Fonts .
From here, you can view any font installed on your system, as well as add new ones or remove those you don’t need anymore. When removing fonts, I’d recommend extreme caution, as many are considered System Fonts, meaning Windows uses them within certain programs.
4. To add a font, simply drag the font file into the font window .
5. To remove fonts, just right click the chosen font and select Delete .
6. Click Yes when prompted.


