- 5 effective ways to unlock user account in Linux
- 1. Unlock user account when password was never assigned
- 2. Unlock user account when password is locked
- 3. Unlock user account when account is locked using usermod
- 4. Unlock user account when account is expired
- 5. Unlock user account when locked after multiple failed login attempts
- 5.1 Using pam_faillock module
- 5.2 Using pam_tally2 module
- Summary
- Further Readings
- Related Posts
- UNIX / Linux : How to lock or disable an user account
- 1. Lock the password
- 2. Expire the user account
- 3. Changing the shell
- Verify if the account is locked or disabled.
- Lock User Account After n Failed Login attempts in Linux
- For CentOS / RHEL / Fedora
- For Debian, Ubuntu and Linux Mint
- How to Lock and Unlock User in Linux
- 3 ways to lock and unlock user accounts in Linux
- Method 1: Lock and unlock users with passwd command
- Verify the status of a user with passwd command
- What about login via SSH?
- Method 2: Lock and unlock users with usermod command
- Method 3: Lock and unlock users with chage command
5 effective ways to unlock user account in Linux
Table of Contents
There can be multiple situations wherein your Linux user account may get locked. Some of the possible scenarios can be:
- Password is explicitly locked by the administrator
- Account is explicitly locked by the administrator
- Password was never assigned hence unable to login
- Multiple failed login attempts (controlled by pam_tally2 or pam_faillock)
We will cover the above mentioned scenarios and share methods to unlock Linux user account in such situation.
1. Unlock user account when password was never assigned
Now this is not a typical scenario of user lockout. But it is definitely one possible use case. Many times the administrator create a user but forget to assign a password. In such case when the respective user tries to login then they may get «Access denied» and the log may contain » Failed password for XXXX «.
First let’s check if the password for this user is locked:
Yes, as expected the user account’s password seems to be locked. We can try to unlock it using passwd —unlock command:
This means that currently the user’s password is empty? Which is most likely possible when the user’s password is not SET. So we will confirm this by checking the content of this user in /etc/shadow file:
If you are aware of different field of /etc/shadow file then you should know that the second field contains the encrypted password. In our case the second field for user1 contains two exclamation marks ( !! ) «ONLY» which means password was never set for this user.
For example, here is an output snippet for root user where you can see that the second field contains encrypted password:
So in such scenario there is nothing to unlock, just go ahead and assign a password to this user using
For example, I will assign password for user1 :
and now I should be able to login with this user:
2. Unlock user account when password is locked
We can also lock a user account by locking the user’s password with passwd command. For example here I have locked user1’s password:
So as you can see from the man page of passwd, the password is locked but the user can still login using other means such as public key authentication.
To verify if the user account password is locked:
You can also check the user entry in /etc/shadow file:
As you can see, we have two additional exclamation marks in the password field. But the output is different from Scenario 1 we discussed above. Here we do have an encrypted password (so password is not empty) but since the encrypted password has been modified, it is not recognised any more hence the user fails to login.
To unlock user password, we need to use —unlock argument with passwd command:
Or you can just go ahead and remove those exclamation marks from /etc/shadow file for user1 and that should also unlock the user account:
3. Unlock user account when account is locked using usermod
We can use following usermod command to lock the password of any Linux user account:
This option is similar to passwd —lock as the above command will add a single exclamation mark in the second field of /etc/shadow file for the respective user:
Since the password field now contains additional character, the user login will be disabled.
The same can be verified using passwd command:
To unlock such user account in Linux, just use —unlock with usermod with the username:
OR just go ahead and manually remove that exclamation mark from the user1 entry in /etc/shadow file and re-verify the user account status:
4. Unlock user account when account is expired
It is also possible that your user account on the Linux box may have expired due to which you are not allowed to login. In such case when you try to login, then you may get following message in /var/log/secure :
So first check the expiry date of the user using chage command: 
So as you can see, the expiry date of user1 is in the past, so it is quite obvious that the user account will be locked. To unlock such user account, you just have to change the expiry date of this user to a date from future.
For example the following can be used to set an account to expire in 180 days:
Now check the user expiry date: 
5. Unlock user account when locked after multiple failed login attempts
Now this is a more realistic and common scenario where a user account can get locked. So you forgot the password and kept on trying until finally you realised, Oh shit! my account is locked.
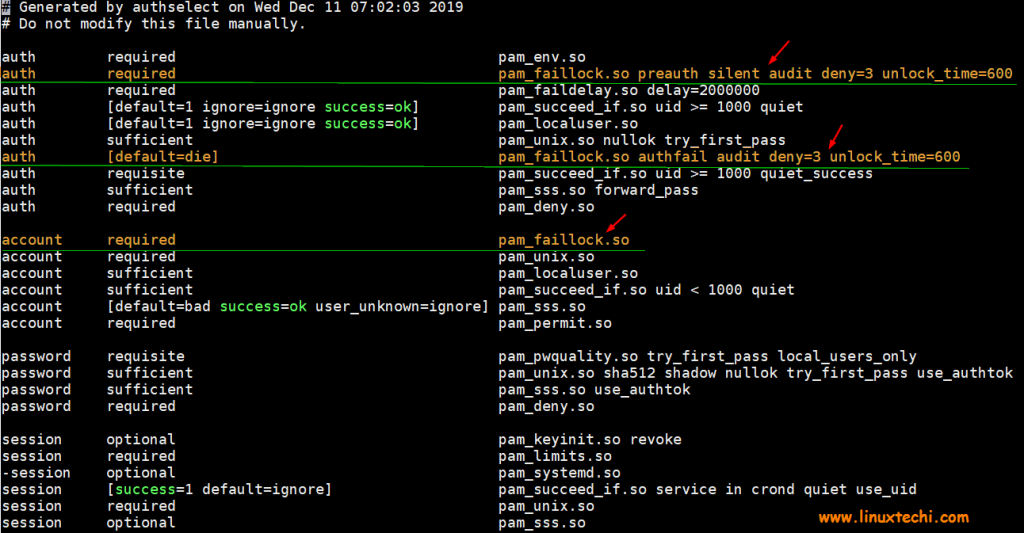
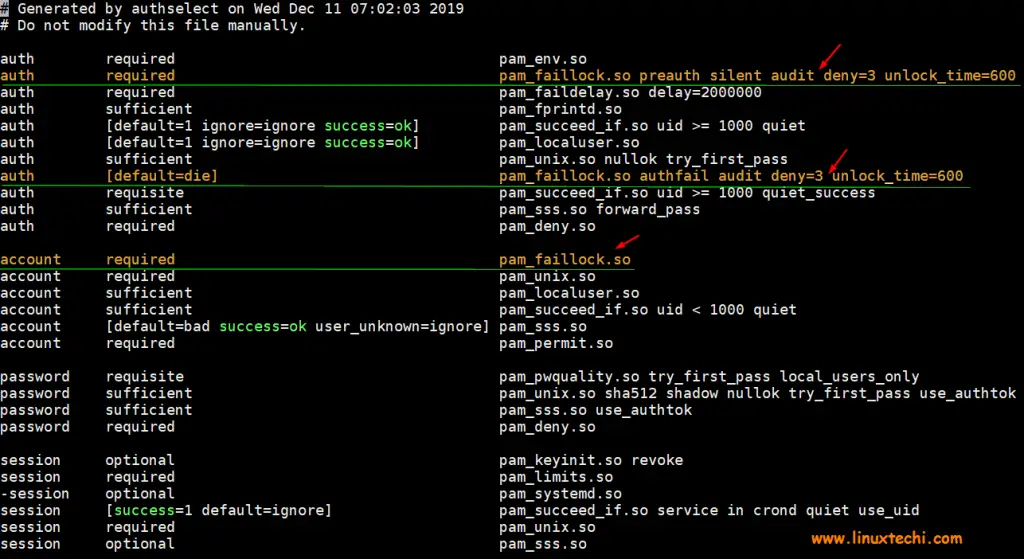
By default this feature is controlled via either pam_tally2 or pam_faillock module. To check the active module on your environment you can use:
Sample output from Linux server with both module:
In this case I have both the modules installed on my server so based on the module used to lock the user, you must choose the same module to unlock the user account. It is possible in later distros, only one module will be shipped.
For example, here only pam_faillock module is available:
Here we don’t have pam_tally2 module so we will only use faillock module.
5.1 Using pam_faillock module
Assuming your admin is using pam_faillock to lock the user account, you can execute faillock from the terminal as root user to list the failed login attempts: 
Here I have intentionally given wrong password to lock the user1 account, this can be confirmed using /var/log/secure :
To unlock the user account here we will again use faillock command as shown below:
Now you will see that all the history of failed login attempts for user1 is cleared so now user1 can log back in:
5.2 Using pam_tally2 module
If you are using pam_tally2 module to count login attempts and allow or deny a user login then you must also use pam_tally2 to unlock a user account in Linux. For example, here user1 is locked after multiple failed login attempts:
So to reset the failed login attempts we use:
Next if you check the active failed login attempt count, the output would be empty which means your user is unlocked and you can try to login again:
Summary
In this article I have tried to cover different possible scenarios under which a user account can get locked and the steps to unlock the user account based on the scenario. These can become really complicated when a root user gets locked out so you must always have a backup plan when you are setting up such features, for example allow console based root access. Because most of these settings apply to SSH based access or su and sudo based access. So for worst case scenario you can allow console based access for root user so it can login and unlock itself.
Further Readings
Related Searches: linux unlock account, unlock user account linux, linux unlock password, passwd unlock account, unlock user password, unlock unix account, unlock linux account redhat, how to unlock password in linux, linux user status, linux user account status, cannot unlock the password for user in linux
Related Posts
Didn’t find what you were looking for? Perform a quick search across GoLinuxCloud
If my articles on GoLinuxCloud has helped you, kindly consider buying me a coffee as a token of appreciation.

For any other feedbacks or questions you can either use the comments section or contact me form.
Thank You for your support!!
Источник
UNIX / Linux : How to lock or disable an user account
There are several ways in which user account can be locked or disabled. The posts discusses few of the most widely used ways.
1. Lock the password
To lock a users account use the command usermod -L or passwd -l. Both the commands adds an exclamation mark (“!”) in the second field of the file /etc/passwd. For example :
2. Expire the user account
The commands passwd -l and usermod -L are ineffcient when it comes to disable/lock user accounts. These commands will not disallow authentication by SSH public keys (or other PAM modules other than pam_unix that may be enabled). Additionally, changing the shell to /bin/false or /sbin/nologin is unsatisfactory to us since this only affects interactive logins. So to completely disable user accounts you can user the command chage -E0. For example :
Expiring an account via use of the 8th field in /etc/shadow (using “chage -E”) will block all access methods that use PAM to authenticate a user.
3. Changing the shell
We can also change the default shell of the user to /sbin/nologin so that the user do not get any login shell when he tries to login into the system.
You can check for the 7th and last field in /etc/passwd for the change of shell to /sbin/nologin.
Verify if the account is locked or disabled.
For each of the methods described above, you can verify if the user account is locked/disabled using below methods.
1. Check if the user account is locked.
Check for the flag *LK* in the below command output which indicates that the account is locked.
2. Check if the account has an expire date.
Check for the lines Password expires and Account expires to check if the account password is expired.
3. Check for non-interactive shell
Check if the user shell has been changed to a non-interactive shell like /sbin/nologin.
Источник
Lock User Account After n Failed Login attempts in Linux
Linux Server hardening is one of the important task for sysadmins when it comes to production servers. It is recommended that one should enable login or ssh attempts policy, means user’s account should be locked automatically after n numbers of failed (or incorrect) login or ssh attempts.
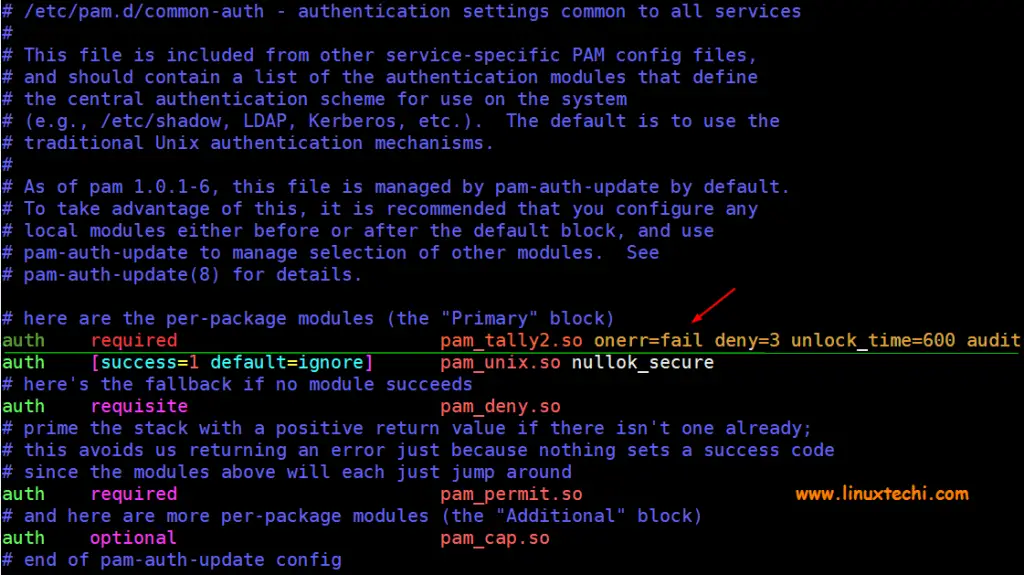
In Linux distribution like CentOS , RHEL and Fedora this is achieved by using pam module “pam_faillock” and for Debian like distributions, this can be achieved using “pam_tally2” pam module.
In this tutorial we will learn how to lock user accounts after n failed login attempts in CentOS , RHEL, Fedora, Debian & Ubuntu
For CentOS / RHEL / Fedora
Add the following lines in two files /etc/pam.d/password-auth & /etc/pam.d/system-auth ,
Where,
- Audit –> it will enable audit logs for user login attempt in secure log file
- Deny=3 –> it will lock the user after 3 unsuccessful login attempts, you can change this number as per your requirement
- unlock_time=600 –> it means user’s account will remain locked for 10 minutes (600 seconds), if you want user account to be locked forever then set this parameter as “ unlock_time=never “
Note: To lock root account as well after n incorrect logins, add “even_deny_root” parameter in auth section lines, example is shown below
As we can see above, we have two lines for auth section and one line for account section, order is very important while adding these lines to the files. Example is demonstrated below where these lines needs to be added,
After making changes in both the files, restart the ssh service using below systemctl command,
Let’s do the testing whether user account will be locked after three unsuccessful login attempts or not.
Let’s assume we have a local account with name “ pkumar “, we will try to ssh our Linux system with this account with incorrect passwords,
Now view secure logs using tail command,

Above logs confirms that account has been locked after three incorrect login attempts, let’s verify from faillock command as well,
To flush or clear these unsuccessful login attempts, execute the following faillock command,
Let’s move to Debian like distribution (Ubuntu, Linux Mint and Debian)
For Debian, Ubuntu and Linux Mint
Add the following line in the file “ /etc/pam.d/common-auth” ,
if you wish to lock root account as well after three incorrect logins then add the following line ,
- Onerr=fail –> In case of error issue a fail
- deny=3 –> After three unsuccessful login attempts account will be locked
- unlock_time=600 –> It means account will remain locked for 10 minutes or 600 seconds
- audit –> It means audit the logs in audit.log file
- even_deny_root –> Lock the root account after three incorrect logins
- root_unlock_time=600 –> Root account will remain locked for 10 minutes or 600 seconds after 3 unsuccessful login attempts
Let’s add above discuss line in file “/etc/pam.d/common-auth” using vi editor,
After making the above changes, save and exit the file and restart ssh service using following command,
Let’s test whether accounts are locked after 3 incorrect ssh logins,
Let’s assume we have a local “ devops ” user, we will try to ssh the Ubuntu system with incorrect passwords
Now view auth log file to see whether incorrect login attempts are captured or not,
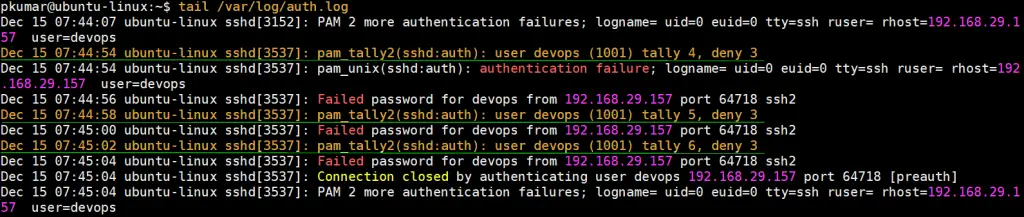
Above logs confirms that account has been locked, let’s verify from pam_tally2 command,
To clear these unsuccessful login attempts use the following pam_tally2 command,
That’s conclude the article, please don’t hesitate to share the feedback and comments.
Источник
How to Lock and Unlock User in Linux
3 ways to lock and unlock user accounts in Linux
There could be a number of reasons why you would want to disable a user in your multi-user Linux environment. Perhaps an employee left the organization and instead of deleting the user altogether, lock the account for archival purpose.
In this tutorial, I’ll show you three ways to lock a user in Linux command line. I’ll also discuss how to unlock the user.
Method 1: Lock and unlock users with passwd command
The passwd command in Linux deals with passwords of a user account. You can also use this command to lock a user account.
The command basically works on the /etc/passwd file. You may manually modify this file but I advise against it.
To lock a user with the passwd command, you can use the option -l or –lock in this manner:
Verify the status of a user with passwd command
You can learn whether a user is locked or unlocked using the option -S or –status of passwd command.
passwd -S user_name
Look at the second field in the output. Here’s what it means:
– P or PS: password is set (user is unlocked)
– L or LK: User is locked
– N or NP: No password is needed by the user
Here’s a sample output of the passwd command:
standard P 10/14/2019 0 99999 7 -1
To unlock the user with passwd command, you can use the option -u or –unlock:
On Ubuntu, you’ll see an output like this for both locking and unlocking the user:
What about login via SSH?
There is a major problem with locking users this way. Since it only works with the /etc/passwd file, the locked user will still be able to log in via SSH keys (if login via SSH key is set). I’ll show you how to deal with it in the next section.
Method 2: Lock and unlock users with usermod command
You can also use the usermod command. The command is primarily used for modifying user accounts in Linux. You can also modify the state of a user by locking or unlocking with usermod.
To lock the user, you can use the -L option in this manner:
To unlock the user, you can use the -U option:
How do you verify if the user is locked or not? The usermod command also works on the /etc/passwd file so you can use the passwd -S user_name command to check the status of the user.
But usermod also works with the /etc/passwd file so this means the locked user could still be able to login via SSH keys, right? That’s right. But there are ways to overcome this problem.
For example, you can change the shell of the user to nologin and this will not allow the user to login to a shell.
Another method is to lock the user and provide an expired date in the past. What it does is that it disables the account on a past date and then locks it.
Make sure that the past date is between 1970-01-02 and the current date.
You can reverse it with this command:
There is a similar way to lock the user in Linux with chage command. Let’s see it in the next section.
Method 3: Lock and unlock users with chage command
The chage command is used for changing the user password expiry information. It can be used to automatically lock an inactive user after certain number of days of inactivity.
Basically what you did with the usermod command in the previous section can be achieved with chage command like this:
Basically, you have set the expired date to 1970-01-02. You can see the details like this:
You can remove the expiry date and thus unlock the user in this manner:
In the end…
As always, there are various ways to accomplish a task in Linux command line. I have shown here three methods to lock and unlock users in Linux. Do you know a better way or do you have some best practices suggestion for locking users? Do share it in the comment section.
Источник


