- How to Sync Settings across devices in Windows 10
- How to sync your settings in Windows 10
- Sync settings grayed out or not working
- Как отключить и удалить настройки синхронизации учетной записи Windows 10
- Как работают настройки синхронизации
- Как отключить настройки синхронизации учетной записи на устройстве
- How to Configure Sync your Settings in Windows 10
- How to Configure Sync your Settings in Windows 10
- Sync Individual Settings
- Configure Sync your Settings in Windows 10 Individually
- Turn on Sync Theme in Windows 10
- Turn on Password Sync in Windows 10
- Sync Language preferences
- Turn on Synchronization for Ease of access
- Sync Other Windows settings
- How to Configure Sync your Settings in Windows 10 using Group Policy editor
- Configure Sync your Settings in Windows 10 Individually using Group Policy editor
- Configure Sync your Settings in Windows 10 using Registry Editor (Regedit.exe)
- Turn On or Off Sync Settings in Windows 10
- Disable or Enable Windows 10 Sync Feature with a Registry Tweak
- About Sergey Tkachenko
How to Sync Settings across devices in Windows 10
Configuring the settings and apps on all your devices is really time-taking and tiresome, this is where the Windows 10 Sync feature comes as a savior. You can sync all your settings and apps across all your Windows devices so that if you ever re-install the operating system, you don’t have to configure them again. The sync settings feature was launched with Windows 8.1 operating system and has always been appreciated by the users. This post will explain how to sync settings in Windows 10.
When you turn on Sync Settings on your Windows 10 PC, your operating system takes care of all your settings and sets the same for all your Windows 10 devices. You can choose which settings you want to sync across your devices, such as passwords, browser settings, color themes and more.
How to sync your settings in Windows 10
To enable the sync settings you first need to login to your Windows 10 with your same Microsoft Account on all your devices.
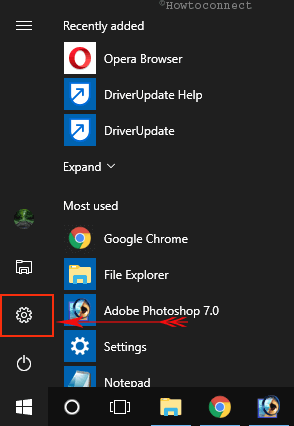
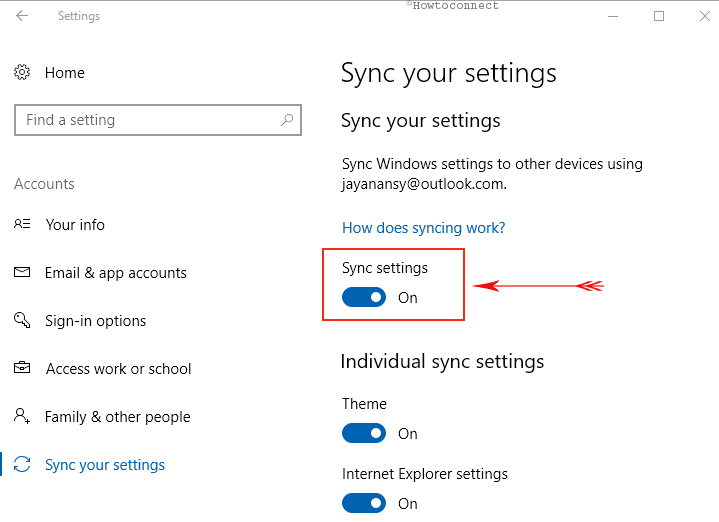
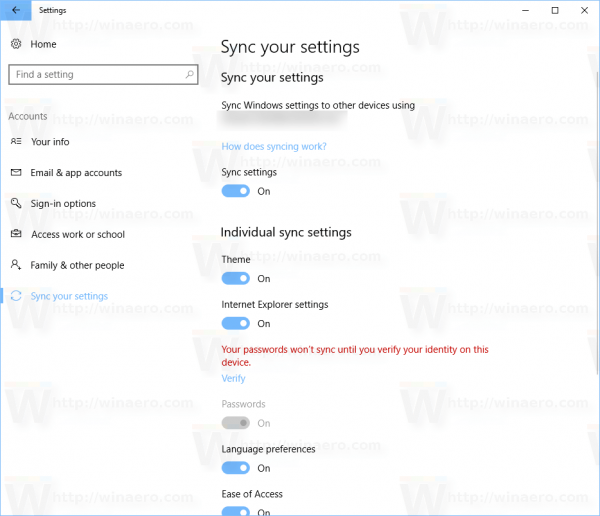
Sync settings are available under the Accounts setting in Windows 10. Open your Settings by pressing Win+I on your Windows 10 PC. Open the Accounts tab and scroll down to select Sync Your Settings.
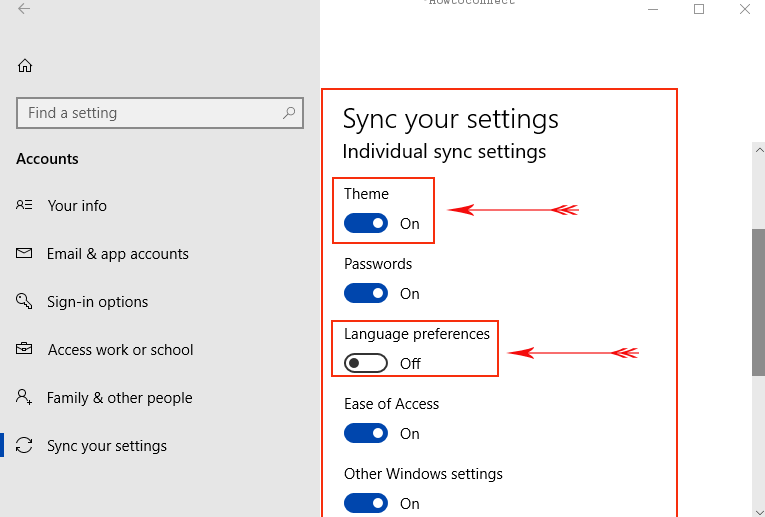
You can choose to turn Sync on for all settings and apps, or you can decide on your preferences. You can also turn off the entire Sync settings altogether by turning the Sync button off. Under the Individual Sync Settings tab, you can see different settings options.
Syncing the Theme setting will synchronize your PC’s background color, theme, etc across all your Windows 10 devices and syncing the Internet Explorer settings will synchronize your bookmarks, log in details, browsing history, etc. However, the default web browser now in Windows 10 is Microsoft Edge and these settings will imply the same.
Next, comes the Passwords. To synchronize your passwords across your Windows 10 devices, you first need to verify your identity. You can get the verification code via your registered phone number or your email address.
The other sync settings let you synchronize the language preferences, ease of access, and other Windows settings which basically include your desktop settings.
Once turned on, the Sync settings for every app will carry over to all your Windows 10 devices where you are logged in with the same Microsoft account.
Sync settings grayed out or not working
Remember that Sync settings are available only if you are logged in with your Microsoft Account. So make sure that you are signed in to your PC with your Microsoft account. If it is still not working, try using another Microsoft account.
The other things you could try are running System File Checker and DISM.
Как отключить и удалить настройки синхронизации учетной записи Windows 10
Windows 10 позволяет синхронизировать настройки на всех устройствах, в которые Вы входите с помощью учетной записи Microsoft. Некоторые из этих настроек включают темы, языковые настройки и пароли. Но что, если Вы не хотите, чтобы Ваши старые настройки были перенесены? Вот как отключить и удалить все настройки синхронизации учетной записи в Windows 10.
Как работают настройки синхронизации
Параметры синхронизации были впервые представлены в Windows 8 и доступны для любого устройства Windows 10, в которое Вы входите с помощью своей учетной записи Microsoft.
По умолчанию при включении параметров синхронизации Windows загружает различные параметры и настройки системы в OneDrive. Когда Вы входите на другое устройство с той же учетной записью и на котором Вы также включили настройки синхронизации, все эти настройки переносятся. Это очень удобно, например, если Вам нравится, что Ваш ПК и ноутбук выглядят одинаково, или Вы хотите сохранить все настройки при новой установке.
Ниже приведен список настроек, которые синхронизируются с Вашей учетной записью Microsoft:
- Тема — фон рабочего стола, иконка пользователя, положение панели задач и т. д.
- Пароли — диспетчер учетных данных Windows, включая профили Wi-Fi
- Настройки языка — Словарь орфографии, системные языковые настройки
- Специальные возможности — Экранная клавиатура, лупа
- Другие параметры Windows — полный список других настроек Windows
Как отключить настройки синхронизации учетной записи на устройстве
Отключение настроек синхронизации в Windows 10 позволяет ограничить информацию, которую Microsoft отправляет в облако и хранит на своих серверах. Хотите ли Вы отключить одну настройку или вообще прекратить синхронизацию, Вы сможете раз и навсегда получить контроль над своими настройками.
Примечание: Если у Вас есть несколько устройств, которые все используют настройки синхронизации с Вашей учетной записью Microsoft, Вам необходимо выполнить следующие шаги для каждого устройства, чтобы полностью отключить и удалить настройки синхронизации.
Откройте приложение «Параметры», нажав кнопку «Пуск», а затем нажмите «Параметры». Вы также можете нажать Win + I.
В окне настроек выберите опцию «Учетные записи».
How to Configure Sync your Settings in Windows 10
This post will help you to configure sync your settings in Windows 10 computer. You will learn the steps through which you can sync PC settings on a whole and if preferred, you can work with individual sync settings.
The one advantage of Windows 10 is its sign in with Microsoft account. When you log into Windows 10 computer with your Microsoft account credentials, you can sync settings and information so that if you need you are able to access your settings, files, folders, and documents globally. After you sign in, your computer is affixed to Microsoft online server or cloud. Let us see this in a more clear way!
With the sync settings on, you can actually experience the same Start Menu, the selected colors, favorites, your web browser settings, language preferences, ease of access, apps, and passwords of your Windows 10 computer to another Windows 10 computer anywhere. The settings get synced between the computers when you choose to sync settings.
You may like to read:
How to Configure Sync your Settings in Windows 10
- Launch Settings from the Start Menu.
- Pick Accounts category.

- On the left column, click Sync your settings.

- Now the right pane exhibits you some options. To sync settings, use the slider of Sync settings option and toggle it to ON.
Sync Individual Settings
- But if you wish to keep few things personal and don’t prefer to sync all the settings, you can always choose individual sync settings.
- Under the Individual Sync Settings section, you can see many settings listed.
- Switch OFF the settings you don’t prefer to sync and turn ON those which you want to get synced.
Update –
Configure Sync your Settings in Windows 10 Individually
Let’s see how to configure Sync your Settings in Windows 10 individually –
Turn on Sync Theme in Windows 10
Windows 10 allows to sync theme with just a toggle so that you may have the ability to experience the same theme across the computers and Mobile devices as well. All you need is logging in using a Microsoft account and you see the universal wallpaper automatically. Follow the steps for how to Sync Theme in Windows 10 –
Step-1: Open Windows Settings (Win+I) and select Accounts.
Step-2: Click on Sync your settings from the left pane.
Step-3: Go to the right and click on the Toggle switch below Theme from Individual Sync Settings section.
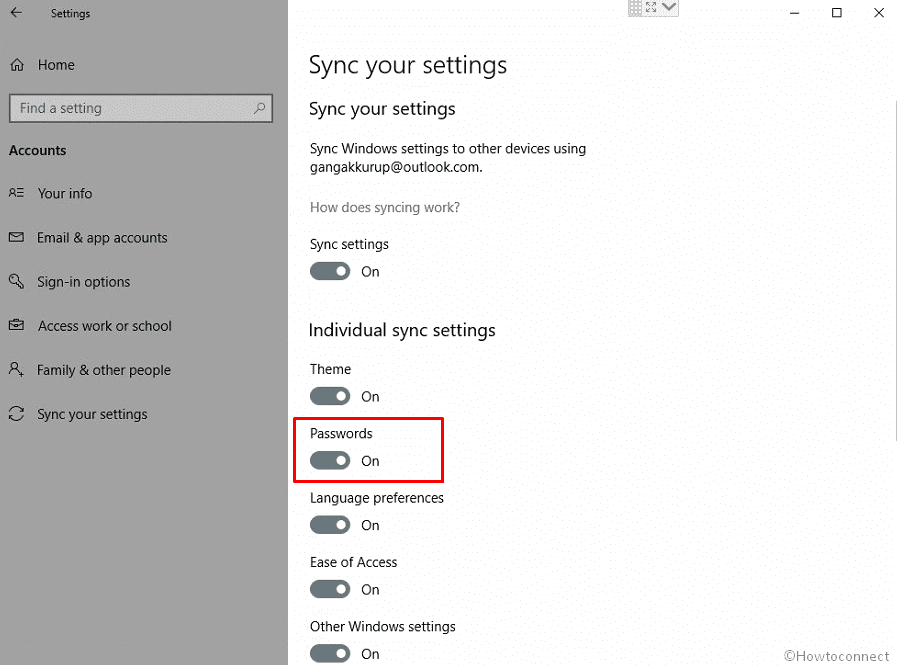
Turn on Password Sync in Windows 10
When you configure Sync your settings in Windows 10, the password is most important. You can carry your saved credentials across multiple Windows 10 devices automatically through this feature. So you don’t need to be bothered to remember and enter them every time after enabling Sync settings for the password. Here is how to turn on Password Sync in Windows 10 –
- Go to Settings => Accounts => Sync your settings as mentioned in the above method.
- Click on the toggle switch for Password in the Individual Sync Settings section.
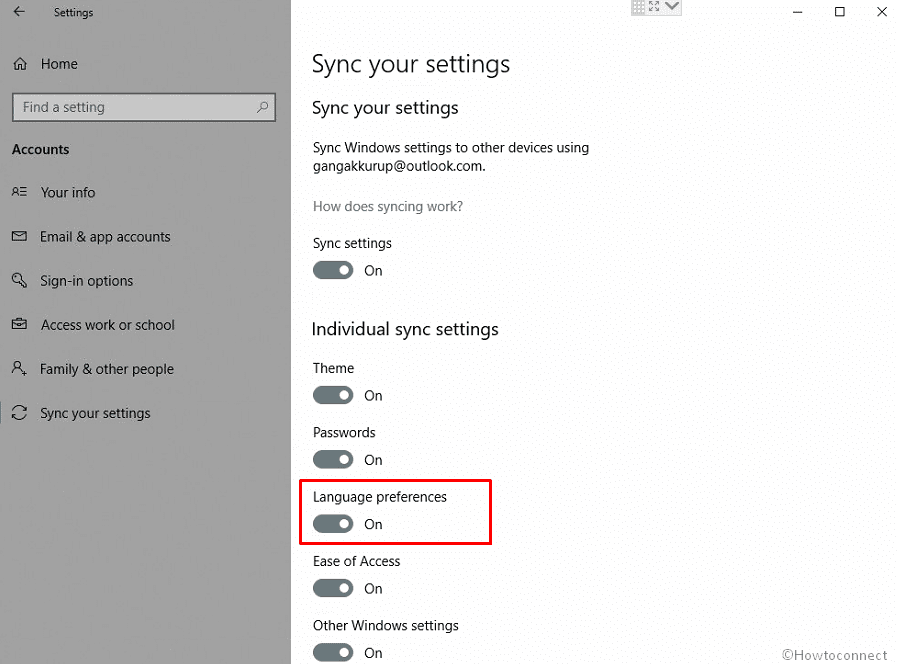
Sync Language preferences
When you enable Sync for Language preferences in Windows 10 you will notice the same lingo between multiple devices. Once you sign in using your Microsoft account whether it is PC or mobile the language sets automatically.
- Access Sync your Settings and click on the Language preferences Toggle button.
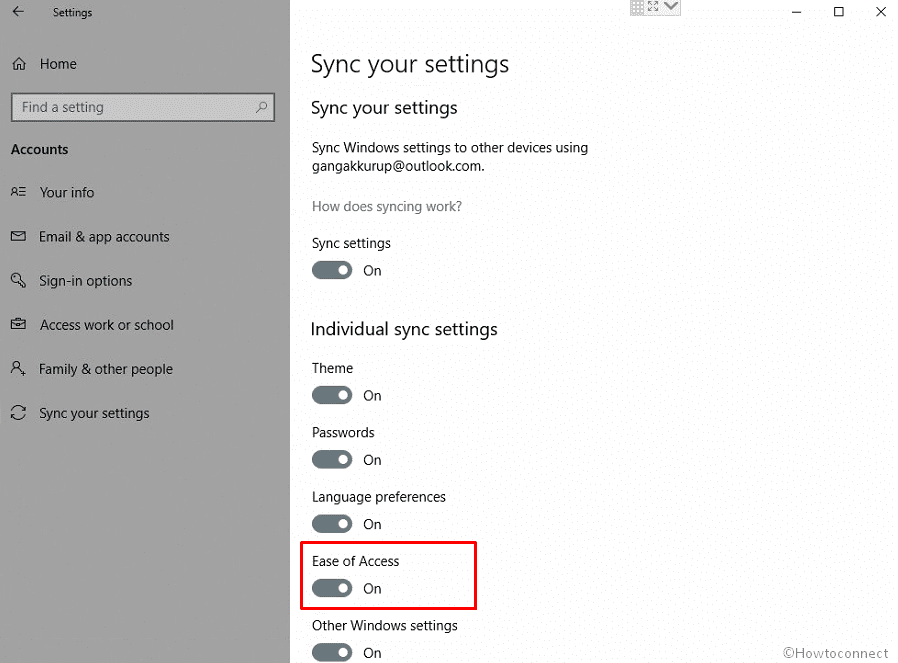
Turn on Synchronization for Ease of access
When you enable sync for Ease of access you will find the all the settings for the tools like Magnifier, Narrator, Color filter, etc in all the devices. You will have to only log in with your Microsoft account and the remaining work will be handled by Windows 10 itself.
- Open Settings and navigate to ‘Sync your Settings’.
- Click on the button for Ease of access underneath Individual Sync settings.
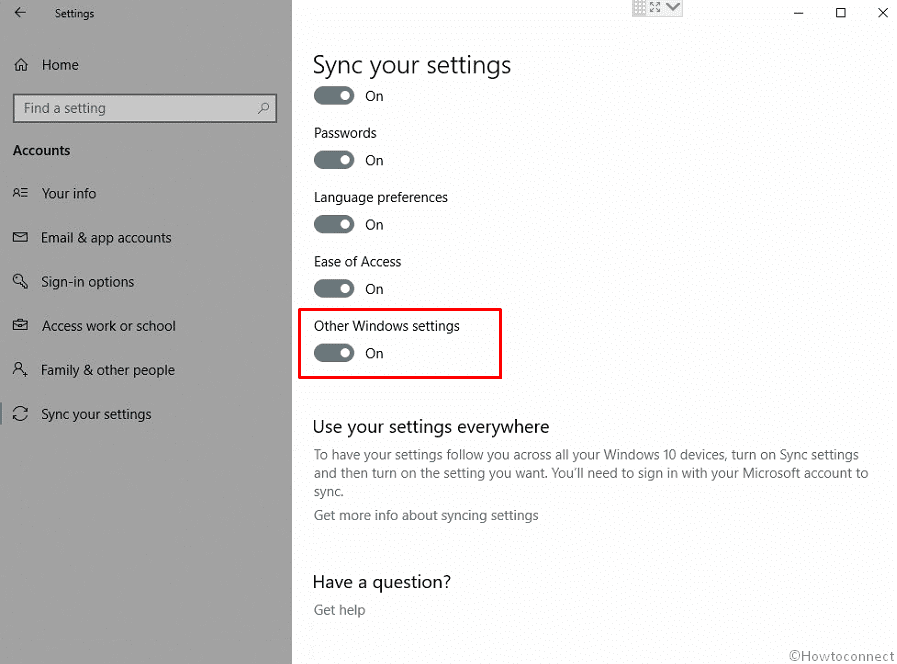
Sync Other Windows settings
This setting is supposed to enable sync for taskbar position, accents and so on. Turn on this setting by clicking on the button underneath.
How to Configure Sync your Settings in Windows 10 using Group Policy editor
Addition to the Settings application, Windows 10 lets you configure Sync your settings from Group Policy Editor (Gpedit). Let’s see how –
- Press Window logo key on the keyboard, type gpedit.msc and then hit Enter.
- Navigate to “Computer configuration => Adminitrative template => Windows component => Sync your settings”.
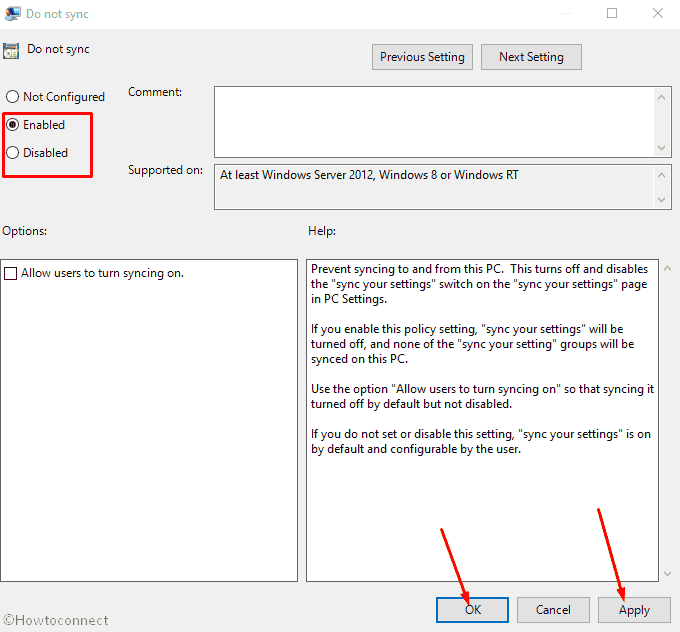
- You will see policies for the Sync options in the right pane. Double click on Do not sync.
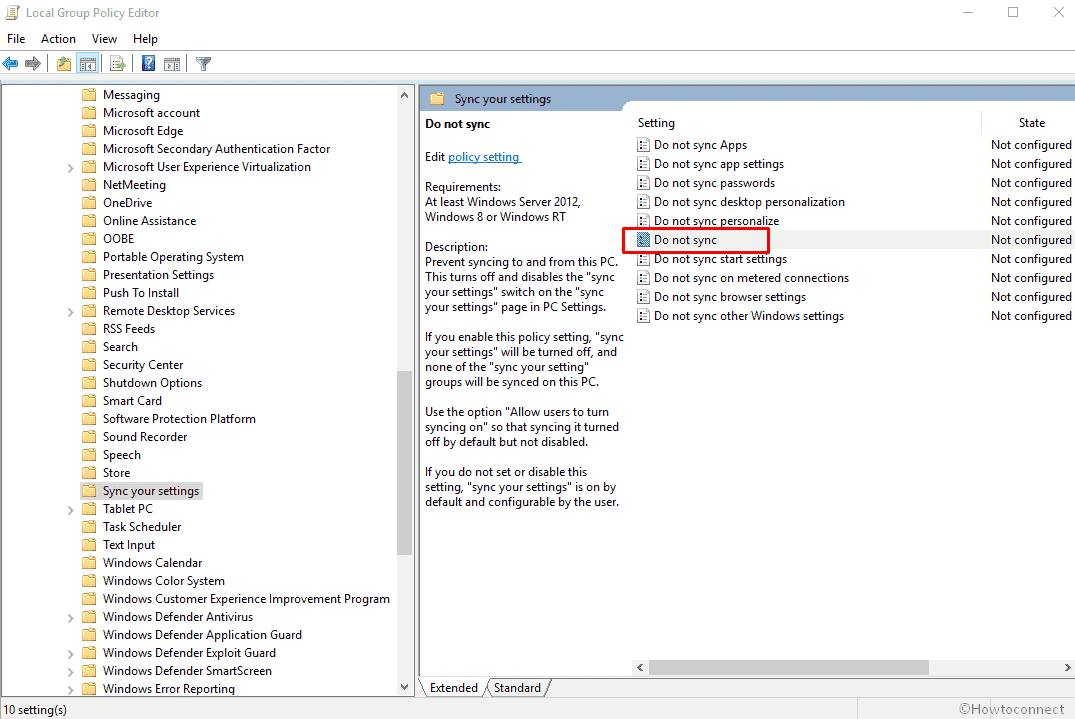
- Select Enabled to stop syncing and Disabled to start.
- Click on Apply then OK.
Configure Sync your Settings in Windows 10 Individually using Group Policy editor
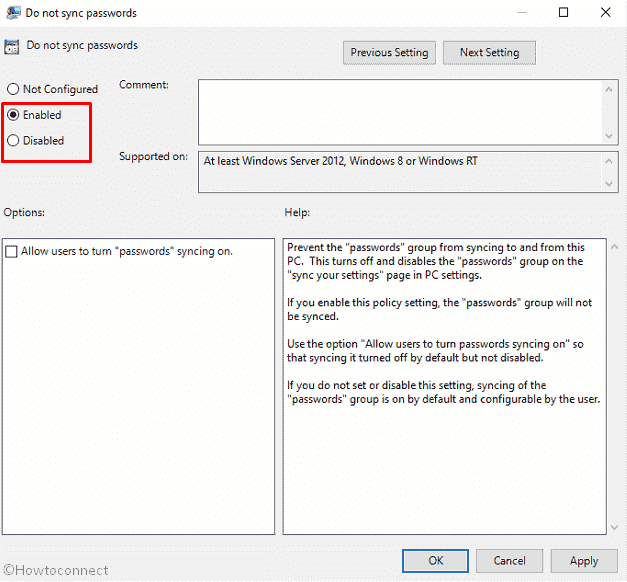
- Double click on the policy for which you want to turn on./off Sync your settings. For example, if you want to change the Synchronization for Passwords then double click on Do not sync passwords.

- Check the radio box Enabled to stop synching and Disabled to start.
- Finally, click on Apply followed with OK to save the modifications.
Configure Sync your Settings in Windows 10 using Registry Editor (Regedit.exe)
Windows 10 Sync settings may also change through some modifications in entries in Registry editor (regedit).
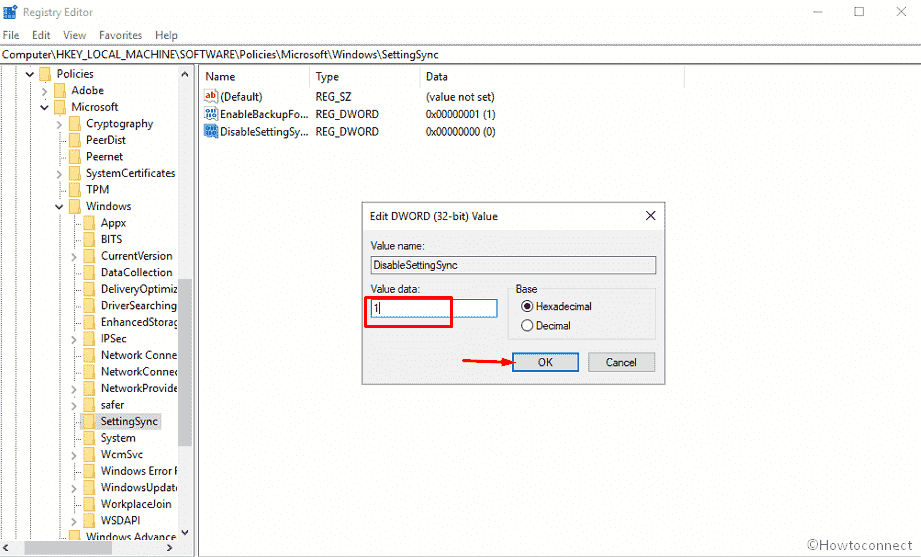
- Access Registry editor. You can click on Start, type regedit.exe, and press Enter to do the same.
- Copy the below-given path, paste into the address bar of Registry editor and then hit on Enter –
- HKEY_LOCAL_MACHINE\SOFTWARE\Policies\Microsoft\Windows\SettingSync
- Go to the right pane, right click anywhere in an empty space and select New => DWORD (32-Bit) Value.
- Name the value DisableSettingSync.
- Double click on the just created value enter 1 in the Value data file and select OK to turn off the sync settings. Change it to zero to enable again.
Turn On or Off Sync Settings in Windows 10
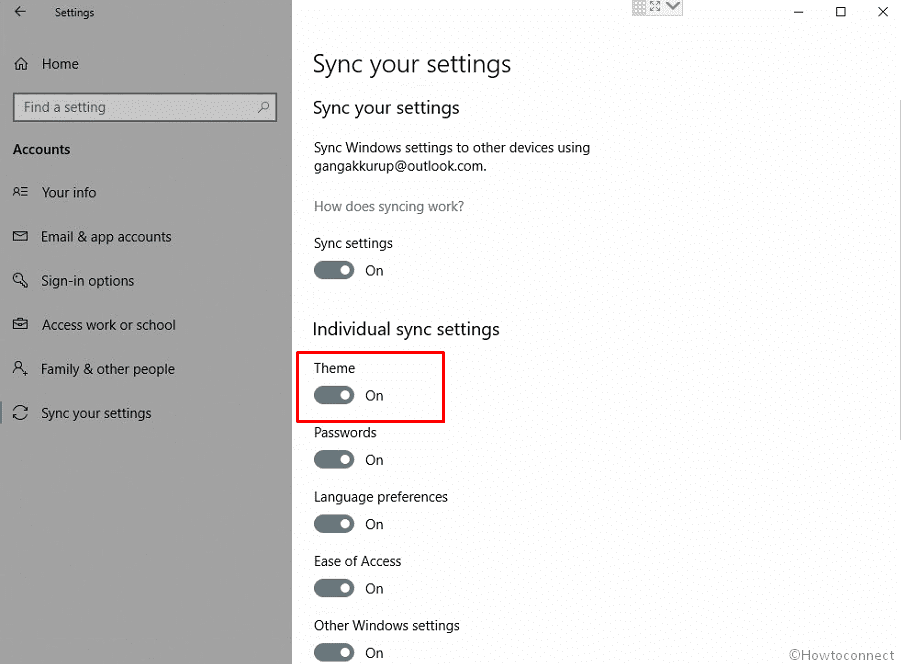
If you are using a Microsoft Account to sign in to Windows 10, the operating system synchronizes your preferences between all the devices you use. If you are not happy with this behavior, you can prevent Windows 10 from syncing its settings between your PCs or choose what to exclude from sync.
To turn on or off Sync Settings in Windows 10, do the following.
- Open Settings.
- Go to the Accounts >Sync your settings page.

- On the right, go to the section Individual sync settings.
- There, turn off each option you want to exclude from sync. Enable the options you need to sync.
- Disabling the option Sync Settings will stop Windows 10 from syncing all your preferences at once. The Sync feature will be disabled.

Also, you can enable or disable the Sync feature with a Registry tweak. Here is how it can be done.
Disable or Enable Windows 10 Sync Feature with a Registry Tweak
- Open the Registry Editor app.
- Go to the following Registry key.
See how to go to a Registry key with one click.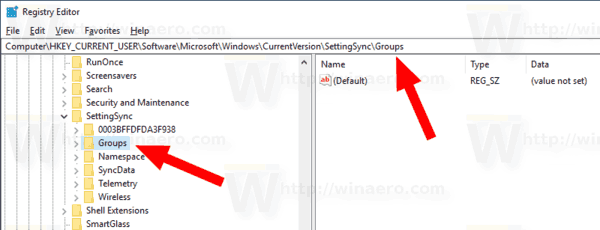
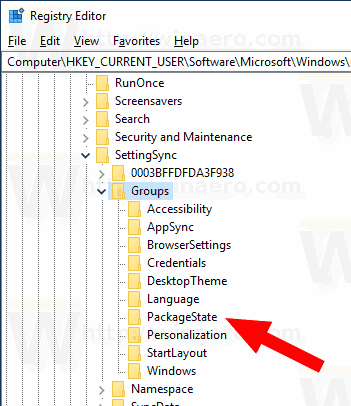 See the following table:
| Individual Sync Setting | Registry Subkey |
|---|---|
| Theme | DesktopTheme |
| Edge and Internet Explorer settings | BrowserSettings |
| Passwords | Credentials |
| Language preferences | Language |
| Ease of Access | Accessibility |
| Other Windows settings | Windows |
| Start Menu layout | StartLayout |
Note: Even if you are running 64-bit Windows you must still create a 32-bit DWORD value.
Set its value to 1 to enable the selected sync option. A value data of 0 will disable it.

Winaero greatly relies on your support. You can help the site keep bringing you interesting and useful content and software by using these options:
Share this post
About Sergey Tkachenko
Sergey Tkachenko is a software developer from Russia who started Winaero back in 2011. On this blog, Sergey is writing about everything connected to Microsoft, Windows and popular software. Follow him on Telegram, Twitter, and YouTube.


